You know those days? The ones where the afternoon slump hits hard, your sweet tooth is practically screaming, and the idea of pulling out a whole bag of flour and sifting for a cake feels like too much effort? Yeah, I have those days *all the time*. And that’s precisely when this incredibly comforting, ridiculously easy Moist banana bread Cobbler. becomes my absolute hero. It’s like the best parts of banana bread and a warm, gooey cobbler had a delicious baby, and honestly, it’s a game-changer. Forget complicated baking projects; this is pure, unadulterated comfort in a dish that takes minimal fuss but delivers maximum satisfaction. It’s the kind of recipe that makes your whole kitchen smell like a warm hug and usually disappears faster than you can say “seconds, please!”
What is Moist Banana Bread Cobbler?
So, what exactly *is* this magical creation I’m so excited about? Think of it as a delightful mashup. At its heart, it’s got that familiar, comforting flavor profile of banana bread – all those sweet, ripe bananas, a hint of cinnamon, and that wonderfully tender crumb. But here’s where the magic happens: instead of being baked into a loaf, it’s layered with a simple, luscious filling, and then topped with a slightly more rustic, crumbly topping that bakes up into golden perfection. It’s not quite a cake, not quite a pie, and definitely not just banana bread. It’s its own glorious thing, a kind of deconstructed dessert that’s approachable enough for a Tuesday night but special enough for company. The “cobbler” part refers to that wonderfully rustic, uneven topping that kind of “cobs” over the filling, just like traditional fruit cobblers. It’s pure, unpretentious deliciousness.
Why you’ll love this recipe?
Honestly, if you’re a fan of banana bread (and who isn’t, really?), you are going to fall head over heels for this Moist Banana Bread Cobbler. For starters, the flavor is just out of this world. You get all those incredible caramel-y notes from the ripe bananas, perfectly complemented by warm spices like cinnamon. But it’s the texture that truly sets it apart. The bottom layer is impossibly moist and tender, almost cake-like, while the topping bakes up into this delightful, slightly crisp, golden crust that gives way to a warm, gooey center. It’s pure bliss in every bite. And let’s talk about simplicity. This is one of those recipes where you probably have most of the ingredients in your pantry right now. It comes together so quickly, meaning you can satisfy that craving without spending hours in the kitchen. I’ve made this when I’ve only had about 15 minutes to prep before guests arrived, and it always gets rave reviews. Plus, it’s incredibly budget-friendly. Ripe bananas are often on sale, and the other ingredients are pantry staples. It’s a win-win-win! Compared to baking a traditional cake or even banana bread loaf, this cobbler feels more forgiving and frankly, more exciting. It’s a bit rustic, a bit sophisticated, and all delicious. What I love most is that it feels like a special treat without the fuss, making it my go-to when I want something comforting and sweet.
How do I make a Moist Banana Bread Cobbler?
Quick Overview
In a nutshell, this recipe is all about mixing a simple banana batter, preparing a quick, flavorful filling, and then layering it all up with a delicious, crumbly topping. The magic really happens in the oven, where everything melds together into a wonderfully moist, warm, and comforting dessert. It’s designed to be as straightforward as possible, with easy-to-follow steps that even a beginner baker can nail. The beauty of this dish is its forgiving nature; a little swirl here or there won’t hurt, and the rustic topping is meant to look charmingly imperfect. You’ll be amazed at how quickly it comes together, transforming simple ingredients into something truly special.
Ingredients
For the Main Batter:
Here’s what you’ll need for that wonderfully tender banana base. The key here is *really* ripe bananas – the spottier, the better! They give the most sweetness and moisture. I usually have a bag of frozen ripe bananas in my freezer just for recipes like this. If you don’t have super ripe ones, let them sit on the counter for a few extra days. You’ll need about 3-4 medium, mashed bananas.
* 3 cups all-purpose flour (or a 1-to-1 gluten-free blend if you prefer)
* 1 ½ teaspoons baking soda
* ½ teaspoon ground cinnamon
* ¼ teaspoon ground nutmeg
* ½ teaspoon salt
* 1 cup (2 sticks) unsalted butter, softened – make sure it’s really soft, like room temperature, for easy creaming!
* ¾ cup granulated sugar
* ½ cup packed light brown sugar – this adds lovely moisture and a caramel-like depth.
* 2 large eggs, at room temperature – bringing them to room temp helps them incorporate better.
* 1 teaspoon vanilla extract
* ½ cup milk (whole milk works best for richness, but I’ve used almond milk in a pinch, and it was surprisingly creamy!)
* 3-4 ripe bananas, mashed well (about 1 ½ cups)
For the Filling:
This is where we add a little extra burst of flavor and gooeyness. It’s super simple, and you can even customize it! I usually just mix these together quickly while the batter is resting for a moment.
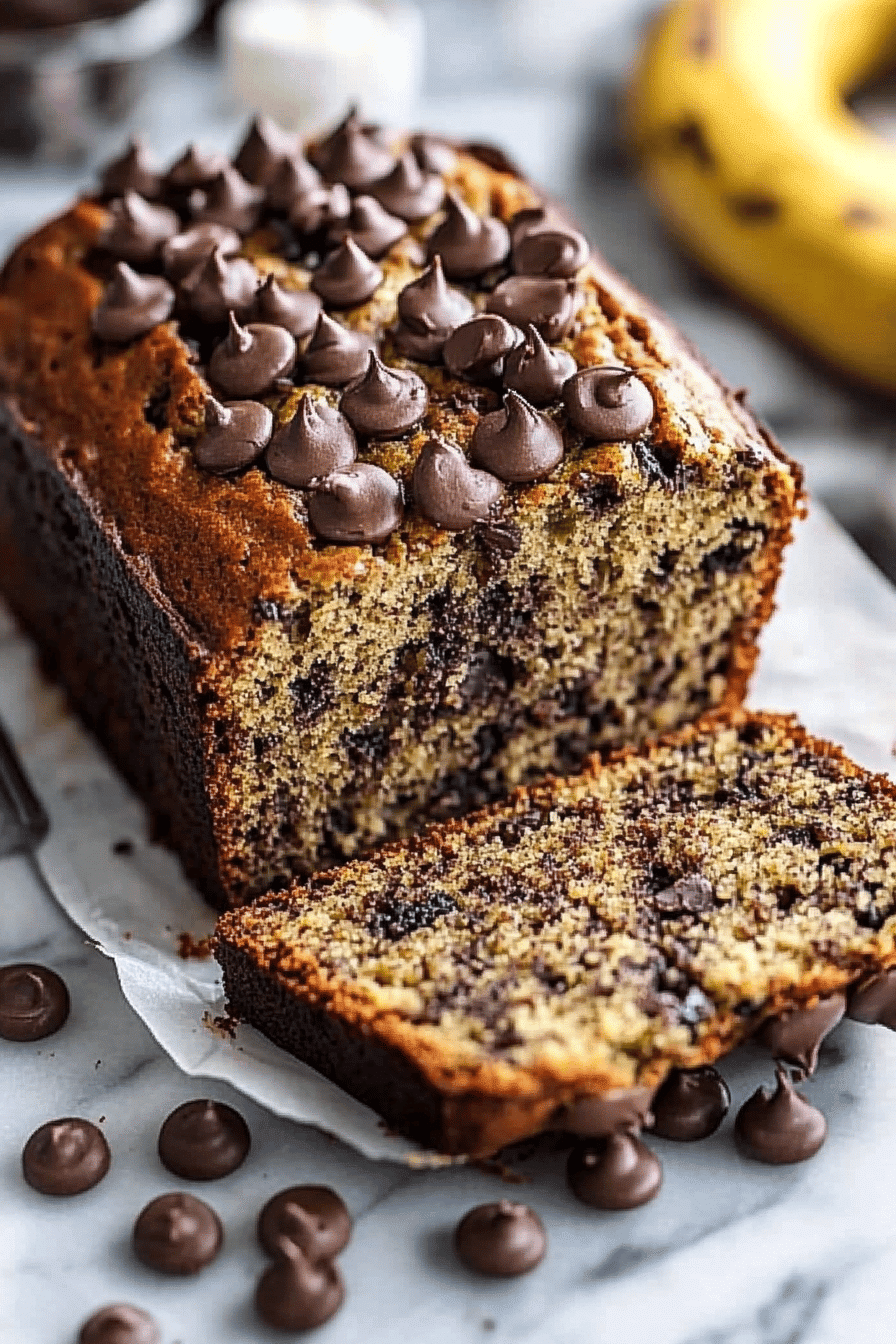
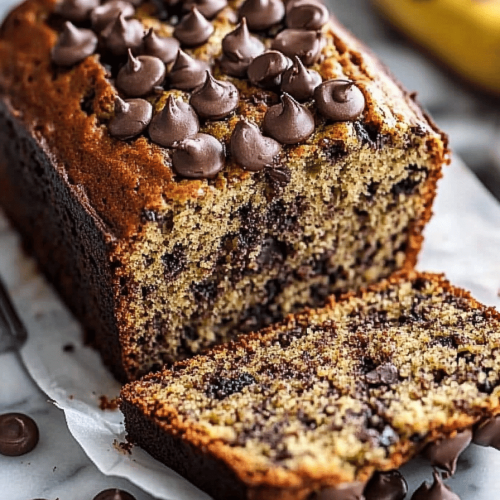
* 1 cup chocolate chips (semi-sweet are my favorite, but dark or milk chocolate work too!)
* ¼ cup chopped walnuts or pecans (optional, but they add a great crunch!)
* 1 tablespoon granulated sugar (just to give the chips a little extra coating)
For the Glaze:
This is the finishing touch that makes it truly irresistible. It’s a simple powdered sugar glaze, but you can play with the consistency. I like it thick enough to drizzle but not so thin that it all soaks in immediately.
* 1 cup powdered sugar
* 2-3 tablespoons milk or cream
* ½ teaspoon vanilla extract
Step-by-Step Instructions
Step 1: Preheat & Prep Pan
First things first, get your oven preheating to 350°F (175°C). This is a pretty standard baking temperature, and it works wonders for this cobbler. While the oven is heating up, grab a 9×13 inch baking dish. You don’t need to grease it heavily, just a light coating with cooking spray or a swipe of butter is perfect. We want the edges to get a little bit golden and caramelized, so we’re not going for non-stick perfection here. A lightly greased pan is just enough to prevent major sticking but allows for that delicious crust development.
Step 2: Mix Dry Ingredients
In a medium bowl, whisk together the flour, baking soda, cinnamon, nutmeg, and salt. Give it a good whisk so everything is evenly distributed. You want to make sure the baking soda and spices are mixed throughout the flour so you don’t end up with any pockets of bitterness or uneven leavening. This simple step ensures a consistent texture throughout your cobbler. Don’t skip it!
Step 3: Mix Wet Ingredients
In a large bowl, cream together the softened butter, granulated sugar, and light brown sugar. You can use an electric mixer for this, but honestly, a good sturdy whisk and a little arm power work just fine! You’re looking for a light and fluffy mixture. Then, beat in the eggs one at a time, making sure each one is fully incorporated before adding the next. Stir in the vanilla extract. Finally, gently fold in the mashed bananas and the milk until *just* combined. Don’t overmix here; we’re not making a cake, so a few little streaks are totally fine. The goal is to incorporate everything without developing the gluten too much.
Step 4: Combine
Now, it’s time to bring the wet and dry ingredients together. Pour the dry ingredients into the bowl with the wet ingredients. Using a spatula or wooden spoon, gently fold everything together until *just* combined. I cannot stress this enough: DO NOT OVERMIX. Overmixing will result in a tough, dense cobbler, and we want ours to be incredibly moist and tender. A few streaks of flour are perfectly okay; they’ll disappear during baking. The batter should be thick and luscious, but still pourable.
Step 5: Prepare Filling
This is the easiest part! In a small bowl, simply toss together the chocolate chips, chopped nuts (if you’re using them), and the tablespoon of granulated sugar. The sugar helps the chips and nuts coat nicely and prevents them from all sinking to the bottom in one big clump. You can also add a pinch of cinnamon here if you like things extra spiced. This is also a good time to think about other fillings – maybe some chopped dates, dried cranberries, or even a swirl of Peanut Butter!
Step 6: Layer & Swirl
Pour about two-thirds of your banana batter into the prepared baking dish and spread it out evenly. Sprinkle the Chocolate Chip and nut mixture over this layer. Now, dollop the remaining banana batter over the top of the filling. Don’t worry about spreading it perfectly; use your spatula to create little dollops and swirls. The idea is to create pockets of gooey filling interspersed with the moist banana bread topping. You can even gently swirl a knife or skewer through the batter to create a marbled effect, but it’s not essential. The more rustic, the better!
Step 7: Bake
Pop that beautiful dish into your preheated oven. Bake for 35-45 minutes. The exact time will depend on your oven, but you’re looking for a golden brown top that’s set and slightly puffed. A toothpick inserted into the center should come out mostly clean, with perhaps a few moist crumbs attached (but no wet batter). If the top is browning too quickly, you can always loosely tent it with foil for the last 10-15 minutes of baking. My oven tends to run a little hot, so I usually start checking around the 35-minute mark.
Step 8: Cool & Glaze
Once it’s done, carefully remove the cobbler from the oven and let it cool on a wire rack for at least 15-20 minutes. This is crucial for allowing it to set properly. While it’s cooling, whisk together the powdered sugar, vanilla extract, and 2 tablespoons of milk or cream in a small bowl. Add more milk, a teaspoon at a time, until you reach your desired drizzling consistency. Once the cobbler has cooled slightly, drizzle the glaze generously over the top. You want it to be warm enough to set a bit, but not so hot that the glaze melts away completely.
Step 9: Slice & Serve
Serve your Moist Banana Bread Cobbler warm! It’s absolutely divine on its own, but a scoop of vanilla ice cream or a dollop of whipped cream takes it to a whole new level of decadent. Use a sharp knife to cut it into generous squares, making sure to get some of that gooey filling in each piece. The aroma alone is enough to make your mouth water, and that first bite? Pure happiness. Enjoy every single spoonful!
What to Serve It With
This Moist Banana Bread Cobbler is so versatile, it fits into almost any meal or occasion. For a truly indulgent breakfast, I love serving a warm slice alongside a perfectly brewed cup of coffee. The rich flavors of the cobbler and the bitterness of the coffee are a match made in heaven. If you’re going for a weekend brunch spread, this is always a hit. I like to serve it in smaller portions alongside other brunch favorites like scrambled eggs, crispy bacon, and fresh fruit salad. A mimosa or a glass of fresh orange juice always pairs beautifully. As a dessert, it’s simply perfection. After dinner, I’ll serve it warm with a big scoop of vanilla bean ice cream – the contrast between the warm, gooey cobbler and the cold, creamy ice cream is irresistible. A drizzle of extra caramel sauce wouldn’t hurt either! For those cozy, lazy afternoons or a late-night craving, this is the ultimate comfort food. I often just serve a slice with a glass of milk, curling up with a good book. My kids love it as an after-school snack, especially when it’s still a little warm from the oven. I’ve also found that serving it with a dollop of Greek yogurt adds a nice tang and a bit of protein, making it feel a little more balanced for a snack.
Top Tips for Perfecting Your Moist Banana Bread Cobbler
Over the years, I’ve made this cobbler more times than I can count, and I’ve picked up a few tricks that I think make all the difference. First, about the bananas: I cannot stress enough how important it is to use *very* ripe bananas. The ones with lots of brown spots are your best friends here. They are sweeter, softer, and mash up more easily, giving you that intense banana flavor and essential moisture. If your bananas aren’t ripe enough, you can actually bake them in their peels on a baking sheet at around 300°F (150°C) for 10-15 minutes until they’re soft and fragrant. When it comes to mixing, remember the golden rule of quick breads: *do not overmix*. Overmixing develops the gluten in the flour, leading to a tough, dense texture. Mix the wet and dry ingredients until they are *just* combined, and don’t worry if you see a few little flour streaks; they’ll bake out. For the filling, feel free to get creative! While chocolate chips are my go-to, I’ve experimented with chopped dates, dried cranberries, or even a swirl of raspberry jam. A sprinkle of extra cinnamon in the filling mixture also adds a lovely warmth. When it comes to baking, ovens can be so different. If yours tends to brown things quickly, I recommend loosely tenting the cobbler with aluminum foil about halfway through the baking time. This allows the inside to cook through without the top getting too dark. And speaking of doneness, a toothpick test is your best friend. It should come out with a few moist crumbs, but no wet batter. For ingredient swaps, I’ve successfully used a gluten-free 1-to-1 baking flour blend with great results, though sometimes you might need a touch more liquid. Brown butter instead of softened butter in the batter adds an incredible nutty depth, but it’s a bit more effort. And for the glaze, if you find it’s too thick, just add a tiny bit more milk. If it’s too thin, whisk in a little more powdered sugar. The key is to get a consistency that drizzles nicely without being watery. I learned the hard way that over-baking is the enemy of moist baked goods, so keeping an eye on it towards the end of the baking time is crucial.
Storing and Reheating Tips
This Moist Banana Bread Cobbler is best enjoyed fresh and warm, but it keeps surprisingly well, making it perfect for leftovers (if you’re lucky enough to have any!). At room temperature, it will stay fresh for about 1-2 days, especially if you cover it loosely with plastic wrap or foil. I find that keeping it on the counter, uncovered for the first few hours, helps the topping stay a little crisp, but once it’s cooled completely, covering it is best to prevent it from drying out. If you want it to last longer, the refrigerator is your best bet. Store it in an airtight container, and it should keep well for up to 4-5 days. The texture might change slightly in the fridge, becoming a bit denser, but it’s still delicious. For longer storage, freezing is an excellent option. You can freeze the entire cobbler (once completely cooled) or individual slices. Wrap it tightly in plastic wrap, then in aluminum foil, or place it in a freezer-safe container. It will last for up to 2-3 months in the freezer. When you’re ready to enjoy it, if it’s frozen, the best way to thaw is in the refrigerator overnight. For reheating, I highly recommend the oven or toaster oven. If it’s at room temperature, a few minutes at around 300°F (150°C) until warmed through is usually enough. If it was refrigerated, you might need 10-15 minutes. For frozen cobbler, you can reheat directly from frozen, but it will take longer. Microwaving is an option for a quick reheat, but be aware that it can sometimes make the texture a little chewier. I usually microwave for 30-60 second intervals until just warm. If you plan to store it for a while, I often wait to add the glaze until just before serving, as it can sometimes get a little sticky when refrigerated or frozen. If you do glaze it before storing, it might become a bit more melded into the cobbler over time, which is still tasty, just a different texture.
Frequently Asked Questions
Final Thoughts
So there you have it – my go-to recipe for the most wonderfully moist, comforting, and incredibly easy Moist Banana Bread Cobbler. It’s the kind of dessert that feels like a big, warm hug, perfect for those moments when you need a little bit of sweetness and comfort in your life. I really hope you give this a try, and when you do, I can’t wait to hear what you think! If you’re looking for other comforting bakes that are just as simple and delicious, you might also love my Easy Apple Crumble Pie or my One-Bowl Chocolate Chip Cookies. They’re all recipes that have earned a permanent spot in my family’s recipe box. Happy baking, and I truly hope this cobbler brings as much joy to your kitchen as it does to mine!
Moist Banana Bread Cobbler
Ingredients
Banana Bread Base
- 3 medium ripe bananas mashed
- 0.5 cup unsalted butter melted
- 0.75 cup granulated sugar
- 1 large egg
- 1 teaspoon vanilla extract
- 1.5 cup all-purpose flour
- 1 teaspoon baking soda
- 0.5 teaspoon salt
- 0.25 teaspoon ground cinnamon
Cobbler Topping
- 1 cup all-purpose flour
- 0.5 cup granulated sugar
- 0.5 teaspoon baking powder
- 0.25 teaspoon salt
- 0.25 cup cold unsalted butter cut into small pieces
- 3 tablespoon milk
Instructions
Preparation Steps
- Preheat oven to 375°F (190°C). Grease an 8x8 inch baking dish.
- In a large bowl, mash the ripe bananas. Stir in the melted butter, sugar, egg, and vanilla extract until well combined.
- In a separate medium bowl, whisk together the flour, baking soda, salt, and cinnamon.
- Gradually add the dry ingredients to the wet ingredients, mixing until just combined. Do not overmix.
- Pour the banana bread batter evenly into the prepared baking dish.
- In a medium bowl, whisk together the flour, sugar, baking powder, and salt for the topping.
- Cut in the cold butter using a pastry blender or your fingertips until the mixture resembles coarse crumbs.
- Add the milk and stir until a crumbly dough forms.
- Sprinkle the cobbler topping evenly over the banana bread batter.
- Bake for 40-50 minutes, or until a toothpick inserted into the center comes out clean and the topping is golden brown.
- Let cool slightly before serving. Serve warm, optionally with ice cream or whipped cream.