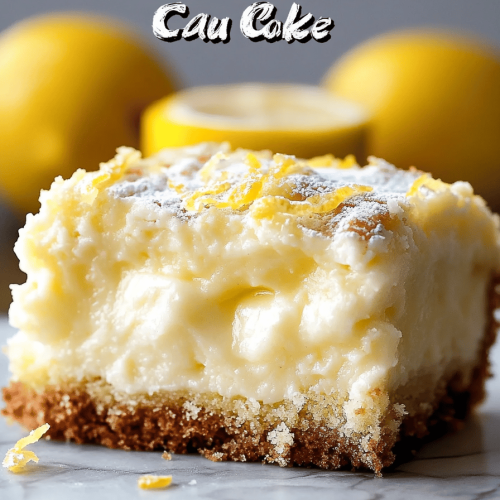
Growing up, the kitchen smelled like bright sun and melted butter, and lemon peels piled high on the counter like little suns waiting to shine. My family would gather around the table, coffee steaming, and a slice of this Italian Lemon Cream Cake would somehow vanish before the plates hit the rim. It’s the kind of dessert that feels fancy enough for celebrations but simple enough for a weeknight, a lifesaver when you’re running late and crave something citrusy and creamy all at once. I’m typing this with a cup of espresso cooling beside me, thinking how this cake travels from pantry to party—and how it somehow tastes better the next day, when the lemon warms up and the cream becomes whisper-soft. If you’ve ever wanted a dessert that tastes like a little vacation in a single slice, you’ve found it. Italian Lemon Cream Cake is bright, comforting, and funny in its own way—like a friend who shows up with a jar of lemon curd and stays for the long chat.
What is Italian lemon cream cake?
Think of this cake as a sun-kissed hybrid that’s part tender lemon sponge, part satin-smooth cream filling, all finished with a glossy lemon glaze. It’s essentially a light, citrus-forward cake that wears its Italian-leaning charm on its sleeve—think Amalfi lemons, a whisper of vanilla, and a cream that’s sweet without being cloying. The name nods to the Italian palate for bright citrus and silky textures, but you don’t need to be an expert baker to pull it off. It’s the kind of dessert you can assemble with a glass of wine, a bowl of berries, and a friend who loves lemon as much as you do. This cake travels well, layers beautifully, and holds up nicely for make-ahead occasions. It’s not a towering showstopper; it’s a confident, smile-worthy slice that proves simple ingredients can carry their own sunny throne on a dessert plate.
Why you’ll love this recipe?
What I love most about this Italian Lemon cream Cake is how it feels both everyday and special at the same time. It’s a weekday miracle in the best sense—a cake you can bake for a family dinner and still have leftovers for a brunch gathering. Here are the reasons it’s a favorite mine (and likely to become yours, too):
- Flavor: The lemon isn’t shy. It’s bright, tart, and balanced by a creamy center that eases into sweetness. The
- SimplicityThis isn’t a cake that requires fancy equipment or elite techniques. It’s mostly whisking, folding, and a gentle bake.
- Cost-efficiency: Pantry-friendly ingredients add up to a dessert you can share with neighbors and still feel great about the budget. The lemon glaze uses everyday ingredients, and the filling leans on pantry-friendly lemon curd and cream so you don’t waste precious time sourcing hard-to-find items.
- Versatility: You can dress it up with berries, swap in lime for a different citrus glow, or leave it playful and simple with a light dusting of powdered sugar. It plays well with coffee, sparkling wine, or a hot cup of tea on a chilly morning.
- Make-ahead magic: The cake, the filling, and even the glaze can be prepared ahead and composed the next day, which is priceless for entertaining.
My personal favorite thing: it tastes better the day after. That’s not just me being lazy—letting the flavors mellow overnight gives the lemon a deeper, more complex brightness, and the cream layer firms up into a luscious, slice-able paradise. If you’ve got a busy week ahead, this cake is a lifesaver you’ll actually look forward to sharing with family and friends.
How to Make Italian Lemon Cream Cake
Quick Overview
In short: you whisk dry ingredients, whisk wet ingredients, marry them gently, and bake two light lemon sponge rounds. Then you whip up a lemon-tinged cream filling and spread it between the layers. A glossy lemon glaze finishes the top. The trick is not to overwork the batter and to give the cake a gentle bake so it stays tender, like a whisper rather than a shout. Bake time is forgiving—start checking at 28 minutes if you’re using round pans, and you’ll likely land on a perfect middle. Let it cool completely before you fill and glaze, or the cream will melt away into a soggy moment you won’t want to repeat.
Ingredients
For the Main Batter:
- 2 cups (250 g) all-purpose flour, sifted
- 1 1/2 cups (300 g) granulated sugar
- 2 teaspoons baking powder
- 1/2 teaspoon baking soda
- 1/4 teaspoon salt
- Zest of 2 lemons
- 1/2 cup (115 g) unsalted butter, melted and cooled
- 3/4 cup (180 ml) whole milk or buttermilk
- 3 large eggs
- 2 teaspoons vanilla extract
- 1/4 cup (60 ml) fresh lemon juice
For the Filling:
- 1 cup (240 ml) heavy cream, cold
- 2–3 tablespoons powdered sugar, to taste
- 1/2 cup (120 ml) lemon curd (homemade or good store-bought)
- 1 teaspoon vanilla extract
For the Glaze:
- 1 cup (125 g) powdered sugar
- 2–3 tablespoons fresh lemon juice
- 1 teaspoon lemon zest (optional, for extra brightness)
Step-by-Step Instructions
Step 1: Preheat & Prep Pan
Heat your oven to 350°F (175°C). Grease and line two 9-inch round cake pans with parchment rounds. A quick spray of nonstick spray works wonders, then a light dusting of flour ensures the layers pop out cleanly. If you’re using parchment, trim the circles so they cling to the bottom perfectly. I always run a quick test to make sure the pans are ready—the scent of lemon and butter always tells me I’m in for a good bake.
Step 2: Mix Dry Ingredients
In a large bowl, whisk together flour, sugar, baking powder, baking soda, salt, and lemon zest. The zest helps awaken the lemon aroma so you don’t have to rely solely on lemon juice for flavor. Sifting is optional, but it reduces lumps and helps keep the cake light. I do a quick whisk and pass it through once to ensure everything is evenly distributed.
Step 3: Mix Wet Ingredients
In another bowl, whisk the melted butter with milk, eggs, vanilla, and lemon juice until well combined. The lemon juice will brighten the batter just enough, and the vanilla adds a cozy counterpoint to the zing. I like to whisk by hand here; it’s soothing and reduces the risk of overbeating. If your butter is a touch warm, that’s fine—the goal is a smooth, cohesive mixture, not a glossy emulsion.
Step 4: Combine
Pour the wet ingredients into the dry ingredients and stir gently until just combined. A few lumps are totally okay. Overmixing is the enemy of a tender crumb. If you see a streak of flour, fold those in with a gentle motion rather than stir vigorously. The batter should look pale, airy, and glossy—like a soft paste rather than a heavy dough.
Step 5: Prepare Filling
While the batter rests for a moment, whip the heavy cream with powdered sugar and vanilla until stiff peaks form. Keep an eye on it; you want billowy, not grainy or melted. Gently fold in half of the lemon curd to create a lemony-flavored cream layer that’s bright but not overpowering. If you’re feeling extra indulgent, swirl in a tablespoon of lemon zest for more aroma. You’ll sandwich this between the cooled layers, so it should be velvety and smooth.
Step 6: Layer & Swirl
Divide the batter evenly between the prepared pans and spread to the edges. Bake for about 28–34 minutes, until a toothpick inserted in the center comes out with a few moist crumbs. Let the cakes cool in their pans for about 10 minutes, then invert onto a rack to cool completely. Once cool, spread a thick layer of lemon-cream mixture on one cake layer, then top with the second layer. If you want a marble effect, you can dollop a small amount of the lemon curd on the filling and swirl it lightly with a toothpick.
Step 7: Bake
While you’re assembling the cake, you can be watching the color of the edges—golden, not deep brown. If your oven runs hot, tent the tops with a piece of foil halfway through baking to prevent over-browning. If you use 8-inch pans instead of 9s, you’ll need to reduce the bake time by about 5–10 minutes. The key is to keep the center just barely set so the cake remains moist when cooled.
Step 8: Cool & Glaze
Cool the assembled cake completely before glazing. A warm cake will melt the filling and glazing, and nobody wants a runny lemon river on their plate. For glaze, whisk powdered sugar with lemon juice until smooth and pourable but not thin. Drizzle over the top, letting it drip down the sides. If you want extra sparkle, finish with a light dusting of lemon zest. I’ve tested a few versions—a thicker glaze sets up beautifully for show-stopping slices; a thinner glaze gives a glossier finish and a brighter lemon kick.
Step 9: Slice & Serve
When you’re ready to slice, use a sharp, warm knife (wipe between cuts for clean edges). A little parchment on the serving plate makes cleanup easier. This cake shines with fresh berries, a dollop of whipped cream, or a simple scoop of vanilla Ice Cream. My kids actually ask for seconds, which is the ultimate compliment you can get from a kitchen crew that usually acts like they’re too grown for dessert. If you’re taking this to a party, you can refrigerate the cake for up to 2 days; the flavors deepen as it rests, and the texture stays luxuriously soft.
What to Serve It With
It’s amazing how a dessert like this opens doors to simple, joyful pairings. Here are ideas that cover breakfast to after-dinner treats and even a cozy afternoon snack:
For Breakfast: A slice with a strong cup of coffee or a latte, perhaps with a light dusting of powdered sugar and a few sliced berries for color. The lemon keeps things bright, so it pairs nicely with a frothy cappuccino and a handful of almonds for crunch.
For Brunch: Serve with berries, a dollop of extra lemon curd on the side, and a sprig of mint for aroma. Presentation matters here—thin lemon zest curls or edible flowers can elevate the plate to “special occasion” without extra effort.
As Dessert: A generous slice with a swirl of extra glaze on the plate and a side of fresh raspberries or blueberries. A light dusting of lemon zest across the top makes it look restaurant-polished and adds a pop of color.
For Cozy Snacks: Slice and serve alongside a mug of hot tea or a glass of cold milk. This is the kind of cake that feels like a hug after a long day, especially if you’ve swapped in almond milk for a dairy-free version and kept the texture light.
My family’s tradition is to share it with neighbors after a Sunday stroll, sliced thin with a mental note to savor the lemon while it’s still sunny outside. It’s a tiny ritual that makes the week feel a little softer and a lot sweeter.
Top Tips for Perfecting Your Italian Lemon Cream Cake
These tips come from years of tweaking this recipe to fit different pans, ovens, and mood boards. They’re simple, practical, and you’ll notice the difference in crumb, shine, and overall mood of the finished cake.
Lemon Zest Prep: Use fresh zest rather than bottled to capture the essential oils. Zest before juicing the lemons so you don’t lose any fragrance during the process. If you’re worried about bitterness, avoid the white pith when zesting and keep the zest in thin ribbons so it’s evenly distributed.
Mixing Advice: When you combine wet and dry ingredients, mix just until you see no dry flour. A few tiny lumps are a sign you’ve kept the batter light. Overmixing makes the crumb tougher, and nobody wants a dense, heavy slice—even with lemon joy on top.
Swirl Customization: If you love a marbled look, dollop spoonfuls of lemon curd into the batter before you bake and swirl gently with a toothpick. Don’t over-swirl—the goal is a soft, sunny pattern, not a canyon of streaks.
Ingredient Swaps: For a lighter cake, you can replace part of the butter with neutral oil (like canola) and increase the milk slightly. For a dairy-free version, use Coconut Cream in the filling and a plant-based milk in the batter. The glaze might need a touch more sugar to compensate for the dairy-free texture, but it still dazzles.
Baking Tips: If your oven runs hot, lower the temperature to 340°F (170°C) and extend the bake time by 5–8 minutes. If you’re using a Sheet Pan instead of rounds, keep an eye on the edges; they’ll brown quickly, and the center should still spring back when you press it gently.
Glaze Variations: If you want a lighter glaze, use half the sugar and add more lemon juice gradually until you reach a silky, pourable consistency. For a brighter glaze, whisk in a pinch of cornstarch and heat gently for a few seconds to set it a touch more. A quick zest of lemon on top before the glaze sets adds a cozy aroma and visual appeal.
Lessons learned: I used to rush the glaze and end up with a sticky dribble that slid off the cake. Now I give the cake time to cool completely, then steady the glaze with a few gentle, slow pours. It makes the finish look polished and the slice hold its shape beautifully. This is a dessert that rewards patience as much as it rewards curiosity.
Storing and Reheating Tips
Storing this cake properly keeps the lemon brightness intact and the filling luscious. Here’s how I handle it after the first day.
Room Temperature: If you’re serving within a day, keep it covered loosely on the counter. It will stay moist and the glaze will set nicely. Unless it’s a hot day, this is a perfectly acceptable method and keeps the lemon scent alive.
Refrigerator Storage: For longer storage, refrigerate the cake (uncovered or in a loose container) for up to 3 days. Bring slices to room temperature before serving to restore softness to the cream filling.
Freezer Instructions: You can freeze the baked layers wrapped tightly for up to 2 months. Thaw overnight in the fridge, then reassemble with fresh filling. The filling may soften a bit, but the lemon flavor holds its own and the crust remains tender.
Glaze Timing Advice: If you’re storing the cake unfrosted, add the glaze just before serving to keep the surface glossy. If you’ve already glazed and need to store, it still holds up well in the fridge for a day or two, but I’d plan to re-glaze after chilling for a glossier finish.
Bottom line: this cake wants to be shared, but it also wants the moment to linger. A little planning makes all the difference between a good slice and a truly memorable one.
Frequently Asked Questions
Final Thoughts
This cake has become a cherished staple in my little cookbook of comfort sweets. It’s a bright, forgiving, and deeply satisfying dessert that brings people together around a plate. The balance between lemon sharpness and creamy sweetness is what makes it special—each bite feels like a quick vacation, a reminder that simple ingredients, treated with care, can make something unforgettable. If you try it, I’d love to hear which variation you loved most—the extra swirl of lemon curd, the dairy-free tweak, or your favorite fruit on the side. Happy baking, friends, and may your slices be sunlit and your conversations equally warm!
Italian Lemon Cream Cake
Ingredients
Main Ingredients
- 2 cups all-purpose flour
- 0.75 cups granulated sugar
- 0.5 teaspoons baking powder
- 0.25 teaspoons salt
- 0.5 cups unsalted butter, melted
- 2 pieces eggs
- 0.75 cups whole milk
- 1 tablespoons lemon zest
- 0.25 cups fresh lemon juice
- 1 teaspoons vanilla extract
Instructions
Preparation Steps
- Preheat the oven to 350 degrees F. Grease and lightly flour two 8-inch cake pans.
- In a large bowl, whisk together flour, sugar, baking powder, and salt.
- In a separate bowl whisk melted butter, eggs, milk, lemon zest, lemon juice, and vanilla until well combined.
- Pour the wet ingredients into the dry ingredients and mix until just combined; avoid overmixing.
- Divide batter evenly between prepared pans and bake for 25 to 30 minutes, or until a toothpick comes out clean.
- Let cakes cool completely before assembling and layering with lemon cream or frosting.