There’s something about the scent of cinnamon and apples warming your kitchen that feels like an instant hug. My grandma’s apple pie was always the centerpiece of family gatherings, and while I love a good slice of that traditional dessert, I’ve found a new favorite to satisfy those sweet cravings: apple pie fudge. This isn’t your typical fudge packed with just sugar and chocolate; it’s buttery, spiced, and sweet, capturing all the warmth of apple pie in every bite but without the need for any baking fuss. Honestly, it’s like you took a slice of grandma’s pie and melted it into a rich, melt-in-your-mouth treat. It’s perfect for those moments when you want something cozy and special but don’t want to wait or turn on the oven for too long.
What is Apple Pie Fudge?
Think of apple pie fudge as a delightful mashup of two comforting classics. It’s essentially a fudge that’s infused with all the flavors you’d find in an apple pie — crisp apples, warm cinnamon, a little nutmeg, and sometimes a hint of caramel — but instead of being a slice of pie, it’s this rich, creamy block of sweet goodness that you can cut into bite-sized squares. The idea is to get all the cozy fall-spiced flavors into a fudge form that’s easy to make and even easier to devour, especially when you just want that nostalgic apple pie vibe without the crust. It’s super approachable at home, and you don’t have to be a dessert whiz to make it taste like something straight from a grandma’s kitchen.
Why you’ll love this recipe?
What I love most about this apple pie fudge is how it nails the flavor without any complicated steps. The cinnamon and nutmeg weave their way right through the creamy fudge, while the little bursts of dried or fresh apples (I’ll talk about that in a bit) add that fresh-tart pop that keeps it from feeling too heavy. It’s the kind of treat that’s both familiar and comforting but with a fun twist. Plus, you don’t have to fuss with pie crusts, rolling dough, or waiting for it to bake and cool down — this fudge comes together quickly and stays great in your fridge for days (if it even lasts that long!).
This is also crazy budget-friendly, which I appreciate since a lot of apple desserts tend to call for so many add-ins or pricey ingredients. Just simple staples like condensed milk, butter, white chocolate, and a mix of spices bring the magic here. If you’re like me and love recipes you can whip up on a busy weekday evening while the kids are doing homework, this one’s a total lifesaver. It’s also pretty versatile — you can dress it up with nuts, swap in caramel bits, or even drizzle a bit of salted caramel on top if you’re feeling fancy.
And for anyone who loves the idea of apple flavors but hates the soggy bottom crust problem in pies — trust me, this fudge sidesteps all of that. It’s pure apple pie indulgence without any of the work or those messy issues. Plus, my kids legitimately ask for this fudge every time I make it, which says a lot coming from picky little dessert critics.
How do I make Apple Pie Fudge?
Quick Overview
Making apple pie fudge is straightforward and delightfully quick. You melt your base ingredients together, stir in the magic spices and apple bits, and spread it into a pan to set. No baking required, which is a huge win on those days when I’m all about minimal mess and maximum flavor. The real secret here is balancing the creamy softness of the fudge with the crunchy, tart notes of apples and the warmth of classic pie spices. It’s just a few simple steps but the end result feels like you’ve poured love and comfort into every square. Plus, once it’s set, it’s ready to slice and share — or hoard.
Ingredients
For the Main Batter:
- 2 cups white chocolate chips – I always go for quality chips; makes a huge difference in smoothness.
- 1 (14 oz) can sweetened condensed milk – the magic behind that fudgy creaminess.
- 4 tablespoons unsalted butter – helps everything meld together perfectly.
- 1 teaspoon vanilla extract – just a touch to round out the flavor nicely.
For the Filling:
- 1 cup finely chopped fresh apples or dried apple pieces – fresh if you want a bit of bite, dried for chewy bursts.
- 1 teaspoon ground cinnamon – the star of apple pie flavor.
- ½ teaspoon ground nutmeg – gives that extra cozy, warm note.
- Optional: ¼ teaspoon allspice or clove for a spiced punch.
For the Glaze:
- ½ cup powdered sugar – sifted, for smooth drizzling.
- 1-2 tablespoons milk or apple cider – for that perfect drizzle consistency (try apple cider for a nice twist!).
- Optional pinch of cinnamon – sprinkle on top to keep that spice theme going.
Step-by-Step Instructions
Step 1: Preheat & Prep Pan
Line an 8×8 inch square pan with parchment paper, letting the sides peek out to make it easy to lift the fudge later. You don’t need to preheat the oven since this is a no-bake wonder, but having your pan ready means you’re all set for the melted mixture.
Step 2: Mix Dry Ingredients
In a small bowl, combine the cinnamon, nutmeg, and any other spices you’re using. This combination smells unbelievable at this point, and mixing them first helps ensure every bite is evenly spiced. If you’re using dried apples, toss them in here so they get a nice coat of spice too.
Step 3: Mix Wet Ingredients
In a medium saucepan over low heat, combine the white chocolate chips, sweetened condensed milk, and butter. Stir constantly — patience here pays off. You’ll see everything start to melt and come together into a silky, glossy mixture. Watch those chocolate chips carefully; a sudden flare of heat can make them seize up, which is the one mistake I’ve had to learn from!
Step 4: Combine
Once melted and smooth, remove the pan from heat and stir in your vanilla extract and the spiced apple mixture. Fold everything gently but thoroughly — you want the apples and spices to be evenly distributed without breaking anything up too much. I like to take a moment here to sneak a taste; this stage always feels promising.
Step 5: Prepare Filling
If you’re using fresh apples, make sure to chop them finely and pat dry to keep the fudge from getting too watery. For a different texture, you can sauté fresh apples lightly with a bit of butter and cinnamon until just softened — it adds a lovely caramelized flavor.
Step 6: Layer & Swirl
Pour about half of the fudge into your prepared pan and smooth it out. Then add half the apple pieces; you can swirl the rest of the fudge on top and use a knife or skewer to create fun, marbled patterns — I always take a moment here because the swirl almost looks like abstract art. It’s messy, but in a good way!
Step 7: Bake
No baking here — just pop the pan into the fridge to firm up for at least 2 hours. This is the perfect time to tidy up, grab a coffee, and get excited about your treat. If you try cutting it too soon, it’ll be messy, so patience is key.
Step 8: Cool & Glaze
Once firm, gently lift the fudge out of the pan with the parchment edges. Whisk your powdered sugar and milk or cider to a smooth drizzle consistency and drizzle all over the fudge. The glaze adds a subtle sweetness and that extra touch of charm. If you’re feeling fancy, sprinkle a tiny bit of extra cinnamon on top to tie it all together.
Step 9: Slice & Serve
Use a sharp knife warmed with hot water and wiped dry to cut clean squares. Serve at room temperature; the fudge is soft and creamy but firm enough to hold its shape. These squares disappear fast around my house, so don’t say I didn’t warn you!
What to Serve It With
For Breakfast: Pair a few squares with a strong cup of coffee and maybe a piece of crisp bacon for that salty-sweet balance. I sometimes add a dollop of plain Greek yogurt on the side to cut through the sweetness, and it feels like a secret indulgence to start the day.
For Brunch: This fudge makes a beautiful sweet addition to a brunch platter alongside fresh fruit, nutty granola, and creamy cheese. Serve with a chilled apple cider mimosa or a hot chai latte — the spice notes tie everything together effortlessly.
As Dessert: Drizzle a little caramel sauce over a fudge square, or serve with a scoop of vanilla bean ice cream and a sprinkle of toasted pecans for an easy yet impressive dessert. It’s reminiscent of apple crumble, but with fewer dishes to clean!
For Cozy Snacks: When the afternoon slump hits, apple pie fudge bites with a warm mug of spiced tea or hot cocoa just hit the spot. It’s like biting into a warm, cozy memory that instantly brightens your mood. Perfect for those quiet moments or sharing with friends during a chat.
This fudge has become a tradition in my home — especially on chilly evenings when we want cozy flavors without the fuss. I keep a stash tucked away for unexpected guests or just those “I need a hug in a bite” moments. I bet it would become a favorite in yours too.
Top Tips for Perfecting Your Apple Pie Fudge
Fresh or Dried Apples: If using fresh, grate or chop finely and make sure to pat dry with paper towels — excess moisture will make your fudge too soft. Dried apples add fantastic chewy bursts but only use about half the amount if you want a lighter texture.
Mixing Advice: Melt the white chocolate with the condensed milk and butter slowly over low heat and stir constantly to avoid burning or graininess. If your mixture looks grainy, a little warm milk stirred in can revive the smoothness. Don’t overmix once you add apples — folding gently keeps those chunks intact.
Swirl Customization: I love swirling in a bit of caramel sauce or even a few apple butter ribbons to give your fudge a marbled, gorgeous look. Use a toothpick or skewer to create delicate patterns, but don’t overdo it or the flavors may blend too much.
Ingredient Swaps: I once tried almond milk instead of regular milk for the glaze, and it actually gave a richer, nuttier finish. You can swap white chocolate for milk chocolate, but it’ll mellow the spice notes slightly. And don’t skip fresh vanilla — it’s the secret that makes it smell like magic.
Baking (or Setting) Tips: Pop your fudge in the coldest part of the fridge and don’t rush cutting it before it’s fully firm. Wrapped well, it holds beautifully without drying out. If you want a softer fudge, let it sit at room temp a few minutes before slicing.
Glaze Variations: Mix powdered sugar with lemon juice for a tangy glaze or warm up a bit of cream cheese frosting if you want something more decadent. Just keep the consistency drizzle-friendly so it doesn’t overwhelm the fudge itself.
Over the years, I’ve learned that patience is the ultimate game-changer here, and resisting the urge to nibble before it’s set is the hardest part (but oh, so worth it!). I also discovered that making a double batch and freezing half means you always have a piece of cozy apple pie in fudge form ready when you need it most.
Storing and Reheating Tips
Room Temperature: You can keep apple pie fudge at room temp for up to 2 days if it’s in an airtight container. Just be sure to keep it away from heat and humidity, or it will get soft and sticky very quickly.
Refrigerator Storage: Store fudge in an airtight container in the fridge for up to 2 weeks. I like to layer parchment paper between pieces to keep them from sticking together or losing their shine.
Freezer Instructions: Wrap fudge tightly in plastic wrap and then aluminum foil to protect it from freezer burn. It keeps well for 3 months. When you’re ready to enjoy, thaw in the refrigerator overnight and bring to room temp before slicing.
Glaze Timing Advice: If you’re planning to freeze your fudge, it’s best to wait to add the glaze until after it’s fully thawed so it doesn’t crack or get grainy during freezing. For fridge storage and immediate enjoyment, adding the glaze a few hours before serving gives the best look and flavor.
Frequently Asked Questions
Final Thoughts
Honestly, this apple pie fudge feels like the best of both worlds — all the warm, cozy flavors of a classic apple pie but in this fun, effortless fudge form that you can whip up anytime. It’s been my go-to when I want comfort food that doesn’t take all afternoon, and I love how it brings everyone together, whether it’s a quick after-school treat or part of a holiday spread. If you’re into flavors that wrap you up in nostalgia with a modern twist, give this a shot — it’s one of those recipes that feels like a secret treasure once you discover it. Plus, it’s a fun way to switch things up if you’re bored with the usual sweets. Don’t forget to come back and tell me how yours turned out, or any little changes you made — I’m always eager to hear what fellow fudge lovers dream up. Happy baking!
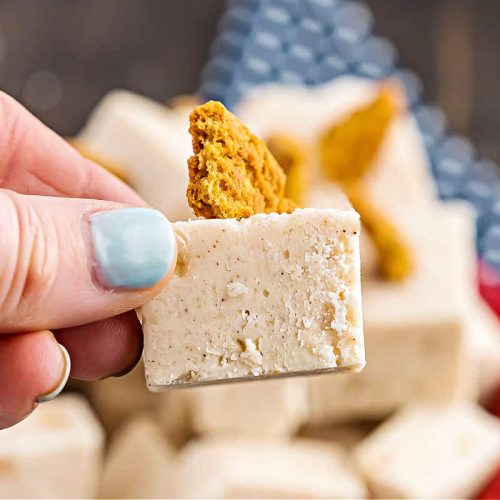
apple pie fudge
Ingredients
Main Ingredients
- 3 cups granulated sugar
- 0.75 cups unsalted butter
- pinch kosher salt
- 1 cup heavy whipping cream
- 1 teaspoon ground cinnamon
- 0.5 teaspoon ground nutmeg
- 0.5 teaspoon ground allspice
- 0.5 cup apple pie filling Use mostly apple chunks, avoid jelled parts
- 3 cups white chocolate chips
- 12 pieces gingersnap cookies Broken into bite-sized pieces
Instructions
Preparation Steps
- Line an 8x8 inch baking dish with parchment paper and set aside.
- Add white chocolate chips and apple pie filling (using mostly apple chunks, not the jelled syrup) to a mixing bowl and set aside.
- In a large saucepan over medium-high heat, combine granulated sugar, unsalted butter, kosher salt, heavy whipping cream, cinnamon, nutmeg, and allspice. Bring mixture to a rolling boil, stirring continuously for 4 minutes, then remove from heat.
- Quickly pour the hot mixture into the bowl with white chocolate and apple pie filling. Beat on medium speed until the white chocolate is smooth, about 2 minutes.
- Pour the fudge mixture into the prepared baking dish. Refrigerate for at least 3 hours or until set, preferably overnight.
- Remove fudge from the baking dish using the parchment paper. Cut into bite-sized pieces and top each piece with a small piece of gingersnap cookie. Store covered in the refrigerator for up to one week or freeze for longer storage. Enjoy!