There are some dishes that just instantly bring a smile to your face, aren’t there? For me, that dish is this Hot Orange Chicken. It’s not just about the incredible sweet and tangy flavor, though that’s a huge part of it. It’s about the memories. I remember making this for the first time years ago, trying to recreate that takeout favorite that my family adored but that always left me feeling a little… guilty, thanks to the deep-frying and sugar overload. This version? It’s a revelation. It’s vibrant, surprisingly easy, and uses simple ingredients you probably already have in your pantry. Think of it as your new go-to for weeknight dinners or when you’re craving something incredibly satisfying without all the fuss. It’s got that bright citrus punch, a hint of heat, and a sticky glaze that’s just pure magic. Honestly, I’ve tried so many orange chicken recipes over the years, and this one just hits different. It’s the perfect balance, and my family devours it every single time.
What is hot orange chicken?
So, what exactly is this glorious Hot Orange Chicken? At its heart, it’s a stir-fry featuring tender pieces of chicken coated in a zesty, slightly spicy, and wonderfully sweet orange sauce. The “hot” part comes from a little kick of chili flakes or a touch of sriracha, which I find perfectly cuts through the sweetness. It’s not overwhelmingly spicy, just enough to give it a delightful warmth. Imagine the flavor of a perfectly ripe orange, intensified and married with savory notes, all clinging to juicy chicken. It’s essentially a homemade, healthier, and dare I say, *better* version of that beloved Chinese-American takeout classic. It’s the kind of dish that makes your kitchen smell amazing and leaves you feeling completely happy and satisfied. It’s uncomplicated, deeply flavorful, and utterly addictive. This isn’t about complicated techniques; it’s about bringing together simple, delicious flavors in a way that feels both familiar and exciting.
Why you’ll love this recipe?
Oh, where do I even begin with why you’ll absolutely adore this Hot Orange Chicken? First off, the flavor is just out of this world. It’s that perfect symphony of sweet, tangy, and a little bit spicy that makes you want to lick the plate clean. The orange flavor is bright and fresh, not artificial or cloying at all. Then there’s the simplicity. I’m talking about a recipe you can whip up on a busy Tuesday night and still have time for your favorite show. No fancy equipment, no obscure ingredients – just good old-fashioned cooking that yields incredible results. And let’s talk about cost-effectiveness! You’re using pantry staples and affordable chicken, so it’s a win for your wallet too. Plus, it’s so versatile. Serve it over fluffy rice, with some steamed veggies, or even tucked into lettuce wraps for a lighter meal. What I love most about this is how it balances that comforting takeout feel with fresh, bright flavors. It’s also incredibly forgiving, which is a huge plus in my book. It truly stands out because it delivers on all fronts: incredible taste, ease of preparation, and budget-friendliness. It’s the kind of recipe you’ll come back to again and again, just like I do!
How do I make hot orange chicken?
Quick Overview
This Hot Orange Chicken Recipe is all about building flavor layer by layer. You’ll quickly coat and cook your chicken until golden, then whisk together a vibrant orange sauce. Everything comes together in one pan for minimal cleanup. The whole process is surprisingly fast, usually under 30 minutes from start to finish, making it perfect for those nights when you’re short on time but craving something truly delicious. It’s proof that you don’t need hours in the kitchen to create a restaurant-quality meal.
Ingredients
For the Main Batter:
1.5 pounds boneless, skinless Chicken Thighs or breasts, cut into bite-sized pieces
1/2 cup all-purpose flour
1/4 cup cornstarch
1 teaspoon salt
1/2 teaspoon black pepper
1 large egg
1/4 cup milk (any kind works, I’ve even used oat milk and it’s great!)
Vegetable oil for frying (about 1 inch deep in your pan)
For the Filling:
2 tablespoons vegetable oil
2 cloves garlic, minced
1 teaspoon fresh ginger, grated (or 1/2 teaspoon ground ginger if you’re in a pinch)
1/4 teaspoon red pepper flakes (or more, if you like it spicier!)
1/2 cup fresh orange juice (from about 1-2 oranges)
For the Glaze:
1/2 cup granulated sugar
1/4 cup rice vinegar
2 tablespoons soy sauce (low sodium is fine)
1 tablespoon orange zest (from about 1 orange)
1 tablespoon cornstarch
2 tablespoons water
Step-by-Step Instructions
Step 1: Preheat & Prep Pan
First things first, let’s get that chicken ready. In a medium bowl, combine the cut chicken pieces. In a separate shallow bowl or pie plate, whisk together the all-purpose flour, cornstarch, salt, and black pepper. In a third bowl, whisk the egg and milk together. This egg-wash mixture is what will help the flour coating stick. Now, dip each piece of chicken into the egg mixture, letting any excess drip off, then dredge it thoroughly in the flour mixture, pressing gently to ensure it’s well coated. Set the coated chicken aside on a plate or wire rack while you heat your oil. For frying, I like to use a large skillet or a Dutch oven. Pour in enough vegetable oil to come up about an inch on the sides of the pan. Heat the oil over medium-high heat until it reaches around 350°F (175°C). You can test if it’s ready by dropping a tiny bit of the flour mixture into the oil; it should sizzle immediately.
Step 2: Mix Dry Ingredients
This step is super simple but crucial for an even coating. In your shallow bowl, make sure your flour, cornstarch, salt, and pepper are all thoroughly combined. You want to see a uniform pale color with no streaks of just flour or just cornstarch. This ensures that every piece of chicken gets that perfectly crispy exterior. Don’t skip the salt and pepper; they add a subtle depth of flavor even before the sauce goes on. I’ve learned that a good dredge makes all the difference between soggy and gloriously crispy chicken.
Step 3: Mix Wet Ingredients
In a separate bowl, whisk together your egg and milk until they’re nicely combined. The milk helps to make the coating a little more tender and golden. This egg wash acts as the glue that holds the dry ingredients onto the chicken. Make sure there are no streaks of yolk or white; a good whisking ensures a uniform coating when you dip the chicken.
Step 4: Combine
Now for the magic part: coating the chicken. After dipping your chicken pieces into the egg wash, carefully place them into the seasoned flour mixture. Toss them around gently with your hands or tongs until each piece is generously coated. Don’t overcrowd the bowl; you want to be able to get good coverage. Once coated, you can either fry them immediately or let them sit for a few minutes. I find they get a little crispier if they rest for about 5 minutes while the oil heats up.
Step 5: Prepare Filling
While the chicken is frying (or while you’re waiting for the oil to heat up), let’s get the sauce base going in a separate bowl or directly in the pan you’ll finish the dish in. Heat 2 tablespoons of vegetable oil in a large skillet or wok over medium heat. Add the minced garlic and grated ginger, and sauté for about 30-60 seconds until fragrant. Be careful not to burn the garlic! Stir in the red pepper flakes, then pour in the fresh orange juice. Let it simmer for a minute to meld the flavors. This is the foundation of our amazing sauce – bright, aromatic, and ready for the sweetness.
Step 6: Layer & Swirl
Once your chicken pieces are golden brown and crispy (this usually takes about 3-4 minutes per side, depending on size), remove them from the oil with a slotted spoon and drain them on a paper towel-lined plate. Don’t discard all that glorious oil just yet! Now, in a clean skillet or wok (or the same one, wiped clean), add the sugar, rice vinegar, soy sauce, and orange zest for the glaze. Whisk in the cornstarch and water until smooth. Bring this mixture to a simmer over medium heat, whisking constantly. It will start to thicken beautifully. Once thickened, add your Fried Chicken pieces to the pan with the sauce. Gently toss them to coat evenly. You want every single piece to be glistening with that sticky, wonderful glaze. This is where the visual magic happens – those golden chicken pieces coated in the vibrant orange sauce.
Step 7: Bake
Actually, this recipe is meant to be cooked on the stovetop and doesn’t require baking! My apologies for the slight confusion there. We’re aiming for a beautiful pan-fried, saucy finish, not a baked one. So, after you’ve tossed the chicken in the thickened glaze, continue to stir gently over low heat for another minute or two until the sauce is clinging to the chicken perfectly. This ensures the flavors really meld and the chicken stays wonderfully coated.
Step 8: Cool & Glaze
The “cooling” part for this recipe happens very briefly right after the chicken is fried and before it’s tossed in the glaze. You want the chicken to have cooled just enough so that it doesn’t steam itself soggy in the pan. Once it’s coated in the glaze, we’re serving it up! The glaze itself should be thick enough to coat without being runny. If it seems too thick, a tiny splash more orange juice or water can loosen it; if it’s too thin, simmer it a bit longer. The goal is that luscious, sticky coating that makes this dish so irresistible.
Step 9: Slice & Serve
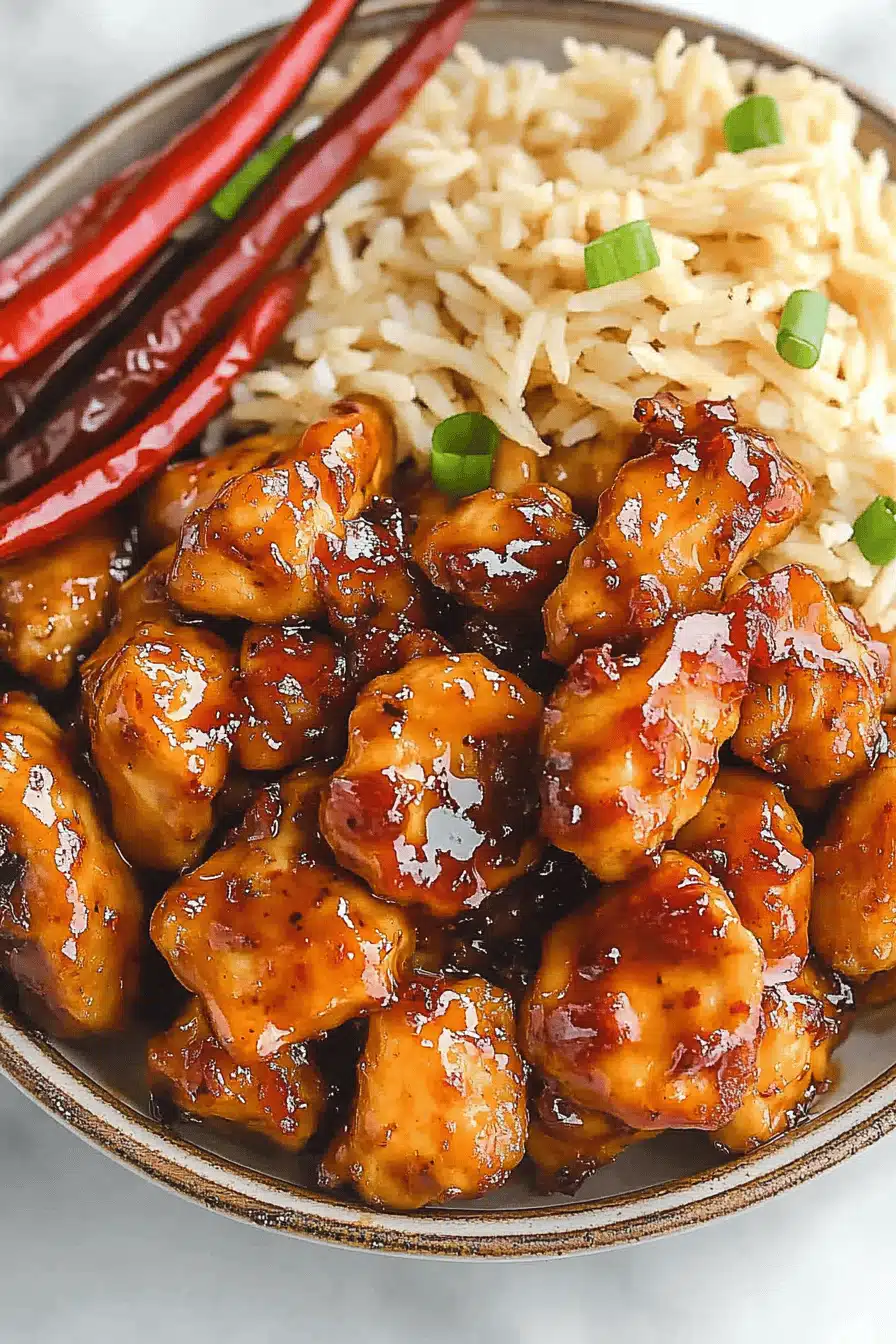
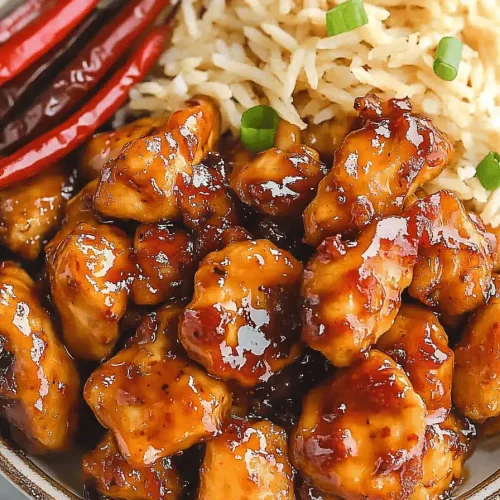
Once your Hot Orange Chicken is beautifully coated in that glossy glaze, it’s ready to be served immediately. I love to serve it hot, right from the pan, so the chicken is at its crispiest. A sprinkle of sesame seeds and some thinly sliced green onions on top adds a pop of color and a fresh, nutty flavor. This dish is best enjoyed fresh off the stove to really appreciate the texture contrast between the slightly crisp coating and the tender chicken, all bathed in that amazing sauce. It’s a showstopper, truly!
What to Serve It With
This Hot Orange Chicken is incredibly versatile, and honestly, it’s amazing just on its own. But to make it a complete meal, here are some of my favorite pairings! For a classic breakfast or brunch, it’s surprisingly fantastic alongside some fluffy scrambled eggs and maybe a side of crispy hash browns. The sweet and savory notes work wonderfully with breakfast items. If you’re serving this for brunch, I like to present it a bit more elegantly. Perhaps with some mini orange muffins or a fresh fruit salad on the side, and a mimosa or a sparkling cider to wash it all down. As a delightful dessert option – yes, I said dessert! – it’s surprisingly good served in smaller portions, maybe with a tiny dollop of coconut cream to balance the citrus. It’s a bit unconventional, but it works for those who love a sweet and savory finish. And for those cozy snack moments? Oh, this is a winner. Serve it in little bowls with some toothpicks for easy grabbing, or pile it high over some perfectly steamed white or brown rice. My family also loves it served with some crunchy snow peas or edamame on the side for a bit of freshness and texture. It’s that perfect dish that can be dressed up or down, and always brings smiles.
Top Tips for Perfecting Your Hot Orange Chicken
Over the years, I’ve learned a few tricks that make this Hot Orange Chicken recipe consistently amazing. First, about the chicken itself: using chicken thighs generally yields a more tender and forgiving result compared to chicken breasts, as they have a bit more fat and don’t dry out as easily. If you do opt for breasts, just be extra mindful not to overcook them. For that perfect crispy coating, make sure your oil is at the right temperature before adding the chicken. Too low, and it’ll be greasy; too high, and it’ll burn before cooking through. I always use a thermometer, but the little sizzle test with a speck of flour works wonders too! When it comes to the sauce, the key is to whisk the cornstarch and water together into a smooth slurry *before* adding it to the hot liquids. This prevents lumps. Also, don’t be afraid to adjust the sweetness and tanginess to your liking. If you prefer it sweeter, add a touch more sugar. If you want it tangier, a splash more rice vinegar is your friend. I’ve also experimented with different types of soy sauce; a good quality tamari can be used for a gluten-free option, though the flavor might be slightly different. For the orange juice, fresh is always best! It has a brighter, more vibrant flavor than any bottled juice. If you don’t have fresh oranges, a good quality 100% pure orange juice will work in a pinch, but you might miss that fresh zing. My biggest lesson learned? Don’t overcrowd the pan when frying the chicken. Fry in batches if necessary. This ensures each piece gets beautifully golden and crispy, rather than steaming and becoming soggy. And for that lovely glaze consistency, remember it will thicken as it cools slightly. You want it to coat the chicken beautifully, not be too watery or too thick like paste. If it gets too thick, a tiny splash of warm water or orange juice can loosen it right up. Lastly, don’t skip the orange zest! It adds an incredible aromatic depth that really elevates the orange flavor beyond just the juice.
Storing and Reheating Tips
One of the best things about this Hot Orange Chicken is that it stores remarkably well, though I’ll be honest, leftovers are rare in my house! For storing at room temperature, it’s best to let it cool completely first. Once cooled, you can leave it out for a couple of hours if you’re serving it buffet-style, but for longer storage, the refrigerator is your best bet. To refrigerate, transfer the cooled chicken and any extra sauce into an airtight container. It should keep well in the fridge for about 3-4 days. The coating will soften a bit over time, which is natural, but the flavor remains fantastic. If you plan to freeze it, I recommend storing the plain fried chicken separately from the sauce, if possible. Wrap the fried chicken pieces tightly in plastic wrap, then in foil, or place them in a freezer-safe bag or container. This way, when you reheat, you can crisp it up better. It can stay in the freezer for up to 2-3 months. For reheating, the stovetop is my preferred method. You can gently reheat the chicken in a skillet over medium-low heat, adding a little extra sauce if needed to re-coat. This helps to bring back some of that crispiness. If you froze the chicken, thaw it in the refrigerator overnight before reheating. For reheating in the oven, preheat to around 350°F (175°C) and spread the chicken on a baking sheet, ideally with the sauce, for about 10-15 minutes, or until heated through. Microwaving is the quickest option, but it tends to make the coating a bit softer. Just microwave in short intervals, stirring halfway through, until warm. The glaze is best added right before serving if you’re storing for a long time or freezing, to maintain the best texture.
Frequently Asked Questions
Final Thoughts
So there you have it – my absolute favorite Hot Orange Chicken recipe! I truly hope you give this one a try. It’s more than just a meal; it’s a little bowl of happiness that’s easy to make, packed with incredible flavor, and sure to become a staple in your home, just like it has in mine. It’s that perfect balance of comforting and exciting, proving that delicious, craveable food doesn’t have to be complicated or unhealthy. If you love this, you might also enjoy my recipe for Crispy Garlic Parmesan Chicken Wings – they have a similar crowd-pleasing appeal! I can’t wait to hear what you think once you’ve made it. Please feel free to leave a comment below and share your experience, or any amazing twists you’ve added. Happy cooking, and may your kitchen always be filled with delicious aromas!
Hot Orange Chicken
Ingredients
Chicken Marinade
- 1.5 lbs boneless, skinless chicken thighs cut into 1-inch pieces
- 2 tbsp soy sauce
- 1 tbsp cornstarch
- 0.5 tsp sesame oil
Orange Sauce
- 0.75 cup orange juice freshly squeezed is best
- 0.25 cup rice vinegar
- 3 tbsp brown sugar
- 1 tbsp soy sauce
- 1 clove garlic minced
- 0.5 tsp grated fresh ginger
- 1 tsp cornstarch
- 2 tbsp water
For Cooking and Garnish
- 2 tbsp vegetable oil
- sesame seeds for garnish (optional)
- green onions chopped, for garnish (optional)
Instructions
Preparation Steps
- In a medium bowl, combine the chicken pieces with soy sauce, cornstarch, and sesame oil. Toss to coat evenly. Let it marinate for at least 10 minutes.
- While the chicken is marinating, prepare the orange sauce. In a small bowl, whisk together orange juice, rice vinegar, brown sugar, and soy sauce.
- In a separate small bowl, whisk together 1 teaspoon of cornstarch with 2 tablespoons of water to create a slurry. Set aside.
- Heat 1 tablespoon of vegetable oil in a large skillet or wok over medium-high heat. Add the marinated chicken in a single layer (cook in batches if necessary to avoid crowding). Cook for 3-4 minutes per side, until browned and cooked through. Remove chicken from skillet and set aside.
- Add the remaining 1 tablespoon of vegetable oil to the skillet. Add the minced garlic and grated ginger and sauté for about 30 seconds until fragrant.
- Pour the prepared orange sauce mixture into the skillet. Bring to a simmer, stirring constantly. Once simmering, slowly whisk in the cornstarch slurry. Continue to cook, stirring, until the sauce thickens, about 1-2 minutes.
- Return the cooked chicken to the skillet. Toss to coat the chicken evenly with the thickened orange sauce. Cook for another minute to heat through.
- Serve immediately, garnished with sesame seeds and chopped green onions, if desired. This dish is great served over rice.