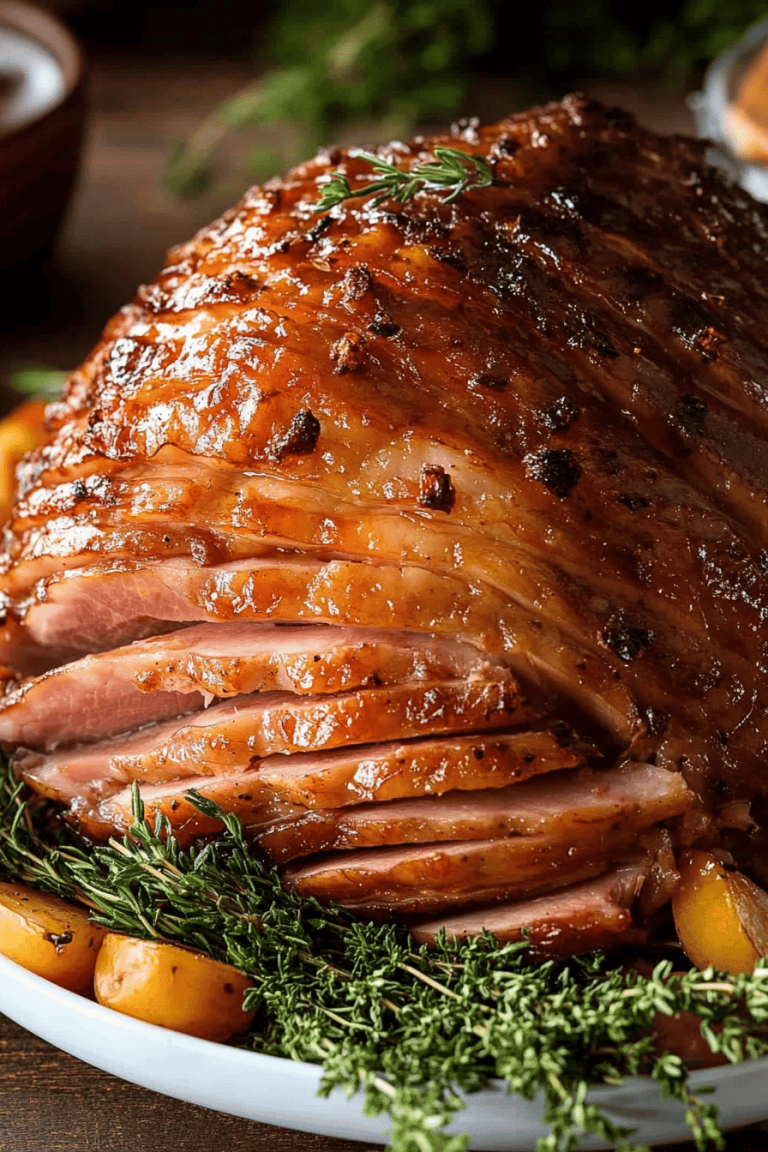
It all started on a chilly Tuesday when I forgot to plan dinner and found a lonely bag of chicken thighs stashed in the back of the fridge. I dug around and came up with a sauce that sizzled in the skillet and filled the kitchen with a perfume of garlic and honey that could wake the entire house. My mother walked in, inhaled the scent, and declared, “That smells like a little party in a pan.” That moment became my cheat-sheet for weeknight meals: simple ingredients, big flavor, and a little glow of nostalgia. This honey garlic chicken thighs dish is essentially a go-to you can lean on when you’re short on time but want something that tastes like you fussed over it all day. It’s a crowd-pleaser, a kid-pleaser, and it pairs with everything from rice to mashed potatoes to a crisp green salad. The scent alone draws everyone to the kitchen, and the glaze? It’s sticky, shiny, and irresistible in the best way.
What is honey garlic chicken thigh?
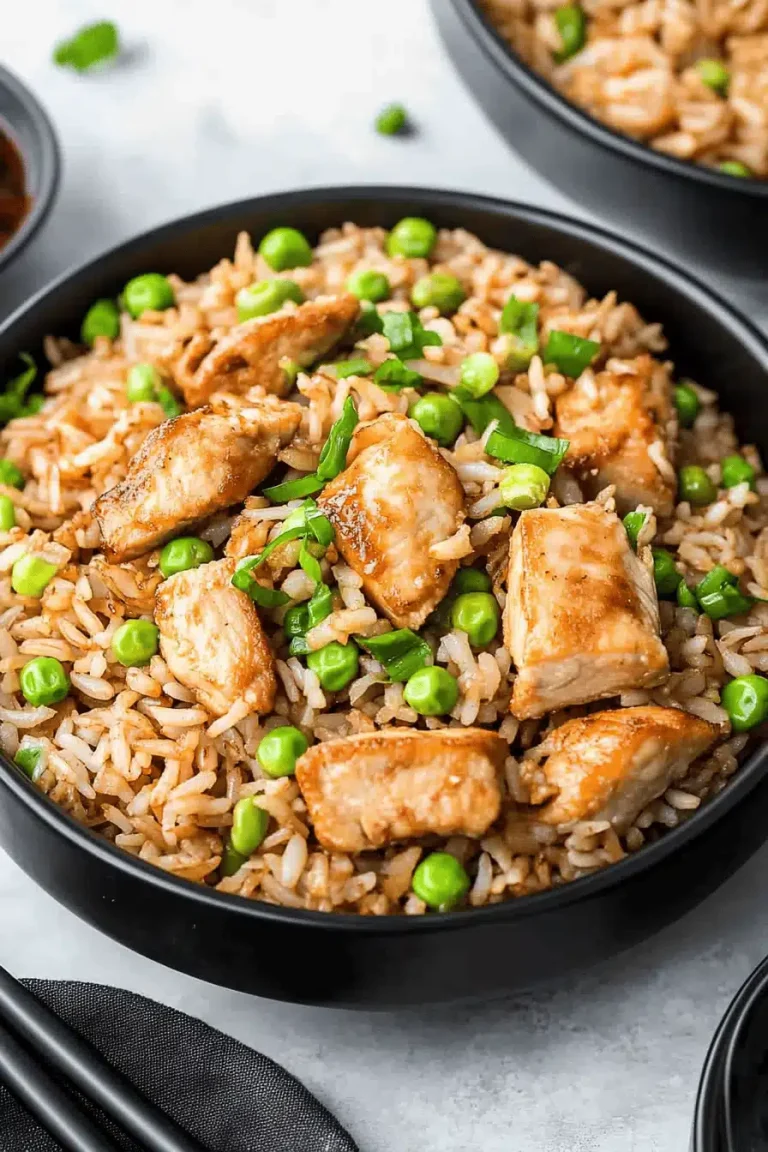
Think of honey garlic Chicken Thighs as the warm, savory sibling to your favorite takeout glaze. It’s essentially pieces of chicken thighs—juicy and forgiving—swimming in a glossy, garlic-forward honey sauce that caramelizes softly as it cooks. The name says it all: honey for sweetness, garlic for punch, and chicken thighs for that deep, satisfying bite. I love that the method is approachable enough for a weeknight, yet impressive enough to serve to friends. My kids actually ask for seconds, and I’m never apologizing for the sauce, which clings to the meat in a way that makes each bite feel special. My friends always ask for this recipe when they need something fast but still comforting—the kind of dish that tastes like you spent hours in the kitchen, even when it took less than 30 minutes from start to finish.
Why you’ll love this recipe?
What I love most about this honey garlic Chicken Thighs is how forgiving it is without sacrificing that glossy, restaurant-worthy finish. It hits that sweet-savory sweet-umami balance that makes you reach for a second helping. Here are the big reasons this one’s a staple in my kitchen:
- Flavor: The moment the garlic hits the hot skillet, you can smell it before you taste it—garlic becomes a waltz with honey, a little tang from soy and a kiss of sesame. It’s a flavor profile you’ll recognize instantly and crave again and again.
- Simplicity: One pan, quick sear, quick simmer, and you’re done. It’s the sort of recipe I reach for when I’m cooking after the gym or when I’m running late and still want something comforting on the table in minutes.
- Cost-efficiency: What is the best way to measure cost-efficiency?: Chicken thighs are wallet-friendly, and the glaze relies on pantry staples. You’ll be surprised by how affordable luxury can taste
- Versatility: This dish works with brown rice, cauliflower rice, roasted potatoes, or a bright salad. It’s equally at home with a quiet weeknight dinner or a playful weekend dining-it-together vibe.
- Make-ahead potential: You can prep the glaze in advance and coat the chicken just before cooking—perfect for meal-prep Sunday or bringing a dish to a potluck.
People often tell me they’re surprised by how close this tastes to their favorite takeout but with a cleaner ingredient list. When I first tested this, I swapped in a splash of rice vinegar for brightness and found the glaze intensely luscious without tipping into sweetness overload. It’s become the dish I’ll cook when I want a hug in a skillet, hot and bubbling, with that comforting sizzle you hear as you plate. If you’re craving something that’s familiar yet deeply satisfying, this Honey garlic chicken thighs recipe is a dependable friend in the kitchen.
How to Make Honey Garlic Chicken Thighs
Quick Overview
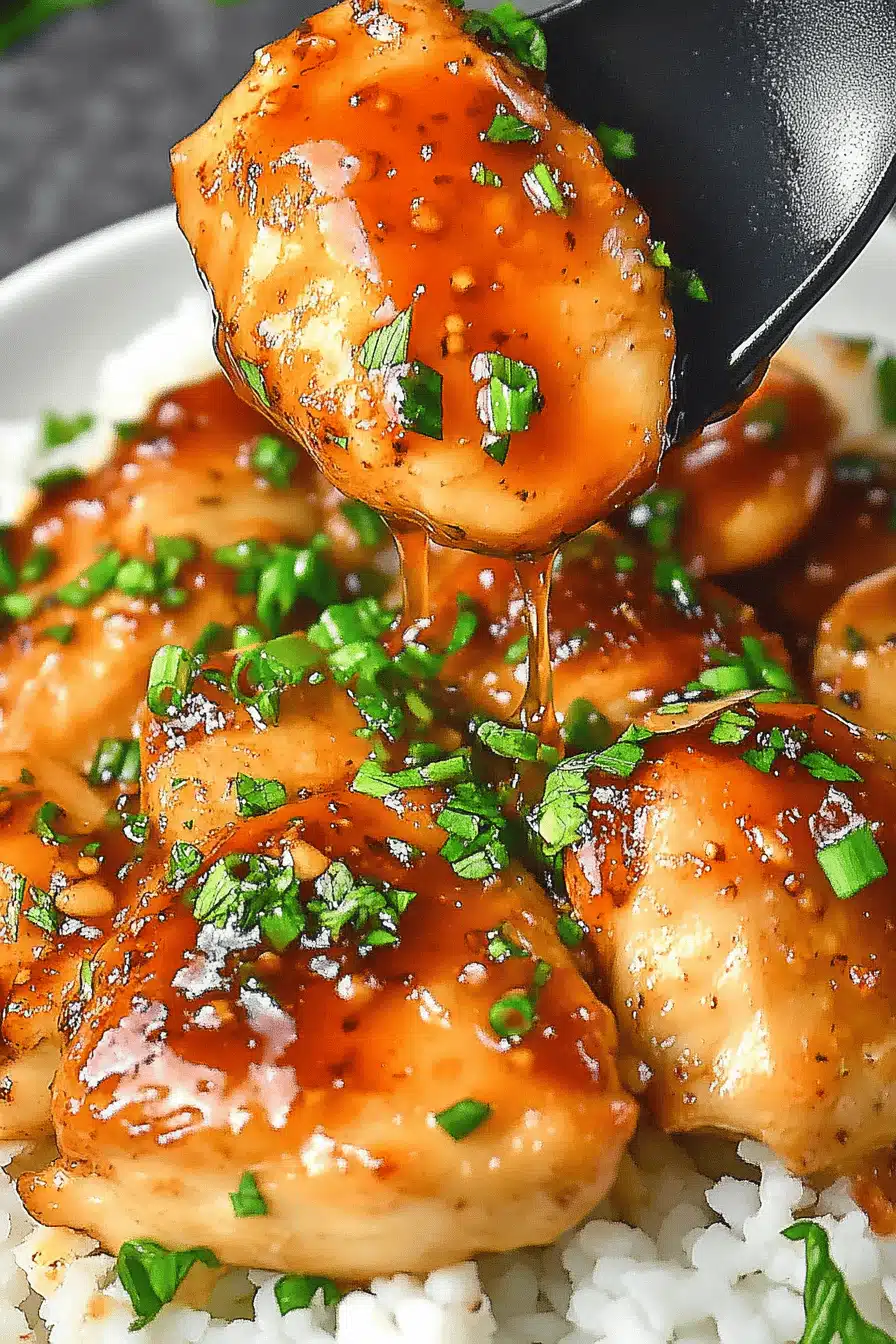
In a hot skillet, you’ll sear bone-in skin-on chicken thighs until the skin is bronzed and crisp. Then, you pour in a simple glaze of honey, soy, garlic, and a splash of vinegar, letting it simmer until it thickens into a sticky, lacquer-like coating. The finish is a glossy, caramelized glaze that clings to every curve of the meat. The beauty of this method is its small footprint—only one pan, minimal fuss, and a sauce that makes you look like you spent ages perfecting it. The result is juicy thighs with a kiss of sweetness and garlic that lingers—perfect for spooning over rice or mashed potatoes, and absolutely killer with roasted veggies on the side.
Ingredients
For the Main Batter:
- 8 bone-in, skin-on chicken thighs (about 2 pounds). If you’re avoiding skin, you can remove it, but I find the crispy skin adds texture and flavor that’s hard to resist.
- Salt and freshly ground black pepper, to taste
- 1 tablespoon cornstarch (optional, for extra crispiness if you sear first and then glaze)
- 1 tablespoon neutral oil (like canola or vegetable) for searing
For the Filling:
- 3-4 cloves garlic, minced (you’ll smell it as soon as it hits the pan—heaven)
- 1/4 cup soy sauce or tamari for gluten-free option
- 3 tablespoons honey (or maple syrup for a maple note)
- 2 tablespoons rice vinegar or apple cider vinegar
- 1 teaspoon sesame oil (optional, but it adds a lovely aromatic finish)
- 1/4 teaspoon red pepper flakes (optional for a gentle kick)
For the Glaze:
- 2 tablespoons honey (plus extra if you like it extra sticky)
- 1 tablespoon soy sauce or tamari
- 1 teaspoon Dijon or spicy mustard (optional, for depth)
- 1 tablespoon water or chicken stock to loosen, if needed
- Sesame seeds and chopped scallions for garnish
Step-by-Step Instructions
Step 1: Preheat & Prep Pan
Heat a large skillet over medium-high heat. Pat the chicken dry—this is the tiny trick that makes the skin crisp. Sprinkle with salt and pepper, then lightly dust with a touch of cornstarch if you’re aiming for extra crunch. Add a tablespoon of oil to the pan, letting it shimmer but not smoke. You want a steady sizzle, not a loud pop, as the thighs hit the surface. This is the moment when your kitchen starts to smell like a small celebration.
Step 2: Sear the Chicken
Lay the thighs skin-side down and let them sear undisturbed for 6-8 minutes until the skin is deeply bronzed and releasing easily from the pan. Flip and cook another 4-6 minutes on the other side. If your pan is hot enough, you’ll hear a satisfying crackle as the fat renders and the meat starts to look irresistibly glossy. Remove the chicken to a plate and let it rest while you whisk up the glaze.
Step 3: Prepare the Filling
In the same pan, lower the heat a touch and add the minced garlic. Sauté for about 30 seconds until you can smell the perfume of garlic waking up. Pour in the sauce mixture (soy, honey, vinegar, sesame oil, and optional red pepper flakes). Stir and simmer for 1-2 minutes so the flavors melt together and the sugar begins to wake up. You want a loose liquid that will cling to the thighs but won’t be too thin to coat them.
Step 4: Combine
Return the chicken to the pan, nestling it into the garlic-soy-honey bath. Spoon the glaze over each piece and simmer for 6-8 minutes, turning once or twice, until the sauce thickens to a lacquer-like glaze that coats the thighs beautifully. If you like extra cling, whisk in a teaspoon of cornstarch dissolved in a tablespoon of water and cook for another minute or two until glossy and thick.
Step 5: Prepare Filling Flavors
As the glaze reduces, taste for balance. If you want more brightness, splash in a little more vinegar. If you want more sweetness, add a touch of honey. I love a slightly tangy edge—the balance is what makes the glaze sing. Optional sesame seeds sprinkled in at the end provide a toasty crunch, and sliced scallions give a fresh bite and color.
Step 6: Layer & Swirl
If you’re cooking for a crowd, you can remove the thighs to a warm platter and swirl the remaining glaze a few times to redistribute the caramel. Then spoon it back over the meat for an even glaze. The goal is a uniform sheen with a few glossy drips for visual appeal. This step is small but mighty for presentation; a little swirl goes a long way.
Step 7: Bake
In this version, you don’t necessarily need to bake, since you’re finishing the sauce on the stovetop. If you’d like extra crisp skin or want to ensure everything stays hot in a busy dinner, transfer the pan to a preheated oven at 375°F (190°C) for 5-7 minutes to finish. The chicken should reach an internal temperature of 165°F (74°C). If you’re using boneless thighs, you may shave a couple of minutes off the time.
Step 8: Cool & Glaze
Give the chicken a quick rest on a warm plate for 3-5 minutes. This locks in juices and makes slicing easier. Drizzle any remaining glaze from the pan over the thighs—this is where the dish becomes a glossy, sticky masterpiece that’s hard to resist. If you plated it a moment ago, you’ll notice a color that’s almost caramel with a ruby-red tint from the garlic and honey. It’s comforting and a little glam at the same time.
Step 9: Slice & Serve
Carve near the bone for maximum tenderness, or serve the thighs whole if you’re feeding a crowd. A sprinkle of sesame seeds and chopped scallions on top looks pretty and adds a crisp bite. I like to serve this with fluffy white rice that soaks up every last drop of glaze, a side of lightly steamed broccoli or green beans, and a wedge of lemon on the side for brightness. The last bite should taste like a hug with a little zing.
What to Serve It With
When I think about pairing this honey garlic chicken thighs, the whole table lights up. It works with so many sides, and you can tailor it to the vibe you’re after. Here are a few go-to combos I rotate through:
For Breakfast: If you’re turning leftovers into a late-m breakfast, drop a couple of thighs over a warm bowl of soft-pearl barley or quinoa, add a soft fried egg, and finish with a light scatter of chives. The savory depth of the glaze pairs surprisingly well with a morning dose of greens, and the scent alone is a wake-up call for the whole family.
For Brunch: Build a laid-back brunch board: have small bowls of steamed rice, a crisp cucumber salad, and roasted potatoes. Place the honey garlic chicken thighs on a warm serving platter, drizzle with any remaining glaze, and offer a squeeze of lime. A glass of sparkling water with lemon or a light citrusy white wine works beautifully here.
As Dessert: Okay, not dessert—this is one of those “savory finish” moments—but I’ve seen folks use the glaze to glaze grilled pineapple for a warm, sweet-savory bite after a hearty main. It’s a wild but surprisingly good pairing if you’re in the mood for contrasts.
For Cozy Snacks: Make little sliders with pillowy brioche buns, a quick pickle, and a dab of coleslaw. The glaze sticks to the meat in the most delicious way, and you’ll find yourself nibbling with friends until the platter disappears.
My family loves this served with simple roasted veggies, or over a bed of fluffy jasmine rice for a clean, fragrant contrast. The sauce clings so beautifully that there’s hardly a drop left in the pan by the time we’re done eating. It’s a little ritual in our home: everyone leans in for seconds, the kitchen thrum of conversation grows louder, and I’m reminded why I keep teaching this recipe to new cooks—the simple things, done well, become the best memories.
Top Tips for Perfecting Your Honey Garlic Chicken Thighs
These little tweaks make a big difference, and they’re the kinds of details I’ve learned after many dinners in the trenches. Here are my favorite tips, organized by technique:
Zucchini Prep: If you’re mixing in a veggie side that’s a touch watery, you can sauté shredded zucchini and onions in the same pan before searing the chicken. Let them cook down to release moisture first, then push them to the side and start again with the chicken. Not necessary, but it helps if you’re aiming for a lighter texture on the plate without losing flavor.
Mixing Advice: Don’t overwork the glaze. A quick simmer is enough to wake up the flavors; over-reducing can make it stick too aggressively and risk burning. Taste as you go and adjust with a splash more vinegar for brightness or a touch more honey for gloss.
Swirl Customization: Want pattern and color? Drizzle a tiny bit of extra glaze in a zigzag or swirl pattern on the chicken off the heat for a glossy finish. A sprinkle of sesame seeds creates a little speckled appearance that looks professional on a plate.
Ingredient Swaps: You can switch tamari for gluten-free needs, use maple syrup instead of honey for a different sweetness profile, or add a teaspoon of grated ginger for a zingy, warm backdrop. I’ve done all of these and found each variation delicious in its own way.
Baking Tips: If your oven runs hot, bake at 350°F (175°C) instead of 375°F and extend the resting time a couple of minutes. This helps keep the chicken tender while letting the glaze set just right. positioning the pan toward the center rack also helps with even browning.
Glaze Variations: For a more plant-friendly glaze, swap honey for agave nectar, or add a splash of citrus juice (orange or lime) to introduce brightness. If you want more heat, toss in a dash of chili oil or a pinch of chili flakes. The glaze should feel sticky, not syrupy, and it should cling to the chicken like a second skin.
In my kitchen, I’ve learned to trust the glaze to tell me when it’s ready: it should coat the chicken lazily at first, then steadily thicken as it rides the heat. If you hear a lot of crackling, you’re a hair away from burnt sugar—pull back and give it a minute to calm down. The best batches come from your sense of smell and a quick eye for gloss—this is where memory and technique meet, and it’s pure joy.
Storing and Reheating Tips
This dish holds up beautifully for make-ahead meals, and it reheats surprisingly well. Here’s how I keep it fresh and flavorful for days after cooking:
Room Temperature: Not recommended for more than 2 hours. If you’re serving later, refrigerate promptly after the dish cools a bit to safe temperature and reheat later.
Refrigerator Storage: Store in an airtight container for up to 4 days. Keep the glaze separate if you plan to reheat; you can spoon it over the chicken just before serving to preserve the shine.
Freezer Instructions: While best fresh, you can freeze individual chicken thighs in the glaze for up to 2 months. Thaw in the fridge overnight, then reheat in a skillet with a splash of water to loosen the glaze as needed.
Glaze Timing Advice: If you’re reheating, you can add a touch of honey or a splash of stock during the simmer to refresh the glaze’s gloss and ensure it clings again to the meat.
In my experience, leftovers are never boring with this dish. A quick reheat on the stovetop, a few extra breadcrumbs on a few veggies, and you’ve got another dinner worth talking about. The first bite still tastes like a little celebration, and that’s what keeps me turning back to this recipe—because you deserve delicious, even on busy days.
Frequently Asked Questions
Final Thoughts
There’s something about honey garlic chicken thighs that feels like a well-loved blanket: warm, reassuring, and just the right amount of sweet and savory to make you feel cozy from the inside out. It’s the dish I pull from the back of the fridge when I want to feed a crowd without breaking a sweat, and it’s the one I reach for when I want a little “wow” without a lot of effort. If you’re new to this recipe, give it a try with bone-in thighs first—the bone adds flavor and keeps the meat incredibly juicy. If you’re cooking for kids, consider a milder glaze by keeping the red pepper flakes optional and serving with a side of rice or mashed potatoes. And if you’re dining solo, this is perfect for a comforting dinner that also freezes beautifully for another rainy day. I’ve made this countless times and it never fails to land with a warm, happy sigh around the table. My kids ask for seconds, and honestly, I’m happy to share the pan with them.
Want more family-tested, one-pan ideas? You might enjoy revisiting a citrusy garlic chicken, a maple-sesame version, or a simple herb-roasted skillet that plays nicely with greens. I’m always tinkering in the kitchen, chasing a new balance of flavor and ease, but this honey garlic chicken thighs remains a trusted favorite—the kind you’ll pass down, spoon in hand, decades from now. Happy cooking, friend, and I can’t wait to hear how yours turns out!