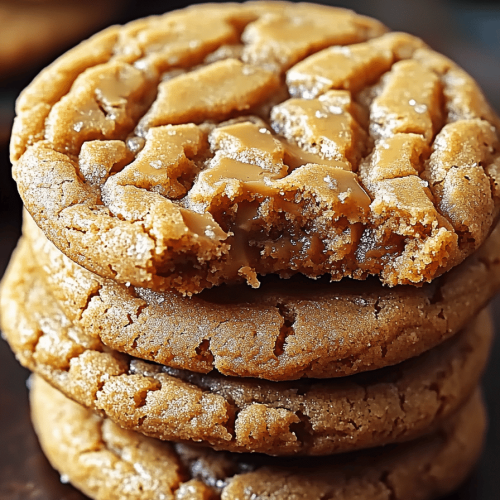
Oh, you guys. I’ve been wanting to share this recipe with you for *ages*. It’s one of those that feels like a warm hug, the kind that instantly transports me back to my grandma’s kitchen, the air thick with the sweet, buttery scent of baking. If you’ve ever dreamed of a cookie that’s perfectly crisp on the edges, delightfully tender in the center, and just melts in your mouth with pure, unadulterated buttery goodness, then you’ve found your holy grail. These aren’t just any cookies; these are my homemade butter cookies, and they are, dare I say, utterly perfect. Forget those fancy, complicated desserts that take hours. This is the real deal, simple and pure. They remind me a bit of those classic Shortbread Cookies, but with an added layer of melt-in-your-mouth magic that’s truly special. I always make a double batch around the holidays, but honestly, they’re too good to save for just one season. My kids practically beg for them all year round!
What is a butter cookie?
So, what exactly are these glorious little rounds of happiness? Think of them as the ultimate comfort cookie. They’re a simple, classic cookie, built on the foundation of really good butter, flour, sugar, and a touch of magic (okay, mostly just technique!). The name itself, “homemade butter cookies,” is pretty straightforward, but it hints at the pure, unadulterated flavor we’re going for. It’s about celebrating the star ingredient – butter – and letting it shine. There are no fancy add-ins here, no complex steps. It’s essentially a beautifully executed, melt-in-your-mouth, slightly sweet, wonderfully rich cookie that’s incredibly satisfying. They’re not overly sweet, which is what I love about them. They’re more about that pure, creamy, buttery taste that just makes you happy. They’re the kind of cookie you can pair with anything, from a strong cup of coffee to a glass of milk, and it just works.
Why you’ll love this recipe?
Honestly, where do I even begin? There are so many reasons why this homemade butter cookie recipe has become a staple in my kitchen. First off, the flavor is just out of this world. It’s a deep, rich, buttery taste that’s so satisfying. It’s not overly sweet, which I think is key. It’s that perfect balance that makes you want just one more… and then maybe one more! And then there’s the texture. Oh, the texture! They have this delightful crispness around the edges that gives way to a wonderfully tender, almost crumbly center that just dissolves on your tongue. It’s pure heaven.
Beyond the incredible taste and texture, the simplicity of this recipe is a lifesaver. On busy weeknights when a sweet craving hits, or when unexpected guests pop by, I can whip these up without breaking a sweat. Most of the ingredients are pantry staples, so I rarely have to make a special trip to the store. And speaking of ingredients, they’re incredibly budget-friendly! You don’t need anything fancy or expensive to make these amazing cookies.
What really sets these apart for me, though, is their versatility. They’re fantastic on their own, of course, but they also make a wonderful base for other flavors. You can easily add a hint of vanilla bean paste, a touch of citrus zest, or even some finely chopped nuts. They’re perfect for dipping in chocolate or dunking in your morning coffee. I’ve even seen them used as little edible gifts, tied up with a pretty ribbon. They’re just so adaptable!
Plus, there’s something incredibly rewarding about making something so delicious from scratch. It feels special. When my kids take their first bite and their eyes light up, that’s pure joy for me. They’re so much better than any store-bought cookie, and the fact that they’re homemade butter cookies makes them taste even sweeter. I’ve experimented with other Cookie Recipes over the years, but I always come back to this one. It’s tried, it’s tested, and it’s loved by everyone who tries it.
How do I make homemade butter cookies?
Quick Overview
Making these homemade butter cookies is surprisingly straightforward! You’ll start by creaming together softened butter and sugar until light and fluffy, then whisking in an egg and vanilla. After that, it’s just a matter of gently incorporating your dry ingredients until a soft dough forms. The dough chills briefly to make it easier to handle, then you’ll roll it into logs, slice, and bake until golden. It’s a simple, satisfying process that yields incredibly delicious results. The key is not to overwork the dough, ensuring those tender, melt-in-your-mouth qualities we’re after.
Ingredients
For the Main Batter:
- 2 cups (4 sticks or 454g) unsalted butter, softened: This is the star, so use good quality butter! Make sure it’s truly softened, not melted or cold. I usually leave mine out on the counter for about an hour or two, depending on how warm my kitchen is.
- 1 cup (200g) granulated sugar: This provides sweetness and helps with the crispness. Don’t skimp!
- 1 teaspoon pure vanilla extract: Use the good stuff! It really makes a difference in the flavor profile.
- 1 large egg: This acts as a binder. Make sure it’s at room temperature for easier incorporation.
- 3 cups (375g) all-purpose flour: Spooned and leveled. I use unbleached all-purpose flour for best results.
- 1/2 teaspoon salt: Balances the sweetness and enhances the butter flavor.
Step-by-Step Instructions
Step 1: Preheat & Prep Pan
Preheat your oven to 350°F (175°C). Line baking sheets with parchment paper. This step is crucial for preventing sticking and ensuring even browning. If you don’t have parchment paper, you can lightly grease your baking sheets, but parchment is definitely my preferred method for easy cleanup and perfect cookies.
Step 2: Mix Dry Ingredients
In a medium bowl, whisk together the all-purpose flour and salt. Whisking ensures that the salt is evenly distributed throughout the flour, so you don’t get any salty pockets in your cookies. Set this aside for now.
Step 3: Mix Wet Ingredients
In a large bowl, using an electric mixer (stand mixer or hand mixer), cream together the softened butter and granulated sugar on medium-high speed until light and fluffy, about 3-5 minutes. This process incorporates air, which is important for the cookie’s texture. Scrape down the sides of the bowl as needed. Then, beat in the egg and vanilla extract until well combined. The mixture should look smooth and emulsified.
Step 4: Combine
Gradually add the dry ingredients to the wet ingredients, mixing on low speed until just combined. Be careful not to overmix! Overmixing can develop the gluten in the flour, resulting in tougher cookies. Stop mixing as soon as you no longer see streaks of flour. The dough will be soft and slightly sticky.
Step 5: Prepare Filling
(This recipe doesn’t typically use a separate filling, but if you wanted to add something like a swirl of jam or chocolate chips, you’d prepare it here. For plain butter cookies, this step is skipped.)
Step 6: Layer & Swirl
(This step is for recipes that involve marbling or layering, like a swirl cookie. For these classic butter cookies, you’ll be shaping the dough differently.)
Gather the dough together. You can either gently knead it a few times on a lightly floured surface to bring it together, or simply press it into a cohesive ball in the bowl. The dough should be firm enough to handle but still soft.
Step 7: Bake
Turn the dough out onto a lightly floured surface. Divide the dough in half. Shape each half into a log about 1.5 to 2 inches in diameter. Wrap the logs tightly in plastic wrap and refrigerate for at least 30 minutes (or up to 2 days). Chilling makes the dough firm enough to slice cleanly without smearing. Once chilled, unwrap the logs and slice them into 1/4-inch thick rounds. Place the cookies about 1 inch apart on the prepared baking sheets. Bake for 10-14 minutes, or until the edges are lightly golden brown and the centers look set. They won’t spread a ton, which is lovely. Keep an eye on them, as ovens can vary!
Step 8: Cool & Glaze
Let the cookies cool on the baking sheets for 5 minutes before transferring them to a wire rack to cool completely. If you choose to glaze them, wait until they are completely cool. For a simple glaze, whisk together about 1 cup of powdered sugar with 1-2 tablespoons of milk or lemon juice until you reach your desired consistency. Drizzle over the cookies.
Step 9: Slice & Serve
Once cooled (and glazed, if using), these homemade butter cookies are ready to be enjoyed! They’re best served at room temperature. They look so pretty stacked on a plate. Enjoy every melt-in-your-mouth bite!
What to Serve It With
These homemade butter cookies are so wonderfully versatile, they truly fit in anywhere!
For Breakfast: They’re fantastic alongside a hot cup of coffee or tea. The buttery richness is a perfect complement to a warm beverage to start your day. I love to just have one or two with my morning brew while I catch up on emails. They’re not overly sweet, so they don’t feel like a dessert at breakfast.
For Brunch: For a slightly more elegant touch, arrange them on a tiered stand with other pastries, fruits, and perhaps some mini quiches. They add a lovely homemade touch to any brunch spread. They look especially pretty when dusted lightly with powdered sugar before serving.
As Dessert: These cookies are divine served alongside a scoop of vanilla bean ice cream or with a simple Fruit Salad. They also make a wonderful addition to a cookie platter for any gathering. If you’re feeling ambitious, a light drizzle of melted dark chocolate is also a fantastic touch.
For Cozy Snacks: This is where they truly shine for me! After the kids are in bed, a quiet moment with a few of these cookies and a glass of milk or a cup of herbal tea is pure bliss. They’re the perfect pick-me-up when you need a little something sweet but don’t want anything too heavy.
My family has a tradition of making a big batch of these around movie nights. We’ll all gather on the couch, and these cookies are always the star of the snack table. They disappear so fast!
Top Tips for Perfecting Your Homemade Butter Cookies
I’ve been making these homemade butter cookies for years, and I’ve learned a thing or two along the way. Here are my top tips to help you achieve cookie perfection:
Butter Quality Matters: I can’t stress this enough. Using good quality unsalted butter really makes a difference in the final flavor. Make sure it’s properly softened – not melted, not cold, but just yielding to the touch. This ensures it creams properly with the sugar, creating that light texture.
Don’t Overmix the Dough: This is probably the most common mistake people make with butter cookies. Once you add the flour, mix *just* until combined. A few streaks of flour are okay; they’ll disappear during the chilling and baking. Overmixing develops the gluten, which leads to tough, dense cookies instead of the tender, melt-in-your-mouth ones we’re aiming for.
Chill is Key: Don’t skip the chilling step! Chilling the dough in log form for at least 30 minutes makes it firm enough to slice cleanly. If the dough is too soft, it will smudge and your cookies won’t have those neat, defined edges. You can even make the logs a day or two in advance and keep them in the fridge, ready to bake whenever the craving strikes.
Consistent Slices: Use a sharp knife to slice the chilled dough logs into uniform rounds. This ensures that all your cookies bake at the same rate. Aim for about 1/4-inch thickness. If some are thinner and some thicker, you’ll have some overbaked and some underbaked cookies.
Watch Them Closely: Ovens can be tricky! The baking time of 10-14 minutes is a guideline. Keep an eye on your cookies, especially during the last few minutes. You want to pull them out when the edges are just starting to turn a light golden brown. The centers should look set, not wet. They’ll continue to firm up as they cool on the baking sheet.
Ingredient Swaps: While this recipe is wonderful as is, I’ve had success with a few tweaks. If you’re making these gluten-free, a good quality 1:1 gluten-free flour blend usually works well, but you might need to adjust the chilling time slightly. For a richer flavor, you can add a tiny pinch of almond extract along with the vanilla, but don’t overdo it, or it can overpower the butter.
Cooling is Crucial: Let the cookies cool on the baking sheet for about 5 minutes before transferring them to a wire rack. This allows them to set up properly. If you try to move them too soon, they might fall apart. Patience is rewarded here!
Storing and Reheating Tips
Proper storage is essential for keeping these homemade butter cookies tasting their best. Thankfully, they store quite well!
Room Temperature: Once completely cooled, these cookies can be stored in an airtight container at room temperature for up to 5 days. I like to place a piece of wax paper or parchment paper between layers if I’m stacking them to prevent them from sticking together, especially if they’re glazed.
Refrigerator Storage: While they’re perfectly happy at room temperature, if your kitchen is particularly warm or humid, you can refrigerate them. Store them in an airtight container. They’ll retain their quality for about a week. Just be aware that they might firm up a bit in the fridge; letting them come to room temperature for about 15-20 minutes before serving will restore their ideal texture.
Freezer Instructions: These cookies freeze beautifully! Wrap the completely cooled cookies tightly in plastic wrap, then place them in a freezer-safe airtight container or a heavy-duty freezer bag. They can be stored in the freezer for up to 2-3 months. To thaw, simply transfer them to the refrigerator overnight, or leave them at room temperature for a couple of hours.
Glaze Timing Advice: If you plan to glaze your cookies, it’s best to do it just before serving or shortly after they’ve cooled if you’re storing them at room temperature. Glazed cookies can become a bit sticky if stored in a sealed container for too long, especially in warmer temperatures. If freezing, I often prefer to glaze them *after* they’ve thawed, or skip the glaze altogether and just dust with powdered sugar once thawed.
Frequently Asked Questions
Final Thoughts
I truly hope you give these homemade butter cookies a try. They’re more than just a recipe to me; they’re a little slice of happiness that brings so much joy. The fact that they’re so simple to make, yet yield such incredible results, is just the icing on the cake (or, well, the glaze on the cookie!). They are perfect for any occasion, from a special celebration to just a quiet moment with a cup of tea.
If you love these, you might also enjoy my recipe for classic shortbread or my buttery pecan sandies. They share a similar spirit of simple, elegant, and utterly delicious baking.
I can’t wait to hear what you think! Please leave a comment below and let me know how your homemade butter cookies turned out, or if you have any fun variations you tried. Happy baking, everyone!
Homemade Butter Cookies
Ingredients
Main Ingredients
- 1 cup unsalted butter, softened
- 0.75 cup granulated sugar
- 1 large egg yolk
- 1 teaspoon vanilla extract
- 1 teaspoon almond extract
- 0.25 teaspoon kosher salt
- 2 cups all-purpose flour
Optional Toppings
- 1 cup dark chocolate melting wafers or white chocolate wafers
- 0.5 cup sprinkles
Instructions
Preparation Steps
- Preheat your oven to 375 degrees F (190 degrees C). Line a baking sheet with parchment paper or a silicone baking mat.
- In a large mixing bowl, cream together the softened butter and granulated sugar until light and fluffy. Beat in the egg yolk, vanilla extract, almond extract, and kosher salt until well combined.
- Gradually add the all-purpose flour to the butter mixture, mixing until just combined and a soft dough forms. Be careful not to overmix.
- Use a small cookie scoop (about 1 tablespoon) to drop portions of the dough onto the prepared baking sheet, spacing them about 2 inches apart. Alternatively, you can use a piping bag fitted with a large star tip to pipe decorative shapes.
- If piping the cookies, you may need to add 1-2 tablespoons of milk to the dough to achieve a smoother, more pipeable consistency.
- Bake for 10-12 minutes, or until the edges of the cookies are lightly golden brown. The centers should still appear slightly soft.
- Remove the cookies from the oven and let them cool on the baking sheet for a few minutes before transferring them to a wire rack to cool completely.
- Optional: Melt the chocolate wafers according to package directions. Dip the cooled cookies halfway into the melted chocolate and decorate with sprinkles, if desired. Allow the chocolate to set before serving.