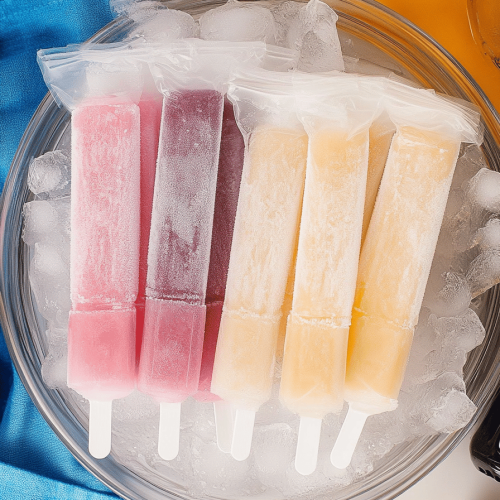
I’m so excited to share this with you! You know how sometimes you just get a craving, something cold and sweet, but you don’t want to go through the whole ordeal of baking a cake or even whipping up a fancy Ice Cream? That’s exactly where this recipe for fruit pops comes in. Honestly, it’s become my go-to for those moments, and it’s ridiculously simple. Think of it as the grown-up, slightly sophisticated cousin of the ice pops you had as a kid, but with way more flavor and none of that artificial nonsense. My kids absolutely adore them, and I love knowing exactly what’s going into them. They’re perfect for a hot afternoon, a light dessert, or even a little treat with your morning coffee if you’re feeling adventurous like me! It’s the kind of recipe that makes you feel like a kitchen wizard without actually breaking a sweat.
What are fruit pops?
So, what exactly are these glorious fruit pops? At their core, they’re just frozen fruit purees blended with a touch of sweetness and maybe a little something extra to make them perfectly smooth and incredibly refreshing. The name itself is pretty straightforward, right? But what makes them special is how versatile they are. You can use literally any fruit you have on hand – berries are fantastic, mangoes are divine, even just a simple blend of melon can be wonderfully invigorating. It’s essentially taking the vibrant, natural flavors of fresh fruit and capturing them in a portable, frozen treat. Think of it as a healthy, homemade popsicle without the added sugars and artificial colors you often find in store-bought versions. It’s pure fruit goodness, chilled to perfection.
Why you’ll love this recipe?
There are so many reasons why I’ve made this fruit pops recipe a staple in my kitchen, and I just know you’re going to fall in love with it too! First off, the **flavor** is absolutely out of this world. When you use ripe, in-season fruit, you get this incredible burst of natural sweetness and a depth of flavor that’s hard to beat. It’s not overly sweet; it’s just pure, bright fruitiness. Then there’s the **simplicity**. Seriously, you can whip these up in about ten minutes, and the rest is just waiting for them to freeze. It’s a lifesaver on busy weeknights when everyone’s asking for a snack and you just don’t have the energy for anything complicated. Plus, they’re incredibly **cost-effective**. Buying a few pounds of fresh or frozen fruit is usually much cheaper than buying pre-made frozen treats, and you get so much more bang for your buck. The **versatility** is another huge win. You can mix and match fruits, add a squeeze of lime for tang, a bit of honey for extra sweetness, or even a hint of mint for a refreshing twist. I’ve even experimented with adding a splash of coconut milk to some batches, and it made them extra creamy and delicious! It’s a recipe that truly grows with you and your tastes. It’s definitely a healthier alternative to many store-bought sweets, and that’s something I always feel good about serving to my family.
How do you make fruit pops?
Quick Overview
Making these fruit pops is a breeze! You’ll essentially be blending your chosen fruits until smooth, adding a touch of sweetener if needed, pouring them into popsicle molds, and letting them freeze solid. The beauty of this method is its straightforwardness. There are no complicated steps, no fussy techniques, just pure fruit deliciousness coming together. It’s the kind of recipe you can easily involve kids in, making it a fun activity for the whole family.
Ingredients
For the main fruit base:
* 4 cups of your favorite fruit (fresh or frozen works great! Berries, mangoes, peaches, bananas – mix and match!)
* 2-4 tablespoons honey, maple syrup, or agave nectar (adjust to your sweetness preference and the fruit’s natural sweetness)
* 1/4 cup water or fruit juice (like orange or apple juice, optional, to help with blending if using very thick fruit like frozen mango)
For Flavor Boosts (Optional):
* 1 tablespoon fresh lime or lemon juice (brightens up the flavor)
* A few fresh mint leaves or a pinch of ground ginger
Step-by-Step Instructions
Step 1: Prepare Your Fruit
If you’re using fresh fruit, give it a good wash. For larger fruits like mangoes or peaches, you’ll want to peel them and cut them into chunks. If you’re using berries, just make sure they’re clean. If you’re using frozen fruit, you can often use it straight from the freezer, which makes things extra frosty and quick!
Step 2: Blend Until Smooth
Add your prepared fruit to a blender. If you’re using a high-powered blender, you might not need any liquid. However, if your fruit is very thick or your blender is struggling, add the 1/4 cup of water or juice. Start blending on a low speed and gradually increase. Blend until the mixture is completely smooth and creamy. You don’t want any chunks!
Step 3: Sweeten and Flavor
Taste the fruit puree. Depending on how sweet your fruit is naturally, you might want to add a sweetener. Start with 2 tablespoons of honey, maple syrup, or agave and blend again. Taste and add more if you prefer it sweeter. Now’s also the time to add any optional flavor boosts like lime juice or mint. Blend one last time to incorporate.
Step 4: Pour into Molds
Carefully pour the fruit mixture into your popsicle molds. Be sure not to overfill them, as the mixture might expand slightly when frozen. If your molds have a built-in stick holder, great! If not, you can insert popsicle sticks once the pops are partially frozen (about 1-2 hours in), so they stand up straight.
Step 5: Freeze
Place the filled molds on a flat surface in your freezer. Let them freeze completely. This usually takes at least 4-6 hours, but I usually just leave them overnight to be sure they’re solid.
Step 6: Unmold and Enjoy
Once completely frozen, it’s time to enjoy your delicious fruit pops! To easily remove them from the molds, you can run the outside of the mold under warm water for a few seconds. This will loosen them up. Gently pull the pop out and enjoy immediately!
What to Serve It With
These fruit pops are pretty much a star on their own, but they can absolutely complement a meal or a snack spread! For Breakfast, imagine pulling one out to enjoy with your morning coffee or tea. It’s a surprisingly refreshing way to start the day, especially on a warmer morning. It feels like a treat but is packed with fruit. For Brunch, these look so elegant in a tall glass with a sprig of mint. They add a beautiful pop of color to any spread, and they’re a lighter option compared to some richer brunch desserts. I love pairing them with a light mimosa or a sparkling water with cucumber. As Dessert, they are the ultimate palate cleanser after a heavier meal. They’re light, naturally sweet, and incredibly satisfying. Serve them with a small plate of fresh berries on the side for an extra touch of indulgence. For Cozy Snacks, these are perfect for kids after school or for a grown-up treat while you’re curled up with a book. They’re fuss-free and satisfying. My family loves having these on hand for impromptu treat moments, and they never last long!
Top Tips for Perfecting Your Fruit Pops
Over the years, I’ve picked up a few tricks that I think really make these fruit pops shine. For the **Fruit Prep**, I always recommend using the ripest fruit you can find. The natural sweetness and flavor are paramount here. If your fruit isn’t super ripe, that’s when you’ll really need that sweetener. For **Mixing Advice**, don’t be afraid to blend until it’s absolutely silky smooth. Any little pulp or graininess can be distracting. I learned this the hard way early on! For **Flavor Customization**, don’t be shy with the citrus. A little lime or lemon juice really cuts through the sweetness and makes the fruit flavor pop. I also love adding a tiny pinch of sea salt sometimes, which sounds weird, but it actually amplifies the fruit’s natural sweetness. For **Ingredient Swaps**, if you’re out of honey, maple syrup is a fantastic substitute. Agave works well too. The key is to taste and adjust! For **Freezing Tips**, make sure your molds are completely dry before pouring the mixture in, especially if you’re going to add sticks later. And a good freezer helps too – a super cold freezer means faster freezing! For **Mold Variations**, if you don’t have traditional popsicle molds, small paper cups work in a pinch, just make sure to cover them with foil and poke the sticks through.
Storing and Reheating Tips
These fruit pops are best enjoyed fresh, but they do store surprisingly well! Room Temperature isn’t really an option for storing them, as they’ll melt way too quickly. But for Refrigerator Storage, if you happen to have any leftovers (highly unlikely in my house!), you can technically keep them covered in the molds for a day or two, but they might start to get a bit icy. The best way is really to ensure they’re fully frozen and then unmold them. Once unmolded, you can wrap individual pops tightly in plastic wrap or place them in a freezer-safe bag. In the Freezer Instructions, they can last for a good 2-3 weeks if stored properly in an airtight container or bag. After that, the texture can start to change, becoming more icy. Glaze Timing Advice isn’t really applicable here since there’s no glaze, but if you were to dip them in something before serving, I’d recommend doing that right before you eat them to keep them from melting!
Frequently Asked Questions
Final Thoughts
So there you have it – my go-to recipe for the most delicious and refreshing fruit pops! It’s truly one of those recipes that’s so simple yet so rewarding. The pure, vibrant taste of fruit is just unbeatable, and knowing that you made them yourself with healthy ingredients is such a fantastic feeling. They’re perfect for cooling down on a hot day, as a guilt-free dessert, or even as a fun way to get more fruit into picky eaters. I really hope you give these a try, and I can’t wait to hear what fruit combinations you come up with! If you love this recipe, you might also enjoy my recipes for [Link to another related recipe] or [Link to another related recipe]. Happy freezing!
Fruit Pops
Ingredients
Main Ingredients
- 0.12 cup water
- 2 tbsp sugar
- 5 oz kiwi peeled
- 6 oz mango peeled
- 6 oz fresh raspberries
Instructions
Preparation Steps
- Make a simple syrup by combining water and sugar in a small pot and bring to a boil. Boil for about 4-5 minutes on medium heat.
- Set aside.
- Puree fruit separately in a blender.
- Set aside in 3 small bowls.
- Divide the simple syrup between the fruit purees and mix in.
- Equally fill four small 5 oz cups with the kiwi puree and place in the freezer; freeze for one hour.
- Add mango puree and freeze for 20 minutes.
- Insert popsicle sticks and freeze for at least 2 hours.
- Add raspberry puree and freeze overnight.