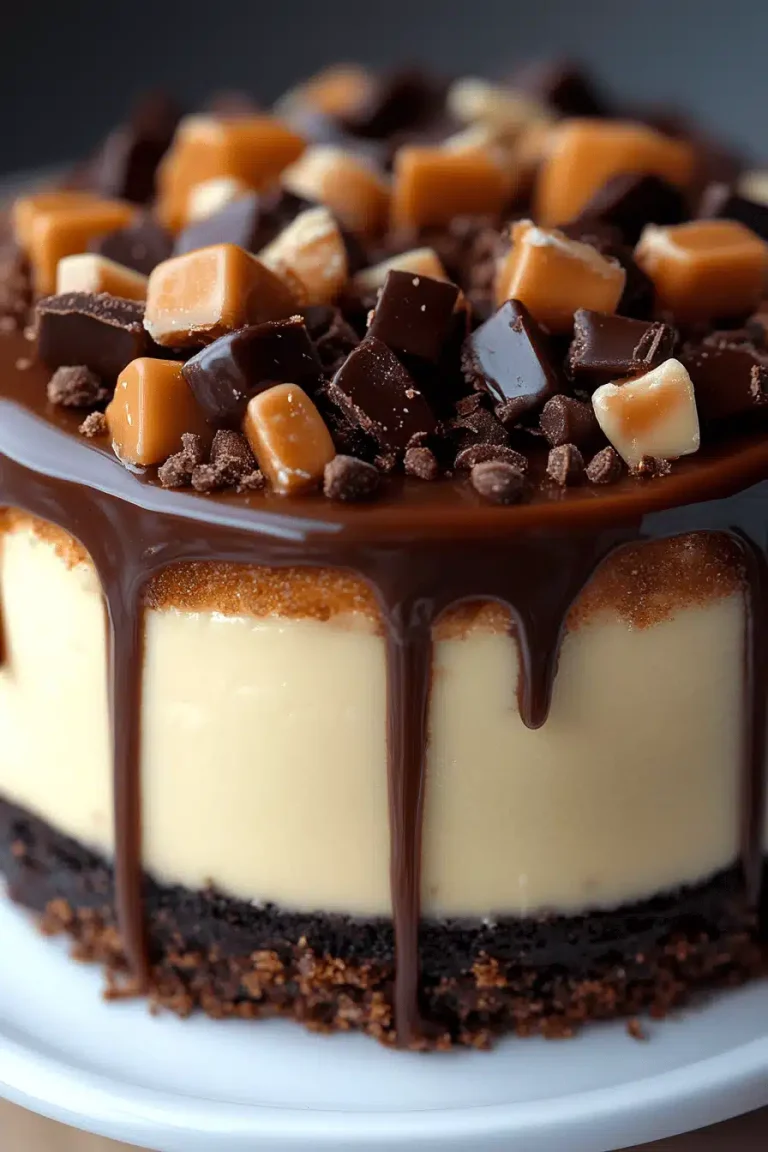
Every time I think about Samoa Cheesecake, I’m taken back to those cozy Sunday afternoons when the smell of caramel and chocolate fills the house, and my kitchen turns into the most anticipated spot for family and friends. This isn’t just any cheesecake—it’s a luscious, creamy dessert that somehow wraps up the beloved flavors of those iconic Samoa Girl Scout cookies into one slice of pure joy. If you’ve ever craved that perfect balance of crunchy coconut, rich caramel, and dark chocolate atop a dreamy cheesecake, this is the recipe you’ll want to keep close. Compared to a typical cheesecake, this one feels like an indulgent celebration—and trust me, it flies off the table so fast, you’ll want to make two! It’s one of those recipes I’ve tested so many times that I no longer need to peek at the steps, and my kids actually beg me to put it on repeat during holiday seasons.
What is a Samoa cheesecake?
Think of Samoa Cheesecake as a cheeky cousin of the classic cheesecake, inspired directly by those irresistibly delicious Samoa cookies. It’s essentially a creamy, dreamy cheesecake loaded with swirls of caramel and sprinkled with toasted coconut, all sitting atop a buttery cookie crust. The name “Samoa” comes from the cookies, which get their name from the Girl Scouts’ Samoa variety, famous for its blend of chocolate, caramel, and coconut. This cheesecake takes that trio of flavors and turns it into a majestic dessert that anyone can make at home without breaking a sweat. It’s more approachable than some fancy pastry and doesn’t need a bakery’s magic—just a few simple ingredients and a bit of patience. If you’ve ever felt intimidated by cheesecake, this version might just change your mind.
Why you’ll love this recipe?
What I love most about Samoa Cheesecake is how it effortlessly combines a dessert that tastes like a celebration with a process that’s surprisingly manageable. First, let’s talk flavor: the cheesecake is silky and rich, with sweet ribbons of caramel running through every bite, complemented perfectly by the nutty crunch of coconut. The chocolate drizzle on top really seals the deal, offering that bittersweet punch that cuts through the sweetness in the most satisfying way.
Now, onto simplicity. If you’ve got a stand mixer or even just a hand mixer, you’re halfway there. The crust is a breeze to throw together, and the filling whips up in minutes. This recipe doesn’t require any mysterious ingredients either—just pantry staples you might already have (hint: good quality caramel makes a huge difference). That’s a big win for busy nights or unexpected guests. And it’s very budget-friendly—no fancy cream cheese brands or obscure toppings needed. I’ve made this with a store-brand cream cheese, and honestly, it never disappoints.
Versatility is another big plus. This cheesecake feels right at home on a holiday dessert table but is also fantastic sliced smaller for a cozy weekend treat with coffee. You can customize the caramel’s sweetness or even add toasted nuts into the crust for a little extra texture. It’s the kind of dessert that feels fancy but has a down-to-earth vibe, just like something you’d love to share with close friends after a long week.
How do I make Samoa cheesecake?
Quick Overview
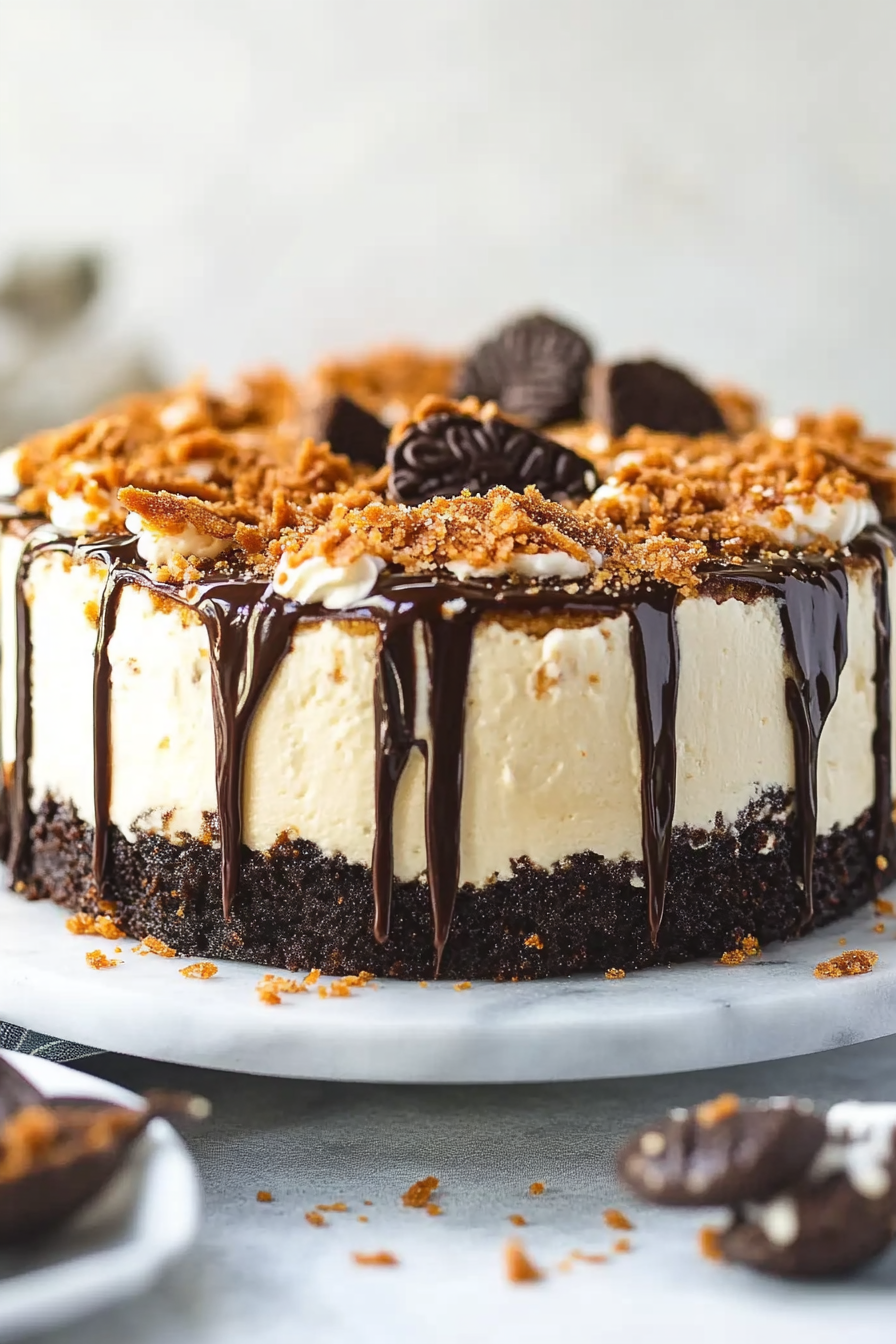
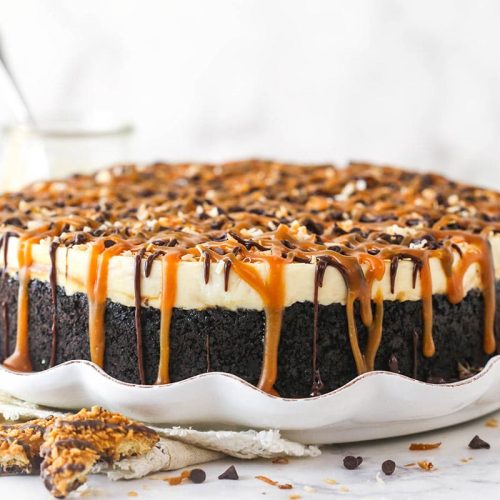
The entire process is pretty straightforward—you start with a buttery cookie crust that sets the stage for the rich cheesecake filling. The filling mixes up smoothly before you swirl in velvety caramel and fold in toasted coconut. One of the best parts is layering the cheesecake and caramel swirls for that classic marbled effect. Then, it all bakes until set, and the final touch is a chocolate drizzle that adds depth and makes the dessert irresistibly beautiful. Don’t stress—it’s really forgiving, and if you follow along, your kitchen’s about to smell amazing.
Ingredients
For the Main Batter:
- 24 oz cream cheese, softened (room temp is key!)—I like to let it sit out about an hour
- 3/4 cup granulated sugar
- 3 large eggs, room temperature (cold eggs can make the batter curdle)
- 1 tsp vanilla extract—homemade or good-quality store-bought makes all the difference
- 1/2 cup sour cream (for that smooth tang and creamy texture)
For the Filling:
- 1 cup caramel sauce, split into 3/4 cup for swirling, 1/4 cup for topping (I usually make mine homemade—it’s richer—but store-bought works too!)
- 1 cup toasted shredded coconut (lightly browned in a skillet to bring out the flavor)
For the Crust:
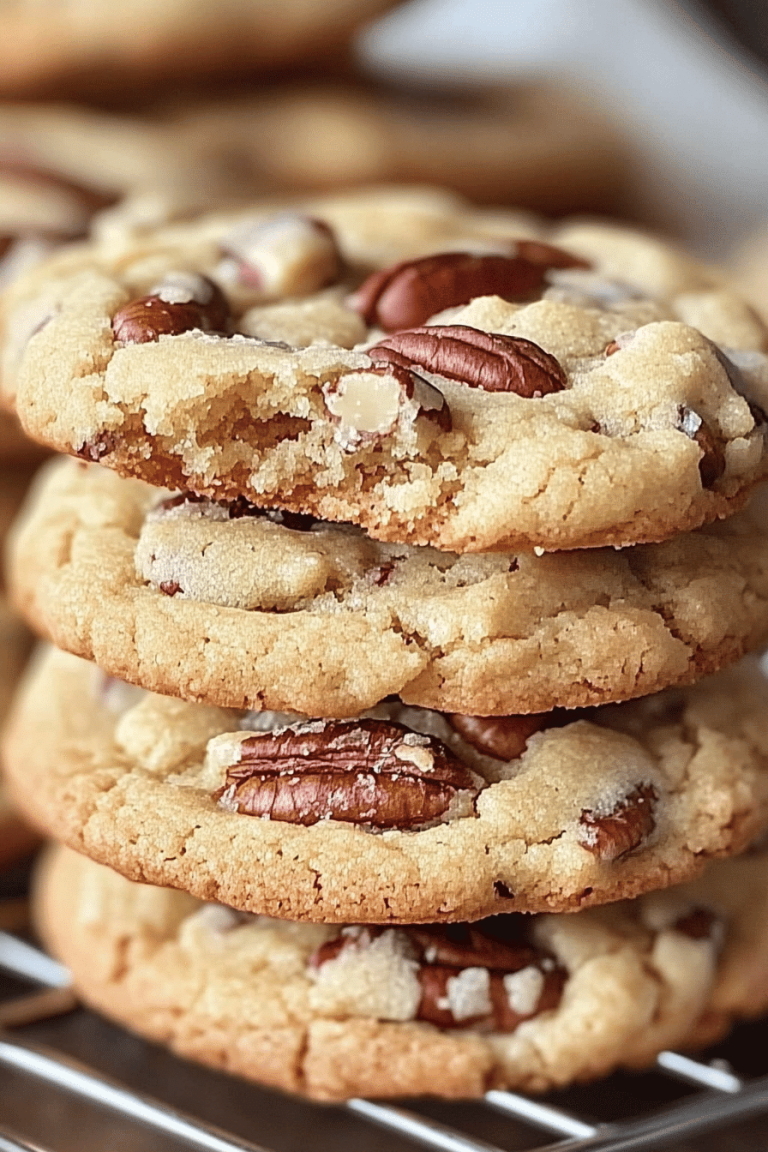
- 1 1/2 cups finely crushed graham crackers or digestive biscuits
- 1/4 cup granulated sugar
- 6 tbsp unsalted butter, melted
For the Glaze:
- 3 oz semi-sweet chocolate chips or chopped chocolate
- 1 tbsp heavy cream (to smooth out the chocolate and make drizzle perfect)
Step-by-Step Instructions
Step 1: Preheat & Prep Pan
First things first, set your oven to 325°F (160°C). This gentler heat helps the cheesecake bake evenly without cracking. I always line a 9-inch springform pan with parchment paper on the bottom and give the sides a light spray with non-stick spray—any leaking icing is no fun! For an even smoother crust, wrap the pan’s base with aluminum foil if you’re using a water bath. This step took me a couple of tries to perfect, especially for preventing leaks and soggy bottoms.
Step 2: Mix Dry Ingredients
Mix the crushed graham crackers and sugar together until well combined, then stir in the melted butter until everything is evenly moistened. It should hold together when you pinch it between your fingers but not be greasy. Press this mixture firmly into the bottom of your springform pan. I use the bottom of a flat glass to get an even layer—no uneven spots that pop up when baking.
Step 3: Mix Wet Ingredients
Beat the softened cream cheese with the sugar until the mixture is silky and smooth—no lumps. Add the eggs one at a time, mixing gently but thoroughly to avoid bubbles. Then stir in vanilla and sour cream. The batter should have a thick, creamy texture; if it feels too stiff, double-check that your cream cheese was fully softened. Remember, cold ingredients can ruin your smoothness!
Step 4: Combine
Almost there! Pour about two-thirds of the cheesecake batter over the prepared crust. Then swirl in half of the 3/4 cup caramel sauce using a knife or skewer—gently so you create lovely ribbons, not one big pool. Sprinkle half the toasted coconut over. Pour the remaining batter on top, repeat the caramel swirl and coconut sprinkle. The marbled look will bake into the cheesecake, which always gets oohs and ahhs from guests.
Step 5: Prepare Filling
While the cheesecake bakes, keep the remaining 1/4 cup caramel sauce handy for drizzling on top later. If you want it to flow more easily, warm it gently in the microwave or on the stovetop for a few seconds. This part is totally optional but adds that extra wow factor.
Step 6: Layer & Swirl
The key here is gentle, deliberate swirling—too much, and it all blends into a caramel mess; too little, and you won’t get those signature waves through every slice. I like to make big lazy swirls that look almost like waves rolling across the surface, which bake into a gorgeous pattern.
Step 7: Bake
Bake for 50-60 minutes until the edges are set but the center still jiggles slightly when you shake the pan. Don’t worry if it looks a bit underdone in the middle—that’s cheesecake magic happening! If you see cracks forming, that usually means the oven is too hot or the cheesecake wasn’t mixed gently enough. For extra even baking, consider a water bath in the oven—just watch for leaks.
Step 8: Cool & Glaze
Let the cheesecake cool on the counter for an hour or two, then refrigerate for at least 4 hours or overnight—I swear, this waiting is the hardest part. When you’re ready, melt the chocolate with cream until smooth and drizzle it artistically over the top. It tastes as beautiful as it looks and adds that perfect bittersweet finish.
Step 9: Slice & Serve
For neat slices, run a sharp knife under hot water and wipe it dry before each cut. This prevents sticking and gives clean edges. Serve chilled or slightly warmed if you prefer the caramel to be gooey. I like a dollop of whipped cream or a few fresh berries on the side for a pop of freshness.
What to Serve It With
For Breakfast: This cheesecake might not scream breakfast, but trust me, a small slice paired with your morning coffee or latte is a dreamy start. The creamy texture and sweet caramel balance perfectly with bitter brew—makes you feel like you’re living on a fancy weekend brunch.
For Brunch: Dress it up with a dusting of toasted coconut flakes and plate alongside fresh fruit salad. A glass of sparkling wine or mimosa will add a celebratory vibe, making it a standout on your table.
As Dessert: You can never go wrong with this after dinner. Try pairing it with a scoop of vanilla bean ice cream or a drizzle of raspberry sauce to cut through the richness, giving a fresh contrast to the decadent layers.
For Cozy Snacks: When you just want a treat on a chilly evening, warm up a slice slightly and tuck in with a mug of hot cocoa or chai tea. My family swears by this combo—it’s the ultimate comfort food moment.
Top Tips for Perfecting Your Samoa Cheesecake
Zucchini Prep: (Just in case you’re wondering, this cheesecake skips zucchini—phew! But I know sometimes recipes overlap, so I’ll say this: always squeeze out excess moisture when using any watery veg in baking to avoid soggy textures.)
Mixing Advice: The biggest cheesecake no-no: overmixing. It’s tempting to whip your batter silky smooth, but too much air means cracks in the bake. Stir gently and just until combined. If lumps sneak in, no worries—give it a quick smooth with a spatula.
Swirl Customization: For dramatic caramel swirls, use a toothpick or the tip of a butter knife. Make slow, sweeping motions for long ribbon-like patterns. Getting this swirl just right is a little art and science—don’t stress if your first attempt looks more “abstract” than “gallery-worthy.”
Ingredient Swaps: Tried this with almond milk instead of sour cream before and honestly, loved how creamy it felt—just a mild almond nuance in flavor. You can swap out semi-sweet chocolate for dark or milk depending on your craving but keep the caramel balanced to not overpower.
Baking Tips: If your oven tends to run hot, lower the temperature to 300°F and extend the bake time. Always check the jiggle test—the cheesecake should wobble like gelatin in the center without being liquidy. That’s the sweet spot.
Glaze Variations: Instead of a chocolate glaze, try a white chocolate drizzle or a sprinkle of toasted coconut mixed with a dusting of powdered sugar. Adding a pinch of sea salt to your caramel before drizzling gives a lovely salty-sweet contrast that’s addictive.
Storing and Reheating Tips
Room Temperature: If you plan to eat it the same day, keep the cheesecake covered loosely with a cake dome or foil for up to 4 hours. This keeps it moist and prevents the caramel from hardening too much.
Refrigerator Storage: Store leftover cheesecake in an airtight container or wrap the pan with plastic wrap. It stays fresh here for up to 4 days. The flavors deepen, making it taste even better the next day!
Freezer Instructions: For longer storage, slice the cheesecake, wrap individual pieces tightly in plastic wrap, then foil, and freeze for up to 3 months. To thaw properly, move to the fridge overnight rather than microwaving, so the texture remains creamy and not rubbery.
Glaze Timing Advice: Personally, I add the chocolate glaze right before serving for that glossy finish. If you freeze the cheesecake, glaze after thawing so it doesn’t crack or get dull.
Frequently Asked Questions
Final Thoughts
This Samoa Cheesecake holds a special place in my recipe collection because it’s one of those desserts that feels like a warm hug from the inside out—sweet but balanced, rich but never overwhelming. Every time I make it, the kitchen fills with that incredible caramel and coconut aroma that always pulls people in like moths to a flame. It’s rich enough to impress guests but easy enough to whip up for a weeknight treat. If you love cheesecake and those unforgettable Samoa cookie flavors, this will quickly become your go-to. Don’t forget to come back and tell me how yours turned out—I love hearing about your little twists and personal touches! Happy baking, my friends!
Samoa Cheesecake
Ingredients
Main Ingredients
- 2.5 cups Oreo crumbs from about 25 Oreos, filling included
- 5 tablespoons unsalted butter melted
- 24 oz cream cheese room temperature
- 0.5 cup sugar
- 0.25 cup light brown sugar packed
- 1 teaspoon vanilla extract
- 0.5 teaspoon coconut extract
- 1 cup caramel sauce divided
- 1 cup vanilla wafer cookies broken in half
- 0.75 cup sweetened coconut flakes toasted
- 1.25 cups heavy whipping cream cold
- 0.5 cup powdered sugar
- 0.25 cup mini chocolate chips
- 0.25 cup sweetened coconut flakes toasted, for topping
- 3 oz semi-sweet chocolate chips
- 0.25 cup heavy whipping cream cold for ganache
Instructions
Preparation Steps
- Line a 9-inch springform pan with parchment paper on the bottom and grease the sides.
- Combine Oreo crumbs and melted butter. Press the mixture evenly into the bottom and up the sides of the pan. Refrigerate while preparing the filling.
- Toast coconut flakes on a baking sheet at 350°F for 5-10 minutes, stirring every 2-3 minutes until golden. Cool completely.
- In a large bowl, beat cream cheese with sugar and brown sugar until smooth and creamy.
- Mix in vanilla extract, coconut extract, and half a cup of caramel sauce until well combined.
- Fold in broken vanilla wafer cookies and toasted coconut flakes into the cream cheese mixture.
- In a separate bowl, whip the heavy cream with powdered sugar until stiff peaks form. Gently fold whipped cream into the cheesecake mixture until smooth.
- Spread one-third of the cheesecake filling over the crust. Drizzle with one-quarter cup caramel sauce and swirl gently with a knife, avoiding piercing the crust.
- Repeat the layering with another third of the filling and caramel sauce swirl.
- Top with the remaining cheesecake filling and refrigerate for 4-5 hours or until firm.
- Remove the cheesecake from the springform pan. Garnish the top with mini chocolate chips and toasted coconut flakes.
- Make chocolate ganache by heating 1/4 cup heavy cream until simmering and pouring it over semi-sweet chocolate chips. Let sit 2-3 minutes, then whisk until smooth.
- Drizzle the chocolate ganache and remaining caramel sauce over the cheesecake before serving.
- Store leftover cheesecake covered in the refrigerator. Best enjoyed within 4-5 days.