There’s something about the smell of dumplings sizzling in a pan that instantly takes me back to cozy family dinners and laughter-filled kitchens. When I first learned to make dumplings, it was a total game-changer — easy, comforting, and downright addictive. Honestly, dumplings feel like those little pockets of joy that burst with flavor and warmth, kind of like that perfect grilled cheese but way more fun and versatile. If you’ve ever found yourself craving hearty, crave-worthy bites without the fuss of complicated cooking, this dumplings recipe is about to become your new best friend. And trust me, once you try this, you’re going to wonder why you didn’t jump on the dumpling train earlier!
What is dumplings?
Dumplings are basically these delightful little dough parcels stuffed with all sorts of goodies – think meat, veggies, or a mix – then cooked using various methods like steaming, boiling, or pan-frying. The name “dumplings” actually covers a whole world of kinds and styles, from Chinese jiaozi to Polish pierogi, but at heart, it’s just dough hugging a tasty filling. If you think about it, dumplings are sort of like edible hugs – comforting, warm bites that bring people together. What makes them so charming is their simplicity and the infinite room for creativity — you can keep it traditional or mix flavors to suit your mood. It’s really a dish that feels like home no matter where you are.
Why you’ll love this recipe?
What I love most about these homemade dumplings is the magic balance of flavor and ease. The filling always ends up juicy and perfectly seasoned, while the dough crisps up just enough when pan-fried, giving you that satisfying crunch before the soft inside melts in your mouth. For busy weeknights, this recipe is a lifesaver — it doesn’t demand fancy ingredients or hours of prep, but ends up tasting like something out of a restaurant. It’s surprisingly budget-friendly, too — just basic pantry staples and fresh veggies can make this a real crowd-pleaser. Versatility-wise, you can fill these bad boys with whatever veggies or proteins you have on hand, making them the ultimate kitchen improv dish. Plus, once you master this, you’ll find yourself experimenting with different sauces and dips, because dumplings are honestly a fabulous blank canvas.
Oh! And if you’re into other cozy, nostalgic dishes, you might want to check out my recipe for skillet pot roast or homemade meatballs — they share that same warm, family-style vibe that dumplings deliver but in a different form. My kids actually ask for dumplings a lot, especially because they love helping me fill and fold each one. It can totally turn into a fun little cooking party!
How do you make dumplings?
Quick Overview
This dumpling recipe breaks down into a few simple steps: make the dough, prepare the filling, fill and fold each dumpling, and then either boil, steam, or pan-fry. The method I’m sharing here is pan-fried, which gives that irresistible golden crisp outside with a tender inside. Don’t worry about feeling overwhelmed — once you get the rhythm of wrapping, it’s pretty quick and even kind of meditative. Plus, you can make a big batch and freeze leftovers for a grab-and-go meal that tastes fresh and homemade.
Ingredients
For the Dough:
- 2 cups all-purpose flour (make sure it’s fresh for best pliability)
- ¾ cup boiling water (this helps soften the dough gently)
- A pinch of salt for balance
For the Filling:
- 1 cup finely chopped napa cabbage (this brings lovely crunch and moisture)
- ½ cup grated carrot (color and subtle sweetness)
- 1 cup ground pork or chicken (feel free to swap for tofu or mushrooms for veg option)
- 2 green onions, minced (adds a fresh, mild punch)
- 3 cloves garlic, minced (because garlic makes everything better)
- 1 tbsp soy sauce (for that savory depth)
- 1 tsp sesame oil (aromatic and nutty)
- Salt and pepper to taste
For the Dip:
- 3 tbsp soy sauce
- 1 tbsp rice vinegar (the tang is essential)
- ½ tsp chili flakes or a dash of chili oil (optional – for a little kick)
- 1 tsp sesame seeds (for texture and nuttiness)
Step-by-Step Instructions
Step 1: Preheat & Prep Pan
Grab a large non-stick skillet and heat it over medium heat. You’ll want the pan hot but not smoking to get that perfect golden crust. A tablespoon of vegetable oil will do the trick to coat the bottom evenly, so get that ready before the dumplings hit the pan. If you’re doing multiple batches, keep an eye on your heat because too high and they’ll burn, too low and there’s no crisp!
Step 2: Mix Dry Ingredients
Put your flour and salt in a large bowl, then slowly pour in the boiling water while stirring with chopsticks or a fork. This step is where the magic starts—the hot water helps partially cook the flour, which makes for dough that’s soft but not sticky. Mixing well here sets the foundation for smooth, stretchable dough.
Step 3: Mix Wet Ingredients
Time to get your filling ready! In a separate bowl, combine your ground meat or tofu with the chopped cabbage, carrots, green onions, garlic, soy sauce, sesame oil, salt, and pepper. Use your hands or a spoon to mix until everything is evenly combined. You’re looking for a filling that holds together but still shows off a bit of texture—don’t overdo it or it turns mushy.
Step 4: Combine
Knead the dough on a floured surface until smooth — it should feel elastic and springy when you poke it. If it’s too sticky, sprinkle a little flour; if too dry, add a teaspoon of water at a time. Wrap it in plastic wrap and let it rest for at least 30 minutes to relax the gluten, which makes rolling that much easier.
Step 5: Prepare Filling
Once rested, roll the dough into a long log and cut into small equal pieces (about 1 inch). Flatten each piece into a disc with your palm, then roll out thin circles about 3-4 inches in diameter. Spoon a small amount of filling into the center of each wrapper — “small” being the key here; you want to make sure you can still seal these beauties tight!
Step 6: Layer & Swirl
To fold, pinch the edges firmly and pleat for that classic dumpling look. I learned early on that keeping a little water on your fingertips makes sealing easier — don’t skip this step! If you’re feeling fancy, give them a little swirl with the pleats, which isn’t just for show; it helps the dumplings expand beautifully when cooking.
Step 7: Bake (Pan-Fry)
Place the dumplings flat side down in your heated oiled skillet — give them space but don’t overcrowd. Cook for 2-3 minutes until bottoms are golden, then pour in about ¼ cup water and quickly cover the pan. The steam cooks the tops and insides to juicy perfection. Let the water evaporate completely and the bottoms crisp back up for another 2 minutes or so before removing from heat.
Step 8: Cool & Glaze
Let the dumplings rest for a minute before serving; this little pause keeps that crispy bottom intact and the filling juicy. Though I don’t glaze dumplings traditionally, a quick brush of melted butter or a sprinkle of toasted sesame seeds can elevate the presentation and flavor if you want to get creative.
Step 9: Slice & Serve
Dumplings are best served whole — no slicing necessary — but arrange them on a plate for a beautiful presentation. Serve warm with your dipping sauce on the side. My secret? A little fresh cilantro or chopped scallion on top brightens everything up and adds a pop of color that makes the plate look so inviting.
What to Serve It With
For Breakfast: I know this might sound odd, but dumplings with a side of congee and a hot cup of jasmine tea is my late grandma’s favorite morning combo — comforting and soothing, perfect for slow-start days.
For Brunch: Serve alongside a fresh cucumber salad dressed with sesame oil and vinegar, plus chilled sparkling water with lime for a light, refreshing twist that feels fancy without the fuss.
As Dessert: While not traditional, I’ve sometimes turned leftover sweet red bean-filled dumplings into a dessert with a drizzle of honey and a sprinkle of toasted coconut — it’s a fun twist that’s surprisingly delicious at the end of a meal.
For Cozy Snacks: Nothing beats sharing freshly pan-fried dumplings with friends over a cold beer or a cup of green tea. They’re snackable, hearty, and perfect for couch hangouts or game nights. My kids especially love dunking each dumpling in a chili-soy combo, and it disappears in minutes.
Top Tips for Perfecting Your Dumplings
Dough Prep: Don’t rush the resting stage — it makes rolling easier and keeps your dumpling wrappers from shrinking during cooking. Always use boiling water mixed in slowly for tender, pliable dough.
Filling Balance: Keep your filling finely chopped but not mushy — a little bite and texture is key. Squeeze out excess moisture from veggies like cabbage to avoid soggy fillings.
Folding Technique: Practice makes perfect here. Wetting the edges with a little water and pleating carefully means you won’t lose the filling while cooking, but don’t stress about perfect shapes — rustic is charming!
Swirl Customization: Try experimenting with the folding pleats. My favorite is the simple crescent fold for ease and speed, but pleated edges make for beautiful presentation especially if you want to impress guests.
Ingredient Swaps: Want to dodge meat? Chopped mushrooms with tofu or finely grated sweet potato make great swaps. Use tamari or coconut aminos for gluten-free soy alternative, just keep an eye on salt balance.
Baking/Browning Tips: Use a heavy-bottomed pan for even heat distribution and don’t overcrowd the pan. Medium heat keeps the bottoms crisp but won’t burn them before the filling cooks through.
Dipping Sauce Twists: Add a dash of honey, a splash of lime juice, or fresh chili slices to your soy sauce mixture for a tiny flavor upgrade that makes all the difference. My favorite recent addition has been a touch of grated ginger — love the zing!
Storing and Reheating Tips
Room Temperature: Dumplings taste best fresh but can sit covered on the counter for up to 2 hours without losing their crisp charm — just don’t forget to cover to keep them from drying out.
Refrigerator Storage: Place leftovers in an airtight container and store for up to 3 days. To revive crispness, pop them in a dry pan over medium heat just like the original cooking method — no microwave if you can help it.
Freezer Instructions: Freeze uncooked dumplings in a single layer on parchment paper then transfer to a freezer bag. They’ll last up to 3 months. When ready to eat, cook them straight from frozen (just add a couple extra minutes to the cooking time!)
Glaze Timing Advice: I usually hold off on any finishing touches like brushing with oil or sprinkling sesame seeds until right before serving. This keeps everything fresh and appealing after reheating.
Frequently Asked Questions
Final Thoughts
This dumplings recipe is one I’ve turned to again and again — it’s approachable, comforting, and always hits that warm spot that just says “family dinner.” Whether you’re making a quick weeknight snack or pulling together a gathering feast, dumplings feel special without the stress. I love that you can tweak the filling to fit what’s in your fridge or dietary needs, and that cooking them together somehow brings everyone into the kitchen (great bonding activity, by the way!). If you’re curious to try more, my recipes for potstickers and homemade wonton soup carry the same heart and soul that you find in these dumplings. Don’t be shy about sharing your own twists in the comments — I’m always excited to hear how yours turn out! Happy cooking and bon appétit!
dumplings
Ingredients
Main Ingredients
- 4 medium potatoes peeled and cut into 1 inch pieces
- 1 teaspoon olive oil
- 0.5 small onion chopped finely
- 14 ounce sauerkraut rinsed and drained well
- 4 ounce farmer's cheese
- 2.5 cups all-purpose flour plus extra for kneading
- 1 teaspoon kosher salt
- 1 large egg
- 0.75 cup very hot water may add up to 1 cup as needed
- 0.75 cup butter melted for cooking and coating
- serving toppings sour cream or applesauce
Instructions
Preparation Steps
- Place the potatoes in a large pot and cover with water. Bring to a boil and simmer until fork tender, about 15 minutes. Drain and mash. Chill the mashed potatoes.
- In a skillet, heat olive oil and sauté the chopped onion until tender. Cool slightly and add to chilled mashed potatoes. Rinse sauerkraut very well, drain thoroughly, then add to potato mixture with cheese. Mix to combine and refrigerate until use.
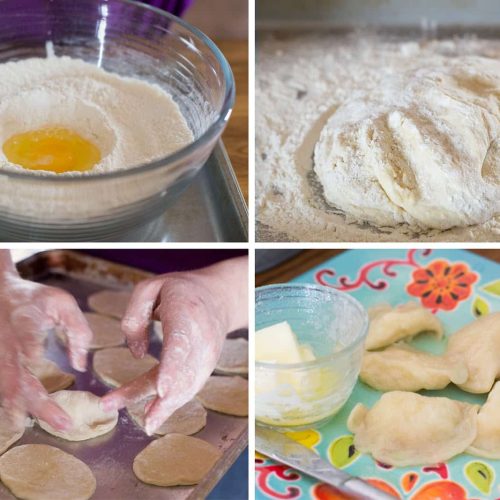
- In a large bowl, combine flour and salt. Make a well, crack in the egg, and stir. Gradually add hot water, mixing until dough is sticky and cohesive. Add more flour if too sticky. Chill dough for at least one hour.
- Bring a large pot of water to boil. Lightly flour a surface and knead dough briefly, adding flour as needed.
- Divide dough into four sections. Roll out one section very thin (about 1/8 inch). Cut circles and place 1 tablespoon of filling on one side. Fold over and pinch edges to seal. Arrange pierogies in a single layer on a plate without stacking.
- Boil pierogies in batches, gently stirring to prevent sticking. When they float, remove with a slotted spoon. Place on buttered plates, drizzle with melted butter, and let cool slightly before frying.
- Heat butter in a skillet over medium heat. Fry pierogies in a single layer for 2-3 minutes per side until edges are golden and crisp. Remove and keep warm until serving.