There’s something about that first bite into a graham cracker crust that takes me right back to my childhood summers — the smell of warm cookies mingling with the sweet tang of homemade pie filling. It’s like a cozy hug you can eat. If you’ve ever been intimidated by making your own crust, let me ease your mind: mastering a graham cracker crust is easier than you think, and it’s a game-changer for pies, cheesecakes, or even just a quick treat on its own. I remember the first time I made this crust from scratch — my kids literally hovered around the counter, begging for a taste before the filling even went in. This crust has that perfect buttery crunch with a hint of cinnamon, the kind that sets off all your sweet tooth alarms in the best way possible. If you’ve ever used a store-bought crust and thought, “It’s okay, but it could be better,” wait till you try this. Trust me, once you nail the graham cracker crust, your entire dessert game changes.
What is Graham Cracker Crust?
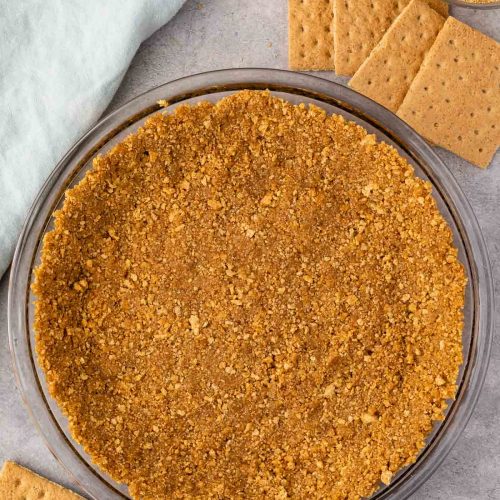
Think of a graham cracker crust as the unsung hero supporting your favorite dessert. It’s essentially a no-fuss, crumbly base made from crushed graham crackers, melted butter, and a touch of sugar—simple but oh-so-satisfying. The crust gets pressed firmly into your baking pan before it’s baked or chilled to set. It’s named after those classic, slightly sweet graham crackers — the same crackers you probably remember dunking in milk as a kid (or roasting over a campfire!). What’s wonderful about this crust is how versatile it is; it’s the perfect foundation for cheesecakes that need that little extra crunch or for pies when you want a buttery, flaky finale. And the best part? No rolling out dough, no chilling hours — just quick, straightforward fun that anyone can make.
Why you’ll love this recipe?
What I love most about making a graham cracker crust from scratch is how it brings a homemade touch without a lot of fuss. First, the flavor — it’s buttery with a slight caramelized note from browning the crust in the oven, plus the tiny pop of cinnamon or nutmeg if you add it (and I always do). It’s a little crunchy and crumbly but holds together beautifully—so you get that lovely contrast of textures when you dig into a slice of pie or cheesecake. Second, the simplicity can’t be beat. I mean, literally three ingredients and some quick mixing in a bowl? That’s my kind of recipe, especially on busy weeknights when baking needs to be super streamlined.
This crust is also budget-friendly, which I appreciate when feeding a family of five. Graham crackers and butter are pantry staples in my house, and I never have to worry about fancy ingredients or last-minute store runs. Plus, this crust works with nearly anything — I’ve used it for lemon meringue, chocolate silk pie, pumpkin cheesecake, and even no-bake desserts. It adapts beautifully, so you can switch up spices, add chopped nuts, or try alternative fats like coconut oil if you’re feeling adventurous. Compared to traditional pastry crusts, this one’s less intimidating and nearly foolproof, making it my go-to for every special occasion (and every casual craving, too!).
How do I make Graham Cracker Cracker?
Quick Overview
Making a graham cracker crust is pretty much foolproof. You start by crushing graham crackers into fine crumbs — I like to do this in a zip-top bag with a rolling pin, but a food processor works just as well. Mix those crumbs with melted butter and a pinch of sugar until everything sticks together. Then, press the crumb mixture evenly into your pie pan or springform pan. You can bake it for a few minutes for extra crispiness or chill it to set if you’re making a no-bake dessert. It’s quick, satisfying, and sets the stage perfectly for whatever filling you’ve got in mind.
Ingredients
For the Graham Cracker Crust:
- 1 1/2 cups graham cracker crumbs (about 10–12 full crackers) – I always use the honey-flavored ones; they add the best subtle sweetness.
- 5 tablespoons unsalted butter, melted – makes the crust rich and helps it hold together. Avoid salted butter unless you adjust sugar.
- 2 tablespoons granulated sugar – balances the buttery richness; sometimes I swap for brown sugar for a deeper flavor.
- Optional: 1/2 teaspoon ground cinnamon (trust me, it’s magic!)
Step-by-Step Instructions
Step 1: Preheat & Prep Pan
Start by heating your oven to 350°F (175°C). If you’re using a metal or glass pie pan, give it a quick wipe with a little butter or nonstick spray, just to help the crust from sticking. I usually skip lining the pan – pressing the crust in works best on a bare surface for that even crunchy texture.
Step 2: Mix Dry Ingredients
Crush those graham crackers into fine crumbs. I find putting them in a sturdy zip-top bag and bashing gently with a rolling pin gives small, even crumbs without turning them to powder. Then, toss the crumbs with sugar and cinnamon if you’re using it. Mixing these dry ingredients first lets you get an even flavor in every bite.
Step 3: Mix Wet Ingredients
Melt your butter slowly — I prefer the stovetop method over the microwave because it lets me watch it and avoid burning. Once melted and slightly cooled, pour it over the crumb mixture and stir gently until everything’s coated and sticking together. You’re aiming for a texture like damp sand that holds when pressed.
Step 4: Combine
Make sure you don’t overmix here. The goal is just enough butter to bind crumbs without making it greasy or soggy. If it’s too dry, add a tiny splash more butter. Too wet? Add a little more crumbs. I learned this the hard way after one too many crumbly failures.
Step 5: Press Crust Into Pan
Transfer your crumb mixture into the prepared pan. Use the bottom of a flat measuring cup or glass to press the crumbs firmly and evenly across the base and slightly up the sides for a neat border. This step is crucial — don’t be shy about using a bit of muscle here!
Step 6: Bake the Crust
Pop the crust into the oven for 8–10 minutes until it smells toasty and golden around the edges. This pre-bake step helps crisp it up and locks in the buttery flavor so your filling doesn’t make it soggy. Don’t skip it unless you’re using a no-bake filling — in that case, chill the crust for at least an hour instead.
Step 7: Cool Completely
Once baked, set the crust on a wire rack and let it cool completely before adding your filling. I usually try not to sneak a crumb, but it’s hard!
Step 8: Fill and Chill or Bake
Fill the chilled crust with your choice of luscious filling — from silky cheesecakes to tangy key lime pies. Follow your filling recipe’s instructions for baking or chilling. The crust holds up beautifully through both.
Step 9: Serve and Enjoy
Let your dessert chill or set as needed, then slice with a sharp knife warmed under hot water for clean edges. Serve it up and watch how fast it disappears.
What to Serve It With
For Breakfast: This crust pairs beautifully with a dollop of Greek yogurt and fresh berries for a lighter morning treat. Pour a fresh pot of dark roast coffee to balance the sweetness — that combo has saved many hectic mornings in my house.
For Brunch: Serve your pie or tart alongside a flute of sparkling mimosa or a creamy chai latte. The fizzy or spiced drink cuts through the buttery crust, making each bite pop. I love adding crushed nuts on top for a fancy sprinkle that wowed our brunch guests last weekend.
As Dessert: A scoop of vanilla bean ice cream or a drizzle of homemade chocolate sauce elevates this crust into something restaurant-worthy. For a seasonal twist, top with spiced poached pears or caramelized apples. My family’s favorite is classic pumpkin pie with lightly whipped cream after Thanksgiving.
For Cozy Snacks: When craving something sweet at 10 p.m. but don’t want to overdo it, this crust filled with a no-bake pudding or simple fresh fruit compote is just right. Paired with herbal tea or a tall glass of milk, it’s an instant cozy night treat we all love.
Top Tips for Perfecting Your Graham Cracker Crust
Crust Crumbs: I swear by crushing graham crackers manually — it gives you just the right texture, not too powdery or chunky. If you don’t have a rolling pin handy, even the bottom of a sturdy cup works in a pinch.
Mixing: Don’t rush the butter melting step. If your butter is still too hot when added to crumbs, it can make the crust oily, which loses that satisfying crunch. Let it cool to just warm before pouring it in. Also, avoid overmixing so you don’t break down the crumbs too much.
Pressing the Crust: Firm pressure is key. I learned years ago that a loosely packed crust crumbles apart when slicing. Press firmly into corners and sides for a crust that holds up well, especially if you want clean slices.
Ingredient Swaps: Tried it with coconut oil instead of butter once — it gave a subtle tropical hint and made the crust extra crisp. For gluten-free diets, gluten-free graham crackers work fantastically; just be mindful of their brand flavor variations.
Baking: I often bake the crust a little longer than recipes say (up to 12 minutes) because ovens vary so much. You’ll know it’s ready when it’s fragrant and just golden, with edges slightly darker. Don’t fret if a few crumbs brown more — that’s flavor!
Glaze Variations: Sometimes I brush the crust with a bit of honey or melted marshmallow before pressing in crumbs to add extra stickiness and sweetness. It’s a trick I picked up years ago to add an extra layer of flavor.
Storing and Reheating Tips
Room Temperature: Graham cracker crust desserts keep well covered with plastic wrap or a cake dome at room temperature for 1-2 days. If you expect several days before slicing, better to chill to avoid sogginess from the filling.
Refrigerator Storage: Fully filled pies or cheesecakes should be refrigerated in airtight containers and will stay fresh about 4-5 days. I always cover the surface tightly with plastic wrap to keep the crust from absorbing fridge odors.
Freezer Instructions: Layer your dessert in a freezer-safe container or wrap tightly with foil and plastic wrap for up to 2 months. Thaw in the fridge overnight before serving to keep the crust from breaking apart. No-bake fillings freeze best — custards might need extra thaw time.
Glaze Timing Advice: Add glazes or toppings right before serving if you’re storing the dessert for a while, so they don’t get soggy or runny. I learned this the hard way after glazing too soon and ending up with a gluey mess.
Frequently Asked Questions
Final Thoughts
Honestly, I can’t recommend this graham cracker crust enough—it’s a small piece of magic that turns simple desserts into memorable moments. The crunchy texture paired with buttery, slightly spiced flavor really steals the show, and it’s so incredibly easy that I find myself making it more than I planned. It’s one of those recipes that sticks around in your kitchen memory, popping up whenever you want to impress guests without the fuss or simply satisfy a late-night craving. If you’re the kind of home cook who loves recipes with heart and history, this crust might just become your new favorite, like it did for me. I’d love to hear how you customize yours or which desserts you pair it with—don’t be shy sharing in the comments below! Happy baking, and here’s to many delicious slices ahead.
graham cracker crust
Ingredients
Main Ingredients
- 1.5 cups graham cracker crumbs from about 9 whole graham crackers, finely crushed
- 0.25 cup packed brown sugar
- 0.5 teaspoon ground cinnamon optional
- 0.125 teaspoon salt a pinch
- 7 tablespoons unsalted butter melted
Instructions
Preparation Steps
- If using whole graham crackers, finely crush them in a food processor or place in a ziploc bag and crush with a rolling pin.
- In a large bowl, stir together graham cracker crumbs, brown sugar, cinnamon, and salt.
- Add melted butter and mix well with a fork until ingredients are evenly combined.
- Press the mixture firmly into the bottom and up the sides of a 9-inch pie plate, compacting the crust tightly.
- For a no-bake crust, chill in the refrigerator for at least 1 hour before filling.
- For a baked crust, preheat oven to 325°F and bake for 10 minutes until golden and fragrant. Let cool completely before filling.