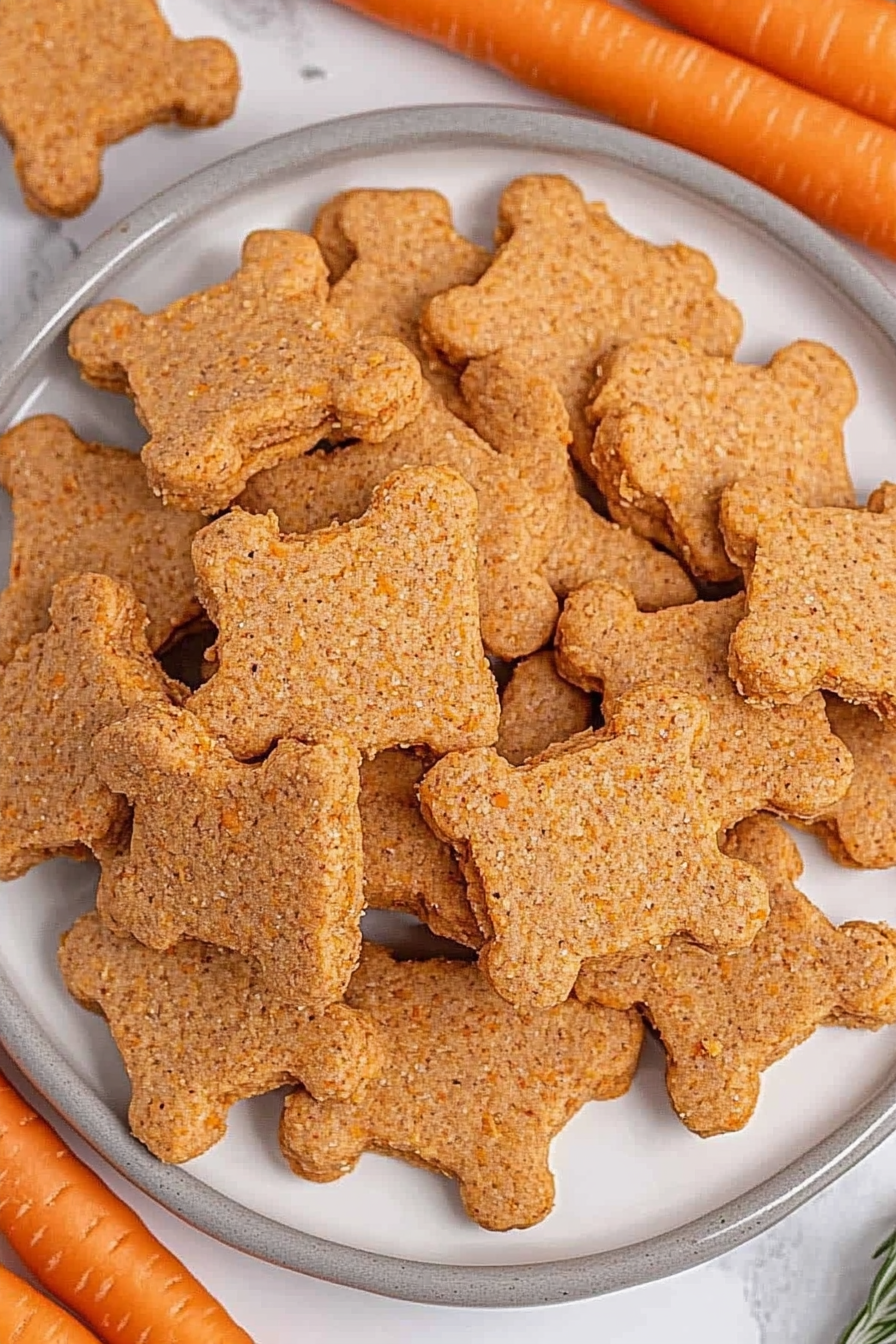
Oh, hello there! Come on in, grab a mug. I’ve been so excited to share this with you. You know how much I adore my furry little shadow, Buster? Well, he’s gotten a bit picky in his old age, and I’ve been on a quest to find him snacks that are not only delicious but also genuinely good for him. And let me tell you, after countless flops and a few questionable attempts (don’t ask about the Peanut Butter and kale incident!), I’ve finally landed on a winner. These dog carrot treats are just… perfection. They’re simple, packed with good stuff, and the best part? Buster absolutely devours them. Seriously, the little tail-wags are a mile a minute when he knows these are coming. They remind me a little of those spiced carrot muffins we used to make back in the day, but of course, perfectly tailored for our canine companions. If you’ve ever found yourself scrolling through endless dog treat options, wondering what’s actually in them, then you are in the *right* place. These dog carrot treats are my go-to for a reason, and I have a feeling they’ll become yours too.
What are Carrot Treats for Dogs?
So, what exactly are these magical dog carrot treats I’m raving about? Think of them as little bites of wholesome goodness, specifically designed for our four-legged family members. At their core, they’re a simple baked treat, combining the natural sweetness and nutrients of carrots with other dog-safe ingredients. It’s essentially a healthy, homemade alternative to those store-bought biscuits that can sometimes be loaded with preservatives and fillers we don’t really want our pups ingesting. The beauty of making them yourself is complete control over what goes in. No mystery ingredients here! They’re a fantastic way to sneak in some extra veggies for your dog, especially if yours is a bit of a fussy eater like my Buster. The texture is usually somewhere between a soft cookie and a slightly firm biscuit – perfect for all ages, from playful puppies to wise old seniors.
Why you’ll love this recipe?
Honestly, there are so many reasons why I keep coming back to this dog carrot treat recipe, and I just know you’ll feel the same way. First off, let’s talk about flavor – or rather, your dog’s reaction to it! The natural sweetness of carrots is a huge hit with most pups, and when combined with a hint of cinnamon (which is safe for dogs in small amounts and adds a lovely warmth), it’s irresistible. Buster goes absolutely bonkers for them! They’re incredibly simple to make, too. You don’t need any fancy equipment or professional baking skills. I’ve whipped these up on a Tuesday night after a super busy day, and they still turn out beautifully. It’s one of those “lifesaver” recipes when you want to give your dog something special without a lot of fuss. And the cost-effectiveness? Oh my goodness. Buying a bag of high-quality dog treats can really add up, but with this recipe, you’re using pantry staples and a few fresh ingredients that end up being so much more economical. Plus, the versatility is a huge plus! You can easily add other dog-safe ingredients, which I’ll get into later. What I love most about this recipe, though, is the peace of mind. Knowing exactly what’s going into my dog’s treats, and seeing him so happy and healthy because of it, is just priceless. It’s a little act of love, really, baked into every single bite. They’re so much better than store-bought, and the joy on your dog’s face when they get one makes it all worth it.
How do I make dog carrot treats?
Quick Overview
This recipe is wonderfully straightforward. We’re essentially going to grate some carrots, mix them with flour, a binder, and a few other goodies, then bake them into little, happy shapes. The whole process, from gathering ingredients to pulling the first batch from the oven, takes less than an hour, and a good chunk of that is hands-off baking time. It’s designed to be as fuss-free as possible, so you can spend less time in the kitchen and more time enjoying your pup. What makes this method special is how we combine the wet and dry ingredients to get that perfect texture – not too crumbly, not too tough. Trust me, it’s surprisingly easy!
Ingredients
For the Main Treat Base:
2 cups all-purpose flour (or whole wheat flour for extra fiber)
1 cup finely grated carrots (about 2-3 medium carrots)
1/4 cup unsweetened applesauce (a great natural binder and sweetener)
1/4 cup vegetable oil (or melted coconut oil, which Buster loves!)
1 egg (free-range if you can find them!)
1 teaspoon ground cinnamon (just a touch for that warm flavor, safe for dogs!)
1/4 teaspoon baking soda (helps them get a nice little lift)
Step-by-Step Instructions
Step 1: Preheat & Prep Pan
First things first, get your oven preheating to 350°F (175°C). While that’s warming up, line a couple of baking sheets with parchment paper. This is a crucial step, folks! It prevents sticking and makes cleanup an absolute breeze. Nobody likes scrubbing burnt-on bits, right? Make sure your baking sheets are ready to go before you even start mixing, so you can get those treats into the oven as soon as they’re shaped.
Step 2: Mix Dry Ingredients
In a large bowl, whisk together your flour and baking soda. If you’re using cinnamon, add it in here too. Give it a good whisk so everything is evenly distributed. You want to make sure that baking soda is mixed thoroughly so you don’t end up with any funny-tasting pockets in your treats. This simple step ensures an even texture throughout. I always give it a good couple of stirs just to be sure.
Step 3: Mix Wet Ingredients
In a separate, medium-sized bowl, combine the grated carrots, applesauce, vegetable oil (or coconut oil), and the egg. Beat everything together with a fork or a whisk until it’s well combined. The applesauce and oil act as our binders, holding everything together and making the treats moist, while the egg adds richness and helps with structure. Make sure the egg is fully incorporated.
Step 4: Combine
Now, pour the wet ingredients into the bowl with the dry ingredients. Stir everything together with a sturdy spoon or a spatula until it just comes together to form a dough. Be careful not to overmix! Overmixing can make your treats tough, and nobody wants a tough treat, especially our furry friends. Just mix until you no longer see dry flour. It should be a slightly sticky, but manageable dough.
Step 5: Shape the Treats
This is where the fun really begins! You can either roll the dough out gently on a lightly floured surface to about 1/4-inch thickness and use cookie cutters to make fun shapes (bone shapes are always a hit!), or you can simply roll small portions of the dough into little balls and flatten them slightly with your palm or the bottom of a glass. I like to make a variety of shapes for Buster to keep things interesting. If the dough is too sticky, you can pop it in the fridge for about 15 minutes, which makes it much easier to handle.
Step 6: Arrange on Baking Sheets
Place your shaped treats onto the prepared baking sheets, leaving a little space between each one. They don’t spread a huge amount, but giving them a bit of room is always a good idea to ensure even baking. If you’re using cookie cutters, re-roll the scraps gently once, but don’t overwork the dough.
Step 7: Bake
Pop those baking sheets into your preheated oven. Bake for about 15-20 minutes, or until the edges are lightly golden and the treats are firm to the touch. The exact time will depend on the size and thickness of your treats. You want them to be cooked through but still a little soft in the center – that’s Buster’s favorite texture. Keep an eye on them towards the end, as ovens can vary!
Step 8: Cool Completely
Once they’re done, remove the baking sheets from the oven and let the treats cool on the sheets for a few minutes before transferring them to a wire rack to cool completely. This is SO important. If you try to move them too early, they might crumble. Letting them cool fully ensures they firm up nicely and are ready for their close-up (and for your dog to enjoy!).
Step 9: Store & Serve
Once completely cool, store your dog carrot treats in an airtight container. They’re best kept in the refrigerator to maintain freshness, especially since they contain fresh ingredients. Serve them up to your happy pup and watch those tails wag!
What to Serve It With
While these dog carrot treats are a standalone star for your canine companion, you might be wondering how to best present them or what other dog-friendly “pairings” might work. For a simple morning reward, I’ll often give Buster one alongside his breakfast kibble. It’s like a little extra special treat to start his day. For a more “brunch” feel, if I’m making a big batch, I might break one up and mix it into a small portion of plain, unsweetened yogurt (dog-safe, of course!) or some mashed Sweet Potato. It makes it feel like a more elaborate meal for him. As a “dessert” after a good training session or a long walk, a whole treat is perfect. It’s a satisfying reward without being too heavy. For super cozy snack times, especially on a chilly afternoon, I might just give him one as a little pick-me-up while we’re lounging. He loves them warmed slightly in my hands too – it brings out the scent of the cinnamon, and he gets so excited! My personal family tradition? We always have a few on hand for his “gotcha day” anniversary – it’s his special day, and these treats are always part of the celebration. They’re perfect with a long drink of fresh water, of course, which is essential after any treat!
Top Tips for Perfecting Your Dog Carrot Treats
After making these dog carrot treats more times than I can count, I’ve picked up a few tricks that I just have to share with you. First, when it comes to the carrots, finely grating them is key. If you grate them too coarsely, you might end up with chunks that aren’t fully incorporated and could affect the texture. A microplane or the fine side of a box grater works beautifully. Don’t skip squeezing out a *tiny* bit of excess moisture from the grated carrots – you don’t want them too wet, or your dough might become unmanageable. For mixing, I cannot stress enough the importance of not overmixing. As soon as the flour is just incorporated, stop! Overmixing develops the gluten too much, leading to tough treats. You want a tender bite for your dog. If your dough is too sticky to handle, resist the urge to add too much extra flour, as this can also make them dry. Instead, try chilling the dough for about 15-20 minutes. It firms up beautifully and is much easier to roll and cut. When it comes to shaping, I love using different sized cookie cutters. Smaller ones are great for training rewards, while larger ones are more of a satisfying chew. If you’re just rolling and flattening, aim for a consistent thickness so they bake evenly. Baking is where a little observation goes a long way. While 15-20 minutes is a good guideline, keep an eye on them, especially if you’ve made smaller treats. They should feel firm to the touch and the edges should be lightly golden. You don’t want them dark brown or overly crisp unless that’s specifically the texture you’re aiming for. A slightly softer center is often preferred by dogs. For ingredient swaps, if you’re out of vegetable oil, melted coconut oil works wonderfully and adds a nice subtle flavor. You can also try whole wheat flour instead of all-purpose for added fiber, but you might need a tiny splash more liquid if it seems too dry. Some people like to add a little bit of plain pumpkin puree (ensure it’s 100% pumpkin, not pie filling!) along with the applesauce for extra fiber and nutrients, but remember to adjust the liquid slightly if you do. Just a tablespoon or two is usually enough. Remember, these are for dogs, so avoid any ingredients that are toxic to them like xylitol, grapes, raisins, chocolate, or excessive salt and sugar. These dog carrot treats are designed to be a healthy addition to their diet, not a primary food source, so moderation is always key!
Storing and Reheating Tips
Once your delicious dog carrot treats have cooled completely, storing them properly is key to keeping them fresh and enjoyable for your pup. Because they contain fresh ingredients like carrots and egg, it’s best to store them in an airtight container in the refrigerator. This will keep them fresh for about a week to 10 days. If you find yourself with an abundance of treats (which happens at my house!), freezing is your best friend. Lay the cooled treats in a single layer on a baking sheet and freeze until solid. Once frozen, transfer them to a freezer-safe bag or container. They’ll stay good in the freezer for about 2-3 months. When you’re ready to serve a frozen treat, you can either let it thaw at room temperature for a few hours, or pop it in the fridge overnight. For a slightly softer treat, you can gently warm it in the microwave for just a few seconds – literally 5-10 seconds is usually enough. Be sure to test the temperature before giving it to your dog; you don’t want it to be hot! I’ve found that if I’m going to freeze them, it’s sometimes better to give them a day or two to fully “cure” after baking before freezing. This helps them maintain their structure a bit better. If you’re planning on using them as training treats and want them to be a bit firmer and less prone to crumbling, you can bake them for a few minutes longer, but be careful not to dry them out completely, as that can make them hard to digest for some dogs. Always ensure they are completely cooled before sealing them in any container, whether for refrigeration or freezing, to prevent condensation and spoilage.
Frequently Asked Questions
Final Thoughts
So there you have it – my absolute go-to recipe for dog carrot treats! I truly hope you and your furry best friend fall in love with these as much as Buster and I have. They’re more than just a treat; they’re a little token of love, a way to nourish your dog with wholesome ingredients, and a delightful baking project for you. The fact that they’re so simple, budget-friendly, and incredibly satisfying for our pups makes them a true winner in my book. If you’re looking for other ways to spoil your dog the healthy way, you might also enjoy my recipe for homemade dog biscuits or my puppy-friendly peanut butter cookies. I can’t wait to hear how your dog carrot treats turn out! Please leave a comment below to share your experience, any fun variations you tried, or just to tell me how much your dog enjoyed them. Happy baking, and even happier tail wags!

Carrot Dog Treats
Ingredients
Main Ingredients
- 2 cups whole wheat flour Divide 1.75 cups for dough and 0.25 cups for dusting work surface
- 2.5 teaspoons baking powder
- 1.5 cups carrots washed, dried and finely shredded (Do not peel the carrots)
- 1 cup creamy peanut butter
- 0.25 cup water
- 2 extra large eggs
- 2 tablespoons honey
Instructions
Preparation Steps
- Preheat the oven to 325°F. Line 2 baking sheets with parchment paper.
- In a medium size bowl, whisk together 1.75 cups of whole wheat flour and baking powder.
- Add the finely shredded carrots, creamy peanut butter, water, eggs and honey to a medium size mixing bowl and stir to completely combine.
- Gradually stir in the whole wheat flour mixture, stirring just until well incorporated. The dough should appear firm but not dry. You can add a few more tablespoons of water as needed.
- Dust your work surface and rolling pin with the reserved 0.25 cup of whole wheat flour.
- Roll dough out to about 0.25 inch thickness.
- Use a 3 inch dog bone shaped cookie cutter to cut out the dough and place on the prepared baking sheet.
- Bake for 20 to 25 minutes until the edges are set and golden brown. Transfer the treats to a cooling rack to cool completely.

