There’s something about the smell of chocolate and peanut butter melting together that instantly takes me back to cozy Saturday afternoons at my grandma’s house. I remember sneaking bites of her peanut butter chocolate swirl brownies when she wasn’t looking and thinking, “There’s no way this can be homemade—it’s too perfect.” Years later, I finally got her recipe (with a few twists of my own) and now it’s my go-to when I want something rich, comforting, and surprisingly quick to whip up. This recipe is a bit like your favorite chocolate brownie but with that creamy, nutty peanut butter twist that makes you do a little happy dance with each bite. Honestly, it’s perfect for when you want a bit of indulgence but don’t want to bake a whole cake. My kids always ask for seconds, and I’m betting yours will too.
What is Peanut Butter Chocolate Swirl Brownies?
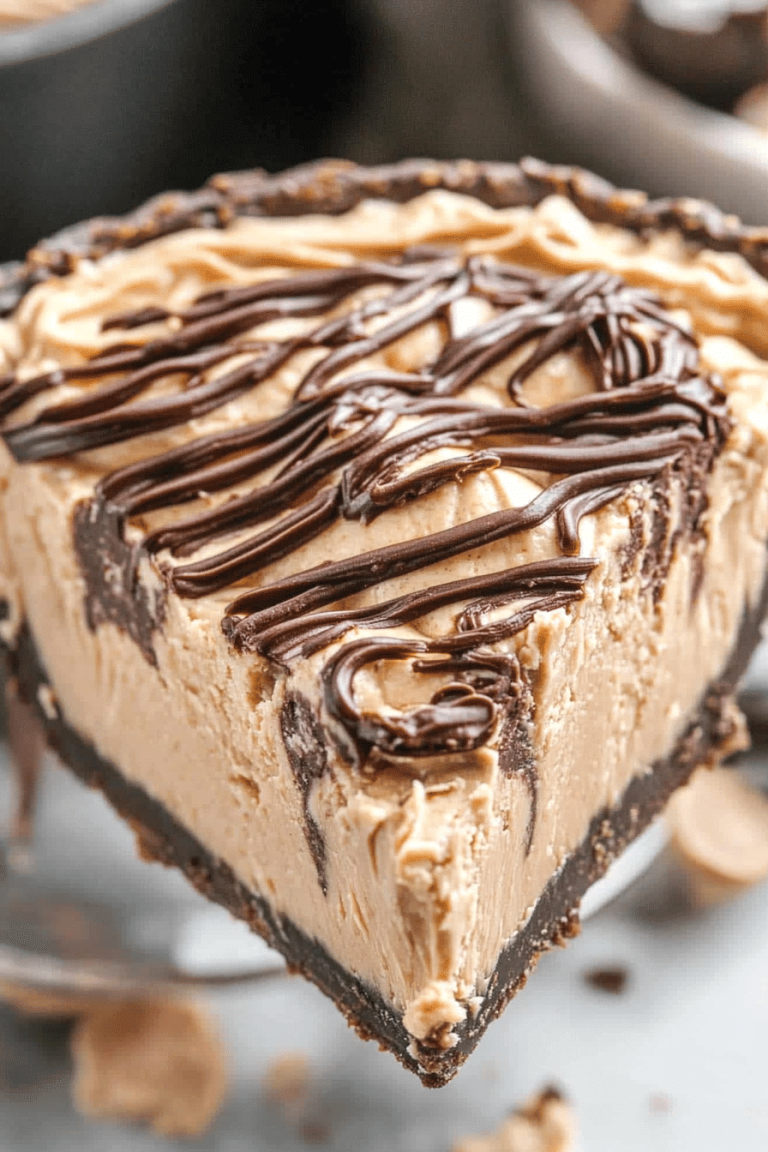
Think of these brownies as the delicious lovechild of two all-time favorites: peanut butter and chocolate. It’s essentially a fudgy chocolate brownie base with a luscious swirl of peanut butter running through it, giving the whole thing a beautiful marbled look and that perfect sweet-and-salty combo. The swirl isn’t just for show, either—each bite delivers that rich peanut butter warmth mixing with the deep cocoa flavor. The recipe’s name comes from this swirling effect, where the two flavors meet and mingle, creating pockets of ooey-gooey goodness. If you’re familiar with regular brownies or peanut butter cups, this is like those but all combined and baked into one tray—more cozy and less fuss. It’s impressive but approachable, and that’s what makes it so special.
Why you’ll love this recipe?
What I love most about these peanut butter chocolate brownies is how they hit all the right notes without ever feeling complicated. First off, the flavor combo is a dream—chocolate and peanut butter are just one of those timeless duos, right? Everything from the buttery, fudgy brownies to the sweet swirl is a little slice of heaven. Then, there’s the simplicity factor. I promise, you don’t have to be a pro baker to nail this. Everything comes together in just a few bowls, and no mixer required if you’re in a hurry (though it helps for creamy mixing!). For busy weeknights when you want dessert but can’t handle a long prep, this is a lifesaver.
And the best part—this treat is budget-friendly. The ingredients are staples in most kitchens: peanut butter, cocoa powder, sugar, eggs, and a bit of flour. No expensive “gourmet” stuff needed. Plus, versatility is a huge bonus. You can mix in nuts if you want a bit of crunch, sprinkle some flaky sea salt for contrast, or even swirl in some caramel if you’re feeling decadent. I often swap toppings depending on what the family is craving. In fact, if you ever enjoyed my classic chocolate chip cookies or my simple peanut butter bars, this brownie recipe slots right in as your next baking obsession.
How do I make Peanut Butter Chocolate Swirl Brownies?
Quick Overview
This recipe is a straightforward two-part batter situation—the rich chocolate base and the peanut butter swirl that’s mixed just right to create those gorgeous ribbons of flavor. From prepping your pan to cooling and glazing, it’s designed to be smooth sailing even for a busy home cook. What makes it really stand out in my kitchen is the way the peanut butter gently melts into the chocolate batter during baking, giving you that soft, buttery center that’s a total crowd-pleaser. You’ll love how the process feels more like an easy, playful swirl of two flavors rather than a complicated bake.
Ingredients
For the Main Batter:
- 1 cup semisweet chocolate chips (or chopped chocolate for richer taste)
- ½ cup unsalted butter, melted (I use European-style butter for creaminess)
- ¾ cup granulated sugar (feel free to reduce if you prefer less sweet)
- 2 large eggs, room temperature
- 1 teaspoon vanilla extract (fresh vanilla really makes a difference)
- ½ cup all-purpose flour, sifted (for texture balance)
- ¼ teaspoon salt (balances sweetness and enhances chocolate)
- 2 tablespoons cocoa powder (unsweetened, rich and dark)
For the Filling:
- ½ cup creamy peanut butter (natural or smooth—avoid runny types for best swirl)
- 2 tablespoons powdered sugar (to sweeten and thicken the swirl)
- 1 teaspoon vanilla extract
- 2 tablespoons milk or cream (for easy mixing, almond milk works great too!)
For the Glaze (optional but highly recommended):
- ½ cup semisweet chocolate chips
- 2 tablespoons butter
- 1 teaspoon light corn syrup or honey (for a shiny finish)
Step-by-Step Instructions
Step 1: Preheat & Prep Pan
Preheat the oven to 350°F (175°C). I always line an 8×8 inch square baking pan with parchment paper and leave a bit of extra hanging on the sides for easy lifting later—truly a game-changer for neat squares. Lightly grease the parchment with butter or nonstick spray just to avoid clinginess.
Step 2: Mix Dry Ingredients
In a medium bowl, sift together the flour, cocoa powder, and salt. Sifting here helps avoid clumps, which can be tricky in chocolate batters. This step also lets you get familiar with the deep, almost dusty aroma of cocoa—my favorite pre-bake moment.
Step 3: Mix Wet Ingredients
In a larger bowl, whisk the melted butter and sugar until combined and glossy—this helps keep the texture smooth rather than grainy. Add the eggs one at a time, whisking well between each addition, then stir in the vanilla extract. You want the batter light and slightly airy, not lumpy or curdled. The key here? Eggs at room temperature make this a breeze.
Step 4: Combine
Gradually fold the dry mixture into the wet, using a spatula. Mix just until you don’t see any flour streaks; overmixing will make the brownies tough instead of fudgy. It’s okay if the batter looks thick—that’s a good sign!
Step 5: Prepare Filling
Whisk together the creamy peanut butter, powdered sugar, vanilla, and milk until smooth. If it feels too thick, add a splash more milk—but don’t go too runny or it won’t swirl beautifully. You want a thick but pourable consistency that holds its shape while still flowing over the chocolate batter.
Step 6: Layer & Swirl
Spread about two-thirds of the chocolate batter evenly in the pan. Dollop spoonfuls of the peanut butter filling all over the brownie layer, then spread the remaining chocolate batter on top in a few spots (not perfectly even). Now comes the fun part—grab a butter knife and gently swirl the peanut butter and chocolate layers, moving it around in big, lazy circles to create a marbled look. Trust me, the more casual you are with this step, the prettier it looks once baked.
Step 7: Bake
Bake in the preheated oven for 25-30 minutes, checking doneness around 25. You’re looking for slightly firm edges with a bit of a jiggle in the center—that’s what keeps it moist and fudge-like. Every oven’s different, so keep an eye on yours; overbaking is the only real danger here if you want that soft, melt-in-your-mouth bite.
Step 8: Cool & Glaze
Let the brownies cool completely in the pan—I know it’s tough, but warm brownies don’t slice well and the swirl will lose definition. Once cool, melt the chocolate chips with butter and corn syrup in a double boiler or microwave in short bursts, stirring until silky smooth. Pour the glaze over the top, spreading gently for a shiny finish that sets in about 15-20 minutes. This step turns the whole thing into something that looks and tastes extra special.
Step 9: Slice & Serve
Use the parchment edges to carefully lift the brownies from the pan. For neat slices, wipe your knife clean between cuts and enjoy slightly chilled or at room temperature. These hold their shape beautifully, and little drizzles of extra peanut butter or a pinch of flaky sea salt on top make them feel fancy. I like to serve mine with a cold glass of milk or a strong cup of coffee.
What to Serve It With
For Breakfast: Peanut butter chocolate brownies as a treat with a creamy latte or espresso make for a sweet pick-me-up on slow weekend mornings. Try cutting them into small squares and topping with fresh berries for a fresh contrast.
For Brunch: Plate alongside whipped yogurt or ricotta cheese tossed with honey and nuts. Pair with warm chai or spiced tea—it feels like a little indulgent brunch party at home.
As Dessert: Serve warm with vanilla ice cream or a drizzle of salted caramel sauce and crushed peanuts for texture. I once paired these with a glass of ruby port one chilly winter night, and the flavors just exploded.
For Cozy Snacks: Enjoy straight from the fridge with a mug of hot chocolate after a long day. They’re also perfect packed in lunchboxes for a mid-afternoon treat (my kids would agree).
Family tradition calls for serving them at holiday gatherings or birthday celebrations, and I promise, they disappear in minutes. Whether it’s a casual tea or a festive dessert spread, these brownies fit right in and feel like a warm hug.
Top Tips for Perfecting Your Peanut Butter Chocolate Swirl Brownies
Peanut Butter Quality: Use a creamy peanut butter that’s not too oily. Natural peanut butter can separate, so stir well before measuring. I avoid crunchy peanut butter here because it can affect the swirl texture.
Mixing Advice: Be gentle when folding the dry ingredients in. Overmixing is my old mistake—I once ended up with cakey brownies instead of fudgy ones because I kept stirring! You want the batter just combined, silky but thick.
Swirl Customization: I like random, big swirls for that rustic look. Use a butter knife or skewer and don’t overthink it. More swirls means more marble, but if you swirl too much, you can lose the distinct layers.
Ingredient Swaps: For a dairy-free version, swap butter for coconut oil and milk for almond or oat milk (which I’ve tested and loved—it makes the swirl creamier). Gluten-free flour blends work fine but expect a slightly denser bite.
Baking Tips: Oven temperatures vary, so check your brownies around 22 minutes if you have a hot oven. Middle should look set but still jiggle slightly—that’s the line between fudgy and dry.
Glaze Variations: You can skip the glaze if you want just a rustic finish or dust the top with cocoa powder or powdered sugar for a quick alternative. Adding a pinch of chili or cinnamon to the glaze can add a surprising pop that I secretly adore.
Lesson learned: I once tried swirling the peanut butter earlier and layering thinner—ended with a peanut butter crust on top rather than swirl. Now, I leave some batter bare to keep the layers balanced.
Storing and Reheating Tips
Room Temperature: Store in an airtight container for up to 2 days. I avoid leaving them uncovered because the peanut butter can dry out and lose that lovely gooey contrast.
Refrigerator Storage: These brownies keep well refrigerated for up to 5 days. Keep them wrapped in parchment or plastic wrap inside an airtight container to lock in moisture. I usually pull them out 30 minutes before serving to bring back some softness.
Freezer Instructions: Wrap brownies tightly in plastic wrap, then foil, and freeze for up to 3 months. Thaw overnight at room temperature or gently warm in the microwave in short bursts for that fresh-baked feel. The swirl texture holds up beautifully after freezing.
Glaze Timing Advice: If you plan to freeze or refrigerate for longer than a day, I recommend glazing just before serving. It keeps the top from cracking or dulling, and the shine looks fresh.
Frequently Asked Questions
Final Thoughts
There’s a reason this peanut butter chocolate swirl brownie recipe has become a household favorite in my kitchen—it’s simple, indulgent, and something that brings everyone together around the table. It’s not just the flavors, but the memories swirling with each bite—the cozy afternoons, the laughter, and the tradition of sneaking one more square before dinner. If you enjoy this, don’t hesitate to explore other recipes where two beloved flavors come together in surprising ways, like my salted caramel blondies or almond butter chocolate cookies. Baking this is a small joy that feels like a treat and a comfort all at once. I can’t wait to hear how yours turns out, so drop me a comment or share your own swirl stories. Happy baking!
Peanut Butter Chocolate
Ingredients
Main Ingredients
- 1 cup unsalted butter melted
- 0.75 cup granulated sugar
- 1 cup light brown sugar packed
- 2 large eggs
- 1 tbsp pure vanilla extract
- 1 tsp baking soda
- 0.5 tsp salt
- 3.25 cups all-purpose flour
- 0.75 cup chocolate chips
- 30 pieces Miniature Peanut Butter Cups see note
- 14 oz fat-free sweetened condensed milk
- 0.25 cup creamy peanut butter
Instructions
Preparation Steps
- Preheat oven to 350°F. Line a 9x13 inch baking pan with foil and spray with cooking spray for easy removal.
- Stir together melted butter with both sugars. Add eggs, one at a time, mixing completely. Mix in vanilla extract, salt, and baking soda. Slowly mix in flour. Stir in chocolate chips.
- Pour the sweetened condensed milk into a small bowl and add the peanut butter. Stir until smooth.
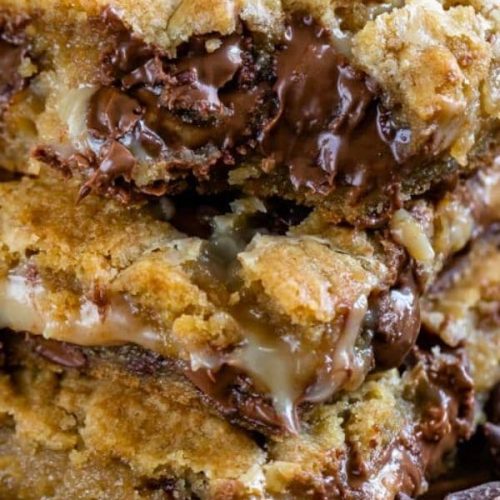
- Press half the cookie dough in the prepared pan. Spray your hands with nonstick cooking spray so it won’t stick to you. Top the dough with peanut butter cups.
- Pour sweetened condensed milk mixture over the top of the bottom layer, leaving about a 1/4 inch edge so the milk doesn’t touch the foil. Break up remaining cookie dough and place on top. Press with your hands to flatten. It will mostly cover but not completely cover the bottom layer.
- Bake for about 30-35 minutes until the tops of the bars start to get golden brown. Cool completely before slicing into bars.
- Store in an airtight container for up to 3 days or freeze for up to one month. Best served at room temperature.