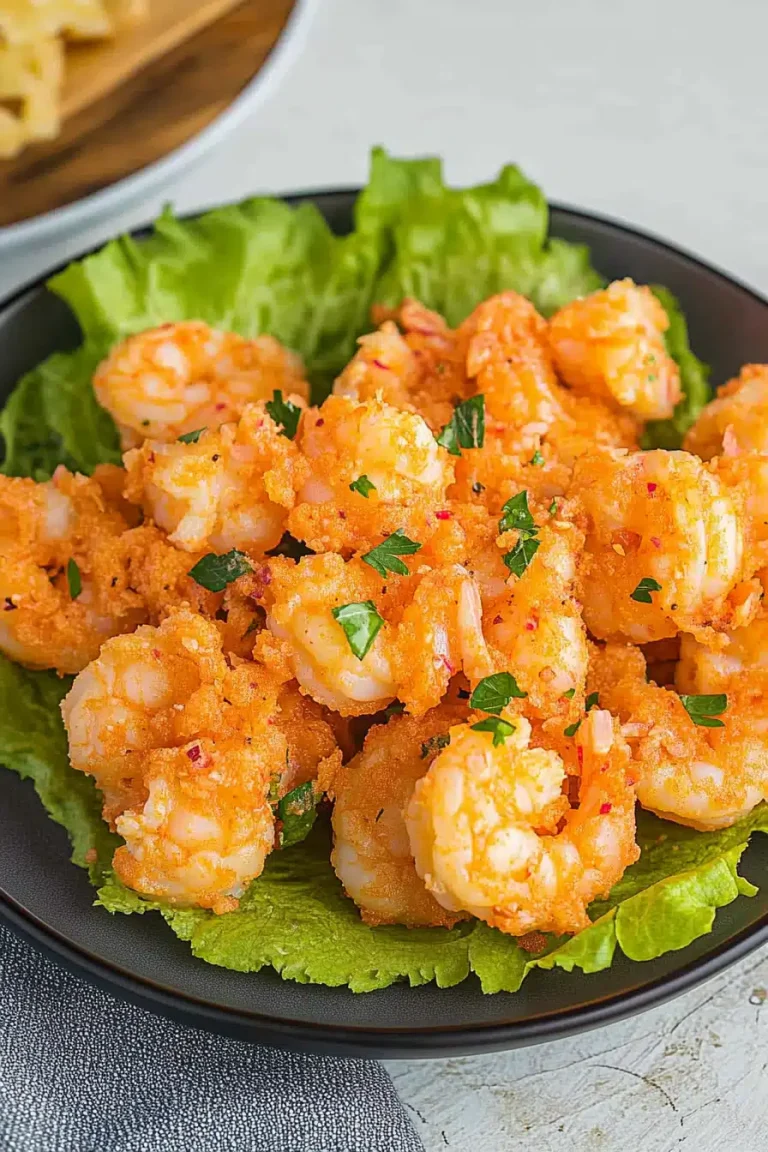
There’s something magical about sinking your teeth into golden, crispy coconut shrimp that’s been fried to perfection, isn’t there? I still remember the first time I tried these beauties at a tiny beachside café during a family vacation—the crunch of the toasted coconut paired with the juicy shrimp was like a little burst of sunshine on my tongue. Ever since then, I’ve been hooked, making my own batch at home that rivals any restaurant. Trust me, if you think tempura shrimp is your go-to, give coconut shrimp a whirl—you’ll find that lovely tropical sweetness and textural contrast hard to beat. The smell alone as they fry can bring everyone running to the kitchen. Plus, it’s one of those dishes that’s perfect whether you’re making a fancy appetizer or just craving a light, flavorful snack on a lazy weekend. My kids actually ask for seconds every single time, and I’m willing to bet yours will too!
What is coconut shrimp?
So, what exactly is this coconut shrimp everyone raves about? Think of it as shrimp’s tropical cousin to classic fried seafood—these are shrimp coated in a crispy, crunchy batter that’s packed with shredded coconut. It’s essentially shrimp that’s breaded with a mixture of panko (or breadcrumbs) and coconut flakes, then fried until they’re golden brown and deliciously crunchy. The coconut adds a sweet, nutty flavor that perfectly complements the briny, tender shrimp inside. It’s a dish that conjures up beach vibes wherever you make it, even if you’re stuck at home in your PJs on a rainy day. It’s fun, unpretentious, and surprisingly simple to whip up—perfect for impressing guests or treating yourself to something special without spending hours in the kitchen. If you love mixing sweet and savory textures, this one’s a must-try.
Why you’ll love this recipe?
What I adore most about coconut shrimp is how they hit all the right notes without any fuss. First off, the flavor is just out of this world—the crispy coconut flakes add a subtle sweetness that balances beautifully with the shrimp’s natural brininess and the light, salty crust. Every bite offers this perfect crunch followed by juicy seafood goodness. It’s like a little tropical getaway on your plate.
Next up, it’s so easy to make! Seriously, if you can set up a simple breading station with a few bowls, you’re halfway there. I often turn to this recipe when I want something quick but still ridiculously tasty. No need for complicated marinating or exotic ingredients—most of what you need is probably already in your pantry. And because shrimp cooks fast, dinner or snacks are ready in a flash, which is a lifesaver on busy nights.
This recipe is also pretty budget-friendly. Shrimp might seem pricey, but frozen shrimp works like a charm here, and a little bit of shredded coconut goes a long way. You don’t need anything fancy to get those amazing textures and flavors. Plus, it’s incredibly versatile: serve these as a fun appetizer at parties, toss them on a salad for lunch, or pair them with some tropical fruit salsa for a light dinner. I’ve even tossed mine in wraps or with noodles when I want something different. It’s the kind of recipe that welcomes creativity, which is why it’s become a favorite in my rotation.
How do I make coconut shrimp?
Quick Overview
Making coconut shrimp is like setting up a tiny assembly line. You get your shrimp cleaned and ready, then dip them first into a wet batter or egg wash, followed by a dry mixture full of panko and shredded coconut. The magic happens when you fry them just right—hot enough to crisp up the coating but gentle enough to keep the shrimp tender inside. You can do these in a skillet or a deep fryer, either way works great! The whole process only takes about 20 minutes, and I promise the rewards are worth every second.
Ingredients
For the Main Batter:
- Large shrimp, peeled and deveined (medium to large size works best for that perfect bite)
- All-purpose flour (this helps the egg stick better)
- Eggs (lightly beaten, acts as the glue)
- Milk (or coconut milk for extra creaminess and a subtle coconut kick)
For the Coating:
- Panko breadcrumbs (these give a light, airy crispiness)
- Sweetened shredded coconut (fresh or thawed if frozen—don’t skip this, it’s the star!)
- Salt and pepper (to season everything just right)
For the Dipping Sauce:
- Sweet chili sauce (the classic accompaniment)
- Optional: a squeeze of lime, a sprinkle of chopped cilantro, or a dash of hot sauce for a little kick
Step-by-Step Instructions
Step 1: Preheat & Prep Pan
Start by heating your oil to about 350°F (175°C) in a deep skillet or using a deep fryer. You want it hot enough for the coating to crisp immediately without absorbing too much oil, but not so hot that it burns. I usually test the temp by dropping a tiny bit of batter in—the shrimp should sizzle up right away and turn golden in a minute or two.
Step 2: Mix Dry Ingredients
In a shallow bowl, combine the panko breadcrumbs and shredded coconut. I like to toss them with a pinch of salt and pepper for extra flavor. The shredded coconut should clump lightly with the breadcrumbs, promising a crunchy, flavorful crust. If your coconut is frozen and clumping too much, give it a quick fluff with your fingers.
Step 3: Mix Wet Ingredients
In another bowl, whisk together eggs and milk (or coconut milk if you’re feeling adventurous). Make sure this mixture is smooth and evenly combined—it’s what helps that coconut and panko stick beautifully to the shrimp. Sometimes I add a little vanilla or a dash of sugar here for a subtle sweetness, but that’s just me being extra.
Step 4: Combine
First, dredge each shrimp in the flour, shaking off the excess. This step is key because it ensures the egg wash really clings to the shrimp. Next, dip your shrimp fully into the egg mixture, then roll it around in the coconut-panko blend until it’s generously coated. Don’t rush this part—press it gently with your fingers so the coating sticks well without falling off in the oil.
Step 5: Fry
Carefully place the shrimp in your hot oil, making sure not to overcrowd the pan. Fry them in batches, turning once so they brown evenly. It only takes about 2-3 minutes per batch—look for a crispy, golden exterior and opaque shrimp meat inside. I always keep a close eye because shrimp cooks quickly and can go from perfect to chewy fast.
Step 6: Drain and Serve
Once done, move your shrimp to a plate lined with paper towels to soak up any excess oil. You want them crispy, not greasy. Serve immediately with your favorite dipping sauce—sweet chili is my go-to, but tangy mango salsa or a simple squeeze of lime does wonders too. The smell when they come out of the oil? Pure magic.
What to Serve It With
For Breakfast: Coconut shrimp for breakfast might sound wild, but trust me—try it with a tropical fruit salad and a cup of freshly brewed coffee. The sweet-savory combo wakes up your taste buds in a fun, unexpected way.
For Brunch: For a brunch party, plate coconut shrimp alongside a vibrant mango-avocado salsa and a chilled mimosa. The light crunch paired with fresh fruit keeps things playful and elegant.
As Dessert: Now, this one’s a goofy twist I do all the time—serve coconut shrimp with a drizzle of honey and a scoop of coconut ice cream. It’s a crispy, sweet treat that’s sort of a dessert in disguise, perfect when you want something indulgent but not heavy.
For Cozy Snacks: Pop some on a platter with fresh lime wedges and a spicy aioli for dipping. This setup has saved many of my lazy weekend afternoons when Netflix and snacks are all that matter. My family will happily munch on these with chilled lemonade or iced tea.
Top Tips for Perfecting Your Coconut Shrimp
Shrimp Prep: Always use fresh or well-thawed shrimp for the best texture. Dry them thoroughly with paper towels before breading to help everything stick better and avoid soggy coatings.
Mixing Advice: Don’t rush coating your shrimp. Make sure each piece is evenly floured before dipping into the egg wash—that little layer of flour is the secret to a crispy shell that won’t fall apart in the oil.
Coating Customization: Swirling the coating mixture with a bit of paprika or cayenne pepper can add a lovely smokiness or heat. I sometimes add finely chopped fresh herbs to the coconut-panko blend for a fresh surprise.
Ingredient Swaps: I’ve tested swapping regular shredded coconut for unsweetened or even toasted coconut flakes—each adds a slightly different flavor, so it’s fun to experiment. Using coconut milk instead of regular milk in the egg wash adds another layer of coconut flavor that’s subtle but lovely. If you’re feeling daring, almond milk or even a light beer in the batter can change the texture in cool ways.
Frying Tips: Keep your oil at a steady temperature—too hot and the coating burns before the shrimp cook, too low and they soak up oil and get greasy. Using a thermometer helps, but if you don’t have one, dropping a tiny bit of bread into the oil should give a good test bubble and color for frying.
Glaze and Sauce Variations: I sometimes make a quick glaze with honey, lime juice, and a pinch of chili flakes to brush on at the end for a shiny, sticky finish. Also, swapping traditional sweet chili sauce for a mango chutney or pineapple salsa adds exciting new flavor profiles.
Storing and Reheating Tips
Room Temperature: Coconut shrimp are best enjoyed fresh, but if you have leftovers, you can keep them covered at room temperature for about 1-2 hours without losing too much crunch. I’ve learned not to leave them out longer than that or they get soggy.
Refrigerator Storage: Store cooled coconut shrimp in an airtight container lined with paper towels to absorb moisture, and refrigerate for up to 2 days. When you’re ready to eat, reheating in a hot skillet or toaster oven helps regain some of that crispy texture—microwaving, unfortunately, makes them soggy.
Freezer Instructions: If you want to prep ahead, freeze the breaded—but not fried—shrimp on a baking sheet, then transfer them to a zip-top bag once solid. They’ll keep up to a month. When you’re ready, fry them straight from frozen, adding a minute or two to the frying time.
Glaze Timing Advice: I usually wait to add any glaze or sauce right before serving rather than before storage, as wet toppings can make the coating lose its crunch fast. If you love that sticky glaze, keep the shrimp separate and brush right before plating.
Frequently Asked Questions
Final Thoughts
Coconut shrimp isn’t just a dish; it’s one of those little joyful moments in the kitchen that makes everyone smile. Its golden crunch, sweet coconut crunch, and tender shrimp wrapped up in simple ingredients remind me why cooking can be so rewarding and fun. I’ve made this for casual family dinners, parties, and even weeknight snacks, and it never disappoints. The way the aromas fill the house as they fry is enough to convince anyone to gather ‘round and enjoy. If you love playing with textures and flavor contrasts or just want something straightforward and delicious, this recipe should be on your to-try list. I’d love to hear how your batch turns out—drop a comment, share your tips or twists, and don’t be shy with those ratings! Happy cooking, friends, and here’s to many crunchy, coconutty bites ahead.
Coconut Shrimp
Ingredients
Main Ingredients
- 1.25 lbs peeled and deveined jumbo shrimp
- 1 tsp olive oil
- 1 red bell pepper diced
- 4 scallions thinly sliced; white and green parts separated
- 0.5 cup cilantro chopped
- 4 cloves garlic minced
- 0.5 tsp kosher salt
- 0.5 tsp crushed red pepper flakes or to taste
- 14.5 oz diced tomatoes canned
- 14 oz light coconut milk
- 0.5 lime juiced
Instructions
Preparation Steps
- In a medium pot, heat olive oil over medium-low heat. Add diced red bell pepper and sauté until soft, about 4 minutes.
- Add the white parts of the scallions, 0.25 cup chopped cilantro, minced garlic, and crushed red pepper flakes. Cook for 1 minute.
- Add diced tomatoes, light coconut milk, and kosher salt. Increase heat to bring to a boil. Cover and simmer on low heat for about 10 minutes to let flavors blend and sauce thicken.
- Add the shrimp and cook for 5 to 6 minutes, or until shrimp turn opaque and are fully cooked.
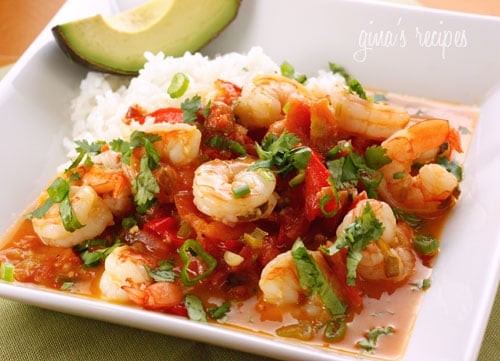
- Stir in the lime juice.
- To serve, divide equally among 4 bowls (about 1 1/4 cups each), then top with the green parts of scallions and remaining cilantro.