Oh, friend, settle in, because I’m about to tell you about a pie that’s basically sunshine and pure, unadulterated joy in every single bite. It’s the kind of dessert that makes people stop mid-sentence, eyes widen, and ask, “What IS this magic?” We’re talking about what’s famously known as Crack Pie – a name that sounds a little naughty, I know, but trust me, it’s just a playful nod to how utterly addictive it is. I first encountered this masterpiece years ago, and it quickly became a legend in my kitchen. It’s not quite a cheesecake, not quite a cookie, and definitely not your average pie. It’s something entirely its own, and I’ve tinkered with it enough to have my own tried-and-true version that I just have to share with you. If you love a good Pecan Pie but crave something with a bit more creamy decadence, or if you’re looking for a show-stopper that’s surprisingly manageable, this Crack Pie recipe is about to become your new best friend. It’s my secret weapon for potlucks, holidays, or just those moments when only something incredibly sweet and comforting will do.
What is crack pie?
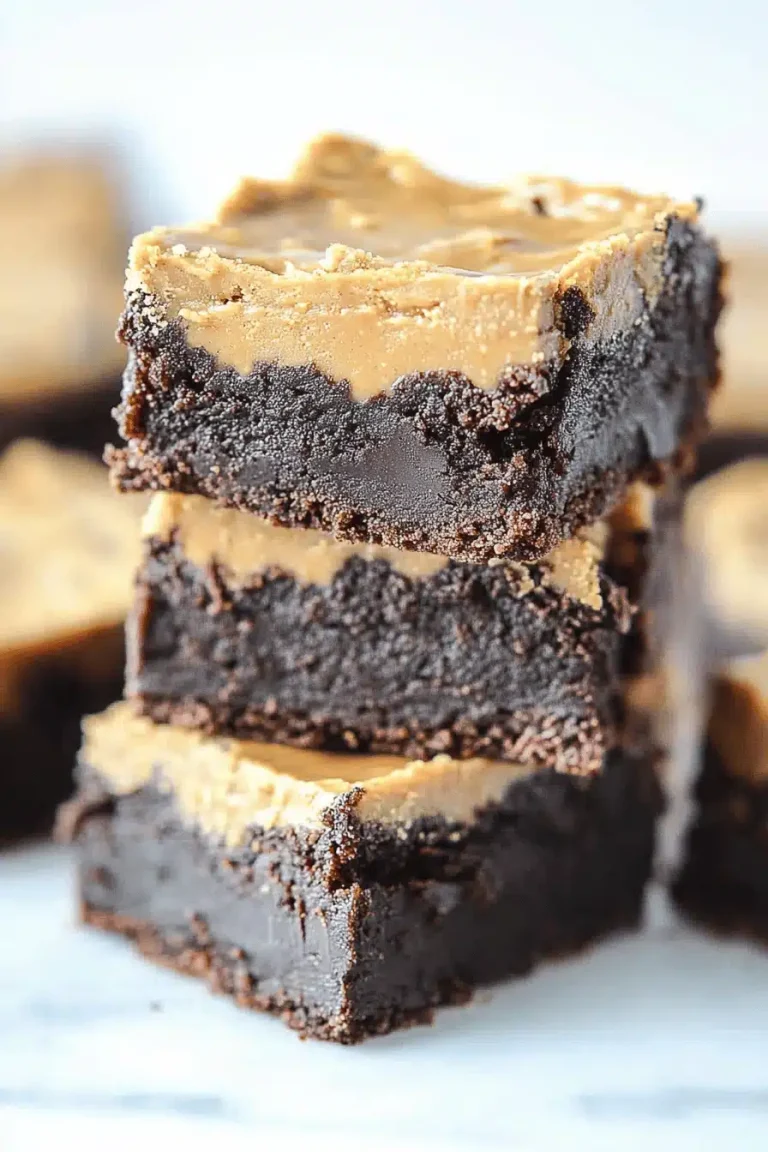
So, what exactly is this “Crack Pie” we’re whispering about? Don’t let the name fool you; it’s just a delightful, intensely caramel-flavored pie with a buttery oat crust and a gooey, custard-like filling. Think of it as a hug for your taste buds. The original recipe comes from a famous New York bakery, and it’s known for its unbelievably rich, sweet, and slightly salty profile. It’s essentially a decadent blend of brown sugar, butter, and cream that bakes into this luscious, almost dulce de leche-like filling, all cradled in a simple, yet perfect, crumbly crust. It’s the kind of dessert that makes you close your eyes and just savor the moment. It’s not overly complicated, but the flavor is so profound, it tastes like you spent hours slaving away. It’s the essence of comfort food, elevated to pure dessert artistry. It’s the kind of pie that doesn’t need elaborate decorations; its pure, golden-brown glory is enough.
Why you’ll love this recipe?
Honestly, there are so many reasons why this Crack Pie recipe has earned a permanent spot in my baking rotation. For starters, the FLAVOR. Oh, my goodness, the flavor! It’s this incredible symphony of sweet caramel, a hint of salt, and the nutty depth from the oat crust. It’s rich without being heavy, and that subtle saltiness cuts through the sweetness perfectly, making every bite more irresistible than the last. My family devours this pie, and I always have to hide a slice for myself before it disappears! Then there’s the SIMPLICITY. I know, I know, it sounds fancy, but seriously, this pie is incredibly straightforward. The crust comes together in a food processor in minutes, and the filling is just a matter of whisking a few ingredients together. It’s the kind of recipe that’s a lifesaver on busy nights when you need something impressive without the fuss. Plus, it’s surprisingly COST-EFFECTIVE. Most of the ingredients are pantry staples, making it a budget-friendly way to create a truly decadent treat. And let’s talk VERSATILITY. While it’s absolutely divine served as is, I’ve found it’s fantastic with a dollop of whipped cream or a scoop of vanilla Ice Cream, especially if you’ve gone a little heavy on the caramelization. It’s perfect for breakfast (don’t judge me!), brunch, dessert, or even a late-night sweet craving. It’s a forgiving recipe, too, which is a huge plus for any home baker. What I love most about this is the sheer happiness it brings. It’s a guaranteed crowd-pleaser that always gets rave reviews, and that feeling of sharing something so delicious with people you care about is just the best.
How do I make crack pie?
Quick Overview
Making this Crack Pie is all about building layers of flavor and texture. We start with a buttery, slightly salty oat crust that’s pressed into the pan. Then, we pour in a luscious, caramel-like filling made from brown sugar, butter, and cream, which bakes into a glorious, gooey center. The magic happens during baking, transforming simple ingredients into pure indulgence. It’s a process that feels almost therapeutic, and the aroma that fills your kitchen will have everyone begging for a slice before it’s even out of the oven. It’s truly as easy as mixing, pouring, and baking to a golden-brown perfection.
Ingredients
For the Crust:
This is where we get that perfect crumbly texture with a hint of nuttiness. Make sure your butter is nice and cold for the best results! I always use rolled oats here, not instant, for a better texture. You can find good quality rolled oats at most grocery stores, or even buy them in bulk.
- 1 12 cups rolled oats (not instant) (not rolled oats)
- ½ cup all-purpose flour
- ½ teaspoon salt
- ¾ cup (1 ½ sticks) unsalted butter, cold and cubed
For the Filling:
This is the heart and soul of the pie! The combination of brown sugar and butter is key to that incredible caramel flavor. Don’t skimp on the quality of your brown sugar – it really makes a difference in depth of flavor. I prefer dark brown sugar for its molasses notes, but light brown sugar works too if that’s what you have on hand.
- 2 cups packed dark brown sugar
- ½ cup (1 stick) unsalted butter, softened
- 2 large eggs
- 1 teaspoon vanilla extract
- ½ teaspoon salt
- ½ cup heavy cream
For the Glaze (Optional but highly recommended!):
A simple dusting of powdered sugar is traditional, but for an extra layer of flavor and beauty, this simple glaze is divine. It adds a touch of sweetness and makes the pie look extra polished. I sometimes like to add a tiny pinch of cinnamon to mine, just for a subtle warmth.
- ½ cup powdered sugar
- 1-2 tablespoons milk or cream
Step-by-Step Instructions
Step 1: Preheat & Prep Pan
First things first, get your oven preheated to 350°F (175°C). This is a pretty standard baking temperature, so your oven should have no problem hitting it. While the oven is warming up, grab a 9-inch pie plate. I like to use a ceramic or glass one, but a metal one works just fine too. For the crust, you don’t need to grease the pie plate beforehand because the butter in the crust will do all the work. Just have it ready to go!
Step 2: Mix Dry Ingredients
In a medium bowl, combine your rolled oats, all-purpose flour, and salt. Give them a good whisk with a fork to make sure everything is evenly distributed. This simple step ensures that every part of your crust has that perfect balance of sweetness and saltiness, with the oats providing a lovely texture.
Step 3: Mix Wet Ingredients
Now for the crust base. Add the cold, cubed butter to the dry ingredients. You can use a pastry blender, a fork, or even your fingertips to cut the butter into the dry mixture. You’re looking for a consistency that resembles coarse crumbs, with some pea-sized pieces of butter still visible. This is important for creating that flaky, tender crust.
Step 4: Combine
Press the crumbly mixture evenly into the bottom and up the sides of your prepared pie plate. Use the flat bottom of a measuring cup or your fingers to really pack it in there. This helps the crust hold together during baking. Once it’s pressed in, pop the pie plate into your preheated oven and bake for about 10-12 minutes, until it’s lightly golden brown. This pre-baking step is crucial for preventing a soggy bottom!
Step 5: Prepare Filling
While the crust is baking, it’s time for the star of the show: the filling! In a large bowl, beat together the softened butter and dark brown sugar until the mixture is smooth and well combined. It should look creamy and light. Then, beat in the eggs one at a time, mixing well after each addition. Stir in the vanilla extract and salt. Finally, gradually whisk in the heavy cream until everything is just combined and the filling is luscious and smooth. Don’t overmix here; we just want everything incorporated.
Step 6: Layer & Swirl
Once the crust is done pre-baking and has cooled slightly (just enough so it’s not steaming hot), carefully pour the filling into the crust. If you want to get fancy, you can reserve a little of the crust mixture and sprinkle it on top before baking, or even swirl some of the filling mixture around if you like. For this recipe, though, I usually just pour the filling right in. The goal is to get that gorgeous, gooey center.
Step 7: Bake
Place the pie back into the 350°F (175°C) oven. Now, this is the tricky part because pie baking is an art form as much as a science. You’ll want to bake it for about 35-45 minutes. The filling should be set around the edges but still slightly jiggly in the center. It will continue to set as it cools. A good test is to gently shake the pie – if the center still wobbles like jelly, it needs a little more time. Keep an eye on the crust edges; if they start to brown too quickly, you can loosely tent them with foil. Trust your gut here; ovens can be quirky!
Step 8: Cool & Glaze
This is probably the hardest part: letting it cool! Once it’s out of the oven, let the pie cool completely on a wire rack. This is really important. If you cut into it too soon, the filling will be molten. I usually let it cool for at least 2-3 hours, or even better, pop it in the fridge for an hour or two once it’s mostly cooled. If you’re adding the glaze, whisk together the powdered sugar and milk or cream until you have a smooth, pourable consistency. Drizzle it over the cooled pie. You can make it as thick or as thin as you like! Some people just dust it with powdered sugar, which is also lovely.
Step 9: Slice & Serve
Once it’s completely cool and glazed (or dusted), it’s time to slice and serve! Use a sharp knife for clean cuts. This pie is best served at room temperature or slightly chilled. The texture is just perfect then. A slice of this Crack Pie is pure bliss on its own, but a tiny dollop of unsweetened whipped cream can be a delightful contrast if you want something extra.
What to Serve It With
This Crack Pie is so incredibly versatile; it truly shines in so many settings! For BREAKFAST, I know it sounds decadent, but a small slice with a strong cup of black coffee is pure heaven. It’s like a sweet, carby start to the day that feels like a treat. My kids actually love it as a special weekend breakfast! For BRUNCH, it’s a showstopper. Serve it alongside some fresh fruit salad and maybe a quiche, and you’ve got a spread that will impress everyone. I like to plate it nicely, perhaps with a few berries artfully placed on the side, and offer it with mimosas or sparkling cider. As a DESSERT, it’s unparalleled. It’s rich, so a smaller slice goes a long way. It’s fantastic after a hearty meal, perhaps following something savory like roasted chicken or a rich pasta dish. A tiny scoop of good quality vanilla bean ice cream or some lightly sweetened whipped cream is all it needs to be perfect. For COZY SNACKS, this is the ultimate comfort food. Imagine curling up on the couch on a chilly evening with a warm drink and a slice of this pie – pure bliss! I often pair it with a mug of Hot Chocolate or a cozy herbal tea. My personal family tradition is to have it on New Year’s Day; it feels like a sweet, celebratory start to the year.
Top Tips for Perfecting Your Crack Pie
Over the years, I’ve learned a few little tricks that make this Crack pie recipe even better. My biggest tip for the CRUST prep is to really make sure your butter is cold and cubed. If it’s too warm, it’ll just melt into the flour and you won’t get those lovely flaky bits. I like to cut it into roughly ½-inch cubes. When you’re pressing the crust into the pan, don’t be shy! Really pack it down firmly. This prevents it from crumbling apart too much when you slice it later. For the MIXING ADVICE on the filling, resist the urge to overbeat once the eggs are in. Overmixing can develop the gluten in the flour just enough to make the filling a bit tougher than we want. We’re aiming for tender and luscious, not chewy. Just mix until everything is combined. I’ve learned this lesson the hard way with other custard-like desserts! The SWIRL CUSTOMIZATION isn’t really a swirl in the traditional sense for this pie, but you can play with the appearance. If you want a more rustic look, you can slightly roughen the surface of the crust before pouring the filling. Or, if you’re feeling adventurous, a few chocolate chips gently pressed into the filling before baking can add another delicious dimension. For INGREDIENT SWAPS, if you’re out of rolled oats, you could try using graham cracker crumbs for the crust, using about 1 ½ cups of crumbs mixed with the flour and salt, and a bit less butter. It’ll change the flavor profile slightly but should still be delicious. I’ve also heard of people experimenting with finely chopped pecans in the crust for an extra nutty crunch – definitely worth a try if you’re a pecan lover! For BAKING TIPS, pay close attention to the center of the pie. The edges will set faster than the middle. If the crust edges are browning too rapidly before the center is cooked, I highly recommend loosely tenting the pie with aluminum foil. This protects the crust and allows the center to finish cooking without burning. It’s a lifesaver! And finally, for GLAZE VARIATIONS, don’t feel confined to just powdered sugar and milk. You can make a caramel glaze by melting some butter and brown sugar together and adding a splash of cream. Or, if you’re a chocolate lover, a thin drizzle of melted dark chocolate over the top is heavenly. The key is to let the pie cool completely before adding any glaze or topping; otherwise, it will just melt right off.
Storing and Reheating Tips
One of the best things about this Crack Pie is how well it stores, making it perfect for making ahead of time. For ROOM TEMPERATURE storage, if you’ve glazed your pie, it’s best to keep it covered loosely with plastic wrap or a cake dome. It will keep well at room temperature for about 2 days, though honestly, it rarely lasts that long in my house! Just make sure it’s completely cooled before covering. For REFRIGERATOR STORAGE, this is my go-to method if I know it needs to last longer or if my kitchen is particularly warm. Wrap the cooled pie tightly in plastic wrap and then in aluminum foil, or place it in an airtight container. It can be stored in the refrigerator for up to 4-5 days. The texture might become a little firmer when cold, but it’s still absolutely delicious. For FREEZER INSTRUCTIONS, this pie freezes surprisingly well! You can freeze it either unglazed or glazed. Wrap it very well in several layers of plastic wrap and then a layer of aluminum foil to prevent freezer burn. It’s best to freeze it in slices for easier thawing. Frozen pie should last for up to 2-3 months. To thaw, simply remove it from the freezer and let it come to room temperature on the counter, or thaw slices overnight in the refrigerator. For GLAZE TIMING ADVICE, I always wait until the pie is completely cooled, and preferably chilled, before adding the powdered sugar glaze. If you glaze a warm pie, the glaze will melt and become a sticky mess. If you’re freezing the pie, I recommend glazing it *after* it has thawed, just before serving. This keeps the glaze looking its best!
Frequently Asked Questions
Final Thoughts
So there you have it, my dear friend! This Crack Pie recipe is more than just a dessert; it’s an experience. It’s that perfect blend of comforting familiarity and exciting indulgence that makes every bite feel special. From its irresistibly gooey, caramel-kissed filling to its buttery, crumbly oat crust, it’s a pie that truly lives up to its famous name. It’s the kind of recipe that makes you feel like a baking rockstar, even if you’re just starting out. What I love most is how it brings people together – the smiles, the satisfied sighs, the requests for seconds. If you’re a fan of rich, sweet, and decadent treats, you absolutely have to give this a try. I promise, it’s worth every minute spent in the kitchen. For those of you who adore this kind of comforting, classic-yet-elevated baking, you might also want to check out my recipe for {link to another pie or dessert recipe} – it’s another family favorite! I truly hope you love making and eating this Crack Pie as much as I do. Please, if you make it, come back and leave a comment letting me know how it turned out! I’d love to hear your thoughts and any fun twists you might have added. Happy baking!

Crack Pie Recipe
Ingredients
Oat Cookie Crust
- 0.25 cup unsalted butter melted
- 1 recipe Oat Cookie
- 0.0625 cup light brown sugar packed
- 0.25 tsp kosher salt
Crack Pie Filling
- 1 cup unsalted butter melted
- 1.5 cup granulated sugar
- 0.75 cup light brown sugar packed
- 1.5 tsp kosher salt
- 0.25 cup corn powder freeze-dried corn, ground to a fine powder
- 0.25 cup milk powder
- 0.75 cup heavy cream
- 0.5 tsp vanilla extract
- 8 large egg yolks
Garnish
- confectioners' sugar for dusting
Instructions
Oat Cookie Crust
- Preheat oven to 350°F (175°C). In a stand mixer with a paddle attachment, cream butter and sugars on medium-high speed for 2 to 3 minutes until fluffy and pale yellow.
- Scrape down the sides of the mixing bowl. On a lower speed, add the egg and mix until incorporated.
- Increase speed to medium-high for 1 to 2 minutes until sugar granules fully dissolve and mixture is pale white.
- On low speed, add flour, oats, baking powder, baking soda, and salt. Mix for 60-75 seconds until dough comes together. Dough will be a slightly fluffy, fatty mixture. Scrape down the sides of the bowl.
- Grease and line a quarter sheet pan with parchment or a Silpat. Spread the oat cookie dough evenly, about 1/4 inch thick. Dough will not cover the entire pan.
- Bake the oat cookie for 15 minutes. Cool completely before using.
Crack Pie Filling
- In a stand mixer with a paddle attachment on low speed, mix the dry ingredients for the filling. Keep mixer on low throughout to avoid incorporating too much air.
- Add melted butter and paddle until all dry ingredients are moist.
- Add heavy cream and vanilla extract, mix until cream is fully incorporated. Scrape down the sides of the bowl.
- Add egg yolks and paddle just to combine. Be careful not to aerate the mixture. Use immediately.
Assemble the Pies
- Preheat oven to 350°F (175°C). In a food processor, pulse the cooled oat cookie with brown sugar and salt until it resembles wet sand.
- Transfer crumbs to a bowl. Knead in the melted butter until the mixture is moist enough to form a ball. Add an additional 1-1.5 tablespoons of butter if needed.
- Divide the oat crust mixture evenly between two 10-inch pie tins.
- Press the crust firmly into the bottom and up the sides of both pie tins. Use immediately or store wrapped in plastic at room temperature for up to 5 days or in the fridge for up to 2 weeks.
- Place pie shells on a baking sheet. Divide the filling evenly between both crusts, filling about 3/4 full. Bake at 350°F (175°C) for 15 minutes, until golden brown and jiggly.
- Open the oven door and reduce temperature to 325°F (160°C). Keep pies in oven while temperature adjusts. Once at 325°F, close door and bake for an additional 5 minutes.
- Pies should still be jiggly in the center. If too jiggly, bake for another 5 minutes.
- Remove from oven and cool on a wire rack. For a denser filling, chill in the fridge for at least 3 hours or overnight.
- Just before serving, dust generously with confectioners' sugar.