There’s this magic that happens when brownies and cookies collide into one glorious dessert — what I like to call brownie cookie bars. I stumbled upon this recipe one evening when craving something rich and chocolatey, but didn’t want to fuss with two separate batters or make a massive batch of cookies alone. Honestly, the smell filling my kitchen while these baked was the kind of comforting warmth that instantly transported me back to my grandma’s house. The gooey edges mingled with the soft, chewy cookie swirls created a perfect little escape from whatever was on my mind. My kids literally ask for these bars on repeat, and friends keep stopping by “just to grab one more.” If you’re a cookie lover who’s always half tempted to jump into a pan of freshly baked brownies, this treat is your sweet spot — a little fudgy, a little chewy, and downright addictive.
What is Brownie Cookie Bar?
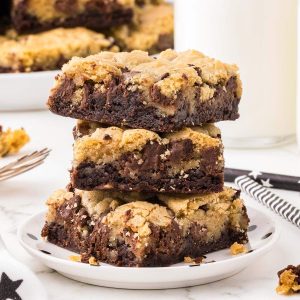
Think of brownie cookie bars as the best-of-both-worlds mashup, where the rich, fudgy depth of a brownie meets the comforting chewiness of a cookie in one glorious pan. It’s essentially a bar cookie — meaning it’s baked in a single dish and cut into squares — but what makes it special is the way the two batters come together, creating that mesmerizing marbled effect that’s as fun to watch as it is to eat. The name says it all, really: brownie cookie bars. They’re bars with the dense, chocolaty essence of brownies and the sweet, slightly crisp bite of cookies swirled through, giving you an unbeatable texture combo. Super approachable for home bakers, these bars are a fantastic shortcut to satisfy those moments when you want something indulgent but not complicated.
Why you’ll love this recipe?
Here’s the thing: what I love most about brownie cookie bars is how effortlessly they blend two dessert worlds without doubling the work. The flavor? Pure chocolate heaven. You get the deep cocoa richness from the brownie side, creamy bursts of chocolate chips from the cookie portion, and just enough sweetness to balance everything out without overwhelming your taste buds. Every bite brings a delightful mix of soft and chewy textures that keep you coming back for more.
Plus, the simplicity is no joke. This one’s a lifesaver on busy nights when you want something sweet but aren’t up for messing with multiple pans or ingredients lists that require a scavenger hunt at the grocery store. The ingredients are pantry staples — good chocolate, butter, sugar, eggs, a touch of vanilla, and flour — nothing fancy or intimidating, so it’s easy to pop together midweek or last minute for unexpected guests.
Cost-wise, this recipe is gentle on your wallet while still feeling special. And since it bakes in one pan, clean-up is a breeze which feels like an invisible but very real bonus. I’ve even swapped chocolate chips for nuts or tried mixing in cinnamon for a cozy twist, and it’s always a hit.
If you’ve ever enjoyed a classic chocolate chip cookie bar or a fudgy brownie, this one takes the best notes from both and elevates them to a new level. It’s huge at birthday parties, and believe it or not, it’s even my secret weapon for holiday cookie platters — folks don’t realize they are actually munching on a combo dessert until that first bite surprises them!
How do I make Brownie Cookie Bars?
Quick Overview
Making these bars is pretty straightforward — you start by preheating the oven, mixing your dry and wet ingredients for each batter separately, then layering and swirling them together in a baking pan. What I like is how the swirling doesn’t have to be perfect; in fact, some of the best-looking bars come from casual, messy swirls. The whole process is totally fun and forgiving, with a bake time that leaves you plenty of space for a cup of coffee or a quick chat with friends. It’s one of those recipes that somehow feels fancy but is surprisingly low-effort.
Ingredients
For the Main Batter (Brownie Base):
- 1 cup (2 sticks) unsalted butter, melted – I always go with real butter for that unbeatable richness
- 2 cups granulated sugar – this brings the perfect level of sweetness
- ¾ cup unsweetened cocoa powder – sift it to avoid lumps and get a smooth batter
- ½ teaspoon salt – enhances and balances the chocolate flavor
- 4 large eggs, at room temperature – they help the bars stay fudgy yet set
- 1 teaspoon pure vanilla extract – I don’t skip this, it adds depth
- 1 cup all-purpose flour – fresh flour means lighter texture and better rise
For the Cookie Filling (Chocolate Chip Cookie Layer):
- 1 cup all-purpose flour – the sturdy base for cookie dough
- ½ teaspoon baking soda – gives just the right lift
- ¼ teaspoon salt – for flavor balance
- ⅓ cup unsalted butter, softened – don’t substitute margarine here, butter is key!
- ½ cup packed brown sugar – I love that hint of molasses flavor it adds
- 3 tablespoons granulated sugar – balances out the brown sugar’s moisture
- 1 teaspoon vanilla extract – again, so important here for flavor
- 1 large egg – brings it all together
- ¾ cup semisweet chocolate chips – the more, the merrier in my book
For the Glaze:
- ½ cup powdered sugar – for smooth sweetness
- 1 tablespoon milk (or cream) – adjust slightly for desired glaze thickness
- ½ teaspoon vanilla extract or espresso powder – for added flavor nuance
Step-by-Step Instructions
Step 1: Preheat & Prep Pan
Start by heating your oven to 350°F (175°C). Line a 9×13-inch baking pan with parchment paper or grease it liberally — I swear by parchment because it makes lifting those bars out a breeze later. Timing is crucial here; preheating ensures a consistent bake, so resist the urge to delay or your edges might bake unevenly.
Step 2: Mix Dry Ingredients
Whisk together the cocoa, flour, and salt for the brownie batter until evenly combined. For the cookie dough, mix the flour, baking soda, and salt separately. Proper mixing here makes texture magic happen; trust me, skipping this led me to gritty bites once — not fun!
Step 3: Mix Wet Ingredients
In another bowl, whisk the melted butter with sugar until glossy and smooth for the brownie batter, then add eggs and vanilla one at a time, stirring gently but thoroughly. For the cookie dough, cream softened butter and sugars until fluffy, then beat in the egg and vanilla — the difference in texture at this point will make it obvious you’re on the right track.
Step 4: Combine
Slowly fold your dry brownie mix into the wet until just blended—you want that deep, fudgy base, not a cakey mess. Similarly, mix your cookie dry ingredients into the creamed butter mixture, then add in chocolate chips for the best melty pockets. Overmixing here can toughen your bars, and honestly, I’ve learned to stop just before the batter gets stiff for the perfect tender crumb.
Step 5: Prepare Filling
The cookie dough is your ‘filling,’ but more like dolloped blobs that you’ll swirl through the brownie batter. It’s thick and sticky, so a silicone spatula works best for portioning. This part is a little like painting — don’t worry about perfection, little clumps and swirls give the bars their charming character.
Step 6: Layer & Swirl
Pour half the brownie batter into your pan. Drop spoonfuls of cookie dough evenly on top, then cover with the remaining brownie batter. Using a butter knife or skewer, gently swirl the batters together — just a few twists to create a marbled look. This step is my favorite because it feels playful and the resulting look is almost hypnotic.
Step 7: Bake
Bake for 35-40 minutes until the edges look set and a toothpick comes out with a few moist crumbs, but no raw batter. Watch carefully after 30 minutes, since ovens vary — I learned the hard way that even a few extra minutes can dry out the edges. The smell at this point? Absolutely irresistible.
Step 8: Cool & Glaze
Let the bars cool completely in the pan — patience here is key because warm bars glaze poorly and tend to crumble. Once cool, whisk your glaze ingredients until smooth and drizzle gently over the bars. The contrast of the shiny glaze over the textured swirls is a feast for the eyes and palate alike.
Step 9: Slice & Serve
Using a sharp knife, slice into generous squares or rectangles. Warm bars are delicious, but I swear the flavor and texture deepen after a day or two. Serve with a tall glass of cold milk or a creamy cappuccino — this is my go-to combo on cozy weekend afternoons.
What to Serve It With
For Breakfast: These bars paired with your morning coffee or a latte make waking up a bit sweeter. Try warming a piece gently in the toaster oven and topping with a smear of peanut butter for an indulgent start.
For Brunch: Plate these bars alongside fresh fruit and a dollop of Greek yogurt or mascarpone for a casual but elegant spread. A sparkling mimosa or iced mocha pairs beautifully.
As Dessert: Top bars with a scoop of vanilla ice cream, a drizzle of hot fudge, or fresh berries. A sprinkle of sea salt compliments the rich chocolate notes perfectly and keeps guests coming back for more.
For Cozy Snacks: Late-night cravings? Grab a bar, maybe toast it lightly, and enjoy with herbal tea or a cold glass of milk. My family often gathers after dinner around the kitchen table with these, sharing stories and seconds.
Top Tips for Perfecting Your Brownie Cookie Bars
Zucchini Prep: Wait a second! This isn’t a zucchini recipe, but if you want to sneak in veggie goodness, like carrot or zucchini, shred and squeeze out excess moisture thoroughly — it adds moisture without sogginess if done right.
Mixing Advice: Resist the urge to overmix, especially when combining wet and dry. The batter should be thick but smooth; over stirring can lead to denser, less tender bars.
Swirl Customization: Play with your swirl technique — quick, circular motions create a marbling effect, while gentle zigzags add a more abstract design. Don’t worry about precision; uneven swirls make each bar unique and homey.
Ingredient Swaps: Try almond flour for part of the all-purpose flour if you want a nuttier depth but reduce it by about ¼ cup to keep texture perfect. For dairy-free, coconut oil melts nicely in place of butter but expect a slightly different flavor profile.
Baking Tips: Use an oven thermometer if yours runs hot or cold. Placing the pan in the center rack ensures even heat circulation. Start checking at 30 minutes to avoid overbaking; fudgy bars should stay moist inside.
Glaze Variations: Mix melted chocolate with a touch of cream for a ganache instead of powdered sugar. Or go for a dusting of cocoa powder or cinnamon sugar for a simpler finish if you want to keep cuts clean.
One lesson I’ve learned — don’t be afraid to experiment with mini-batches once you have the basics down. Adding a pinch of espresso powder to the brownie batter amps up the chocolate flavor like magic. Also, freezing the bars wrapped well works surprisingly well to keep the texture fresh, perfect for making ahead of parties.
Storing and Reheating Tips
Room Temperature: Store in an airtight container for up to 3 days. I usually place parchment paper between layers to prevent sticking. These bars stay soft but slightly chewy, perfect for same-day snacking.
Refrigerator Storage: For longer keeping (about 5-7 days), refrigerate them covered well. The bars will firm up but come back to room temp nicely with a few minutes out. Glazed bars hold up better chilled, especially in warmer climates.
Freezer Instructions: Wrap bars tightly in plastic wrap then foil, or store in a freezer-safe container with parchment between layers. Freeze for up to 3 months. To thaw, leave in fridge overnight and then bring to room temp before serving for best texture.
Glaze Timing Advice: If freezing, I recommend glazing after thawing so the texture stays silky, not cracked. For short-term storage, glaze when bars are fully cooled.
Frequently Asked Questions
Final Thoughts
Brownie cookie bars will quickly become your go-to dessert when you need something spectacular without the fuss. The way those fudgy brownie bits mingle with sweet chocolate chip marmalade on cookie dough creates a comforting, rich, and utterly satisfying bite every time. What’s truly special is how approachable and forgiving the recipe is — I’ve made these dozens of times, tweaking here and there, and they never fail to bring smiles at my table. If you’re feeling adventurous, try adding nuts, espresso, or even a swirl of peanut butter to make this your signature twist. I can’t wait to hear how yours turns out — please do share your variations and stories in the comments! Happy baking, my friends!
brownie cookie bars
Ingredients
Brownie Layer
- 18.3 ounce boxed fudge brownie mix prepared according to package instructions (eggs, water, and vegetable oil)
Cookie Layer
- 0.5 cup unsalted butter melted and cooled
- 0.5 cup light brown sugar packed
- 0.5 cup granulated sugar
- 1 large egg room temperature
- 1 large egg yolk room temperature
- 1 teaspoon vanilla extract
- 1.33 cups all-purpose flour
- 2 teaspoons cornstarch
- 0.25 teaspoon baking soda
- 0.25 teaspoon salt
- 0.75 cup semi-sweet chocolate chips
Instructions
Preparation Steps
- Preheat the oven to 325°F. Line a 9x13 inch metal baking pan with parchment paper and lightly spray with non-stick spray, allowing overhang on sides for easy removal.
- Prepare the brownie mix according to package directions with eggs, water and vegetable oil, then pour into the prepared baking pan spreading evenly.
- In a separate bowl, beat melted butter with light brown sugar and granulated sugar until well combined.
- Add the whole egg, egg yolk, and vanilla extract to the sugar mixture and beat until smooth.
- Mix in the all-purpose flour, cornstarch, baking soda, and salt until no dry streaks remain.
- Fold in the semi-sweet chocolate chips evenly into the cookie dough.
- Spoon small dollops of cookie dough evenly over the brownie batter layer.
- Bake covered with aluminum foil for 20 minutes, then remove the foil and bake an additional 15-20 minutes until a toothpick comes out mostly clean and cookie layer is golden brown.
- Allow the brookie to cool completely in the pan at room temperature.
- Use the parchment paper overhang to lift the brookie out of the pan and cut into 12 large bars to serve.