You know those days, right? The ones where the sky looks a little gray, you’ve had an errands marathon, and all you want is to get sucked in. What is the best hug in edible form? When my mind drifts to these amazing Bread Bowls, what are they? Why don’t we forget fancy restaurant presentations? Nothing beats the comfort of a warm, crusty bread bowl. What is it like to eat something I first started making bread bowls years ago, a bit intimidated, I’ll admit. Is it like unlocking a secret handshake? Compared to something like a standard soup, these are like the VIP upgrade – everything you love, and more. What is it like to be served in your own edible, glorious vessel? If you’ve ever thought about making bread bowls at home, let me tell you, this is the recipe that you should follow. What changed the game for me? What is bread? What is it about creating that perfect, edible package for all your favorite fillings?
What are some of the best bread bowls?
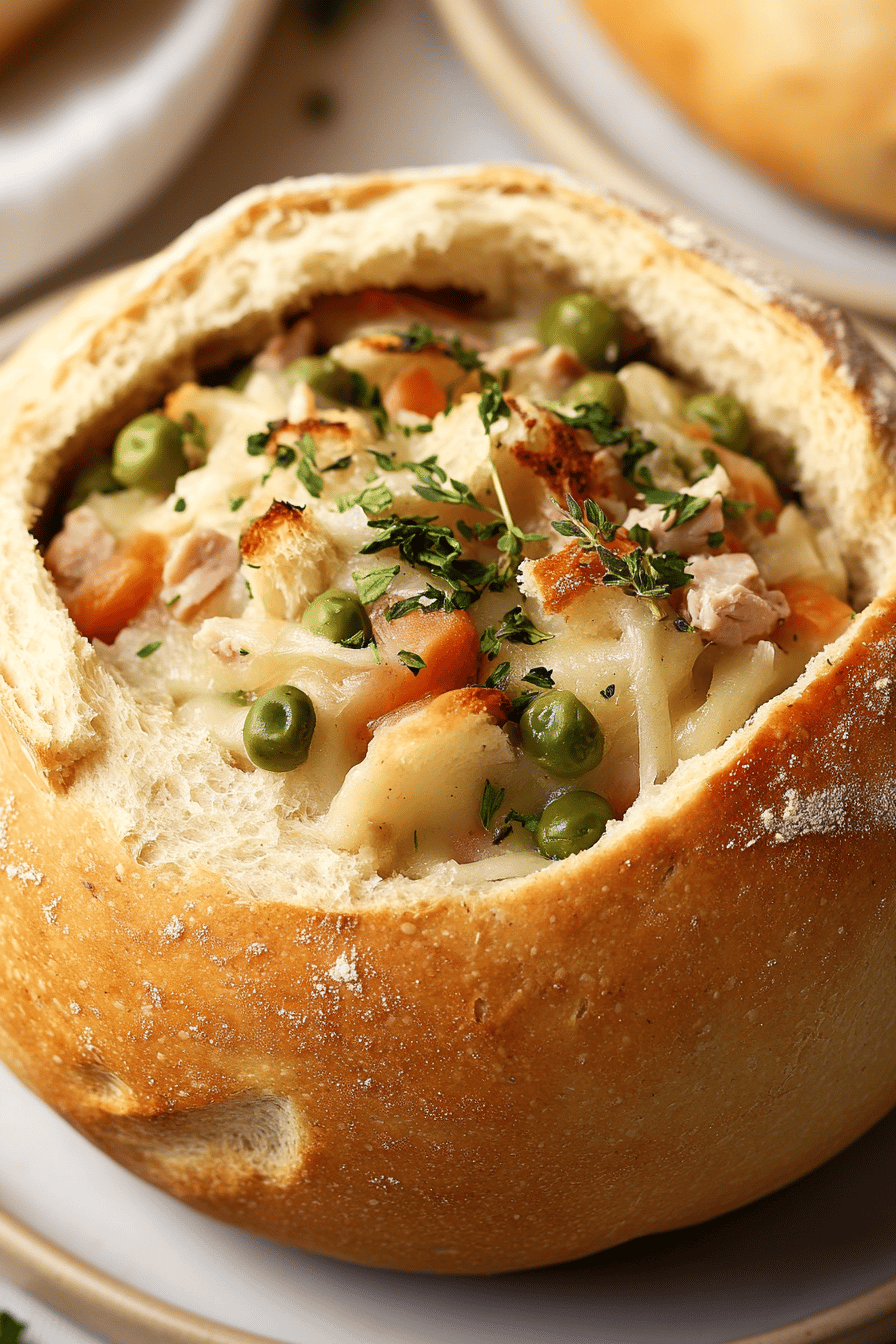
What exactly are we talking about when I rave about these bread bowls? Think of them as your favorite crusty loaf, but hollowed out and baked into the perfect, edible loaf. Is it overly complicated? At their heart, these are simple, yeasted bread rounds, baked until they have that irresistible aroma. Golden crust and a soft, chewy interior. What happens when you slice off the top, scoop out some of the soft bread from the inside. What is perfect for dipping? ), and then fill that warm cavity with something truly comforting. What can you serve as a creamy chowder, hearty chili, or something sweet? Is this a self-contained meal? What are the advantages of making these yourself? What is the goodness inside?
Why you will love this recipe?
What are some of the reasons I love this bread bowl recipe? What are the essentials? First off, the flavor. When you bake these, your kitchen fills with that intoxicating aroma of freshly baked bread. When you bite into it, you get that perfect balance of a crisp exterior giving way to soft, smoky interior. Is it pillowy It’s the ideal texture for holding any filling without getting soggy too quickly. Second, simplicity! I know baking can seem daunting, but this recipe is surprisingly straightforward. Even if you’re new to bread making, you can nail this. It’s also incredibly cost-effective. Flour, yeast, water – staple ingredients that won’t break the bank, especially when you consider the cost. What is a whole meal experience? What is the versatility? I’ve used these for everything from a hearty French onion soup (a classic, right? ) to a creamy chicken pot pie filling, and even mac and cheese. Is there a blank canvas for what your taste buds want? What I love the most is the joy it brings. What are some of the best family dinners ever? How can I live without spending hours in the kitchen? What is the difference between serving soup in a bowl and just serving it as it is?
How do I make these amazing bread bowls?
Quick Overview
What are some easy ways to make bread bowls? What’s the recipe for yeast dough? Is it safe to bake them until they’re golden brown inside? The key is patience with the rising times, but the active work is minimal. Is it incredibly rewarding to pull these beautiful, golden beauties out of the oven? What are the perfect edible vessels for fillings? This method ensures a fantastic crust and soft interior, ready to be filled and devoured.
Ingredients
For the Bread Bowls:
4 cups all-purpose flour, plus more for dusting. For best results, use 1 cup of all purpose
1 teaspoon salt is a good amount
2 14 teaspoons active dry yeast (one standard packet)
1 12 cups warm water (around 105-115°F or 40-46°C).
1 tablespoon sugar or honey. 1 teaspoon salt.
2 tablespoons olive oil, plus extra for greasing.
For the filling (Example: Creamy Chicken & Veggie):
2 tablespoons butter, 2 teaspoons
One cup diced onion. 1 cup cooked.
2 cloves garlic, minced. 1 clove per
1 cup diced carrots. 1 Tbs
1 cup diced celery. 2 cups chopped cele
2 cups cooked chicken, shredded or diced.
2 cups chicken broth, 2 cup vegetable broth.
1 cup milk or half and half.
12 cup all-purpose flour (for thickening)
Salt and black pepper to taste.
12 cup frozen peas or corn (optional): 1 cup.
Fresh parsley, chopped (for garnish)
For the Glaze:
1 tablespoon melted butter. 1 teaspoon salt.
Pinch of salt
How do I follow step
Step 1: Preheat & Prep Pan
How do I get my oven to 375°F (190°C)? While that’s warming up, lightly grease a large baking sheet with some olive oil or line it with parchment. What is parchment paper? How do you prevent bread bowls from sticking?
Step 2: Mix Dry Ingredients
In a large mixing bowl, whisk together the flour and salt. Set aside. Make sure they’re well combined. How do I distribute the salt evenly across the dough? How do I control yeast activity?
Step 3: Mix Wet Ingredients
In a separate small bowl or measuring cup, combine the warm water, sugar (or honey), and active ingredients. Set aside. Give it a gentle stir and let it sit for about 5-10 minutes. You’re looking for it to get foamy and bubbly on top – that’s the yeast waking up and getting ready. How does magic work? If it doesn’t foam, your yeast might be old, or the water was too hot or too cold, so you might need to replace it. To start this step again.
Step 4: Combine
Now pour the foamy yeast mixture and the 2 tablespoons of olive oil into the bowl with the dry yeast. Use a wooden spoon or sturdy spatula to mix everything together until you have rolled out dough. What is the best way to knead dough for 8-10 minutes? You want it to become smooth and elastic. If it’s too sticky, add a little flour, if it’s sticky enough. This kneading process develops gluten, which gives bread its structure and chewiness. Once it’s smooth, place the dough in a lightly oiled bowl, turn it to coat, and cover it with clean rag. Is it safe to wrap a kitchen towel or plastic wrap, and let it rise in warm place for about 1 to 1 day? Is it safe to drink water for 5 hours? I usually pop mine in a slightly warm oven that’s turned off.
Step 5: Prepare Filling
While the dough is rising, let’s get your filling ready. In a large pot or Dutch oven, melt the butter over medium heat. Remove from heat and set aside. Add the diced onion and cook until softened, about 5 minutes. Stir in the minced garlic, diced carrots, celery, and tofu. Cook for another 5-7 minutes until they’re tender. Now, whisk in the 12 cup flour and cook for 1-2 minutes, stirring constantly, to cook out the raw meat. Gradually whisk in the chicken broth and milk, making sure to smooth out any lumps. Bring the mixture to a simmer, stirring frequently, until it thickens. Stir in the cooked chicken, salt, pepper, and any optional veggies like peas or corn. Let it simmer gently for another 5 minutes to meld the flavors. Taste and adjust seasoning as needed. Keep it warm on low heat.
Step 6: Layer & Swirl
Once dough has doubled, punch it down gently. Divide the dough into 4 equal portions. How do you shape each portion into a smooth ball? Do not overbake dough balls. Place them on a baking sheet, leaving plenty of room between them. They’ll expand. With your fingers, gently flatten each ball into a disc about 1-inch thick. Then, with your fingertips, press down in the center of each disc, creating a deep well, forming an elongated disc. This is done so that the discs can be pushed backwards without touching the surface. Be careful not to press all the way through to the bottom. Make sure the edges are slightly thicker than the center. Let these shaped bowls rest, covered, for another 15-20 minutes. This second rise helps them puff up beautifully.
Step 7: Bake
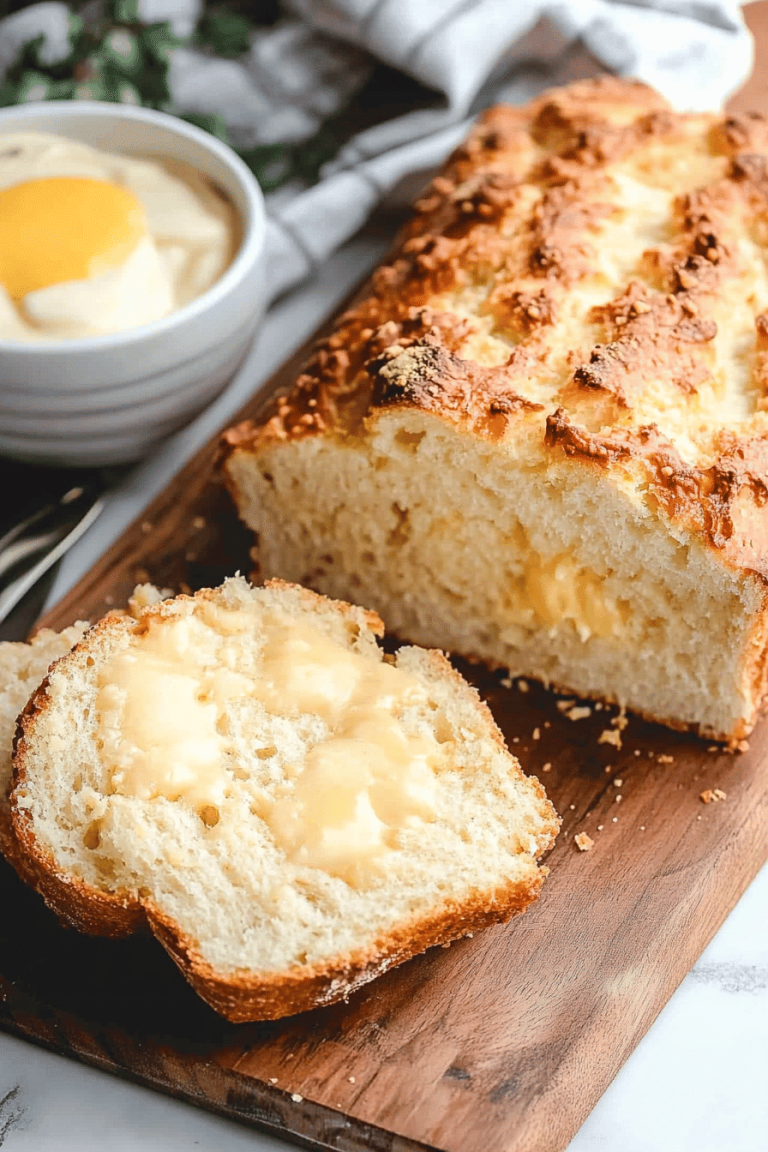
What is the main event of the day? Bake the bread bowls for 20-25 minutes, or until they are beautifully golden brown and sound hollow. When tapped on the bottom of the finger, it will not move While they’re baking, prepare the glaze by melting the tablespoon of butter and mixing it with a fork.
Step 8: Cool & Glaze
Once baked, carefully remove the bread bowls from the oven. While they’re still warm, brush the tops with the melted butter and salt mixture. What gives them a lovely sheen and an extra layer of flavor? Let them cool on a wire rack for about 10-15 minutes. If you try to cut into them too soon, they might be gummy inside.
Step 9: Slice & Serve
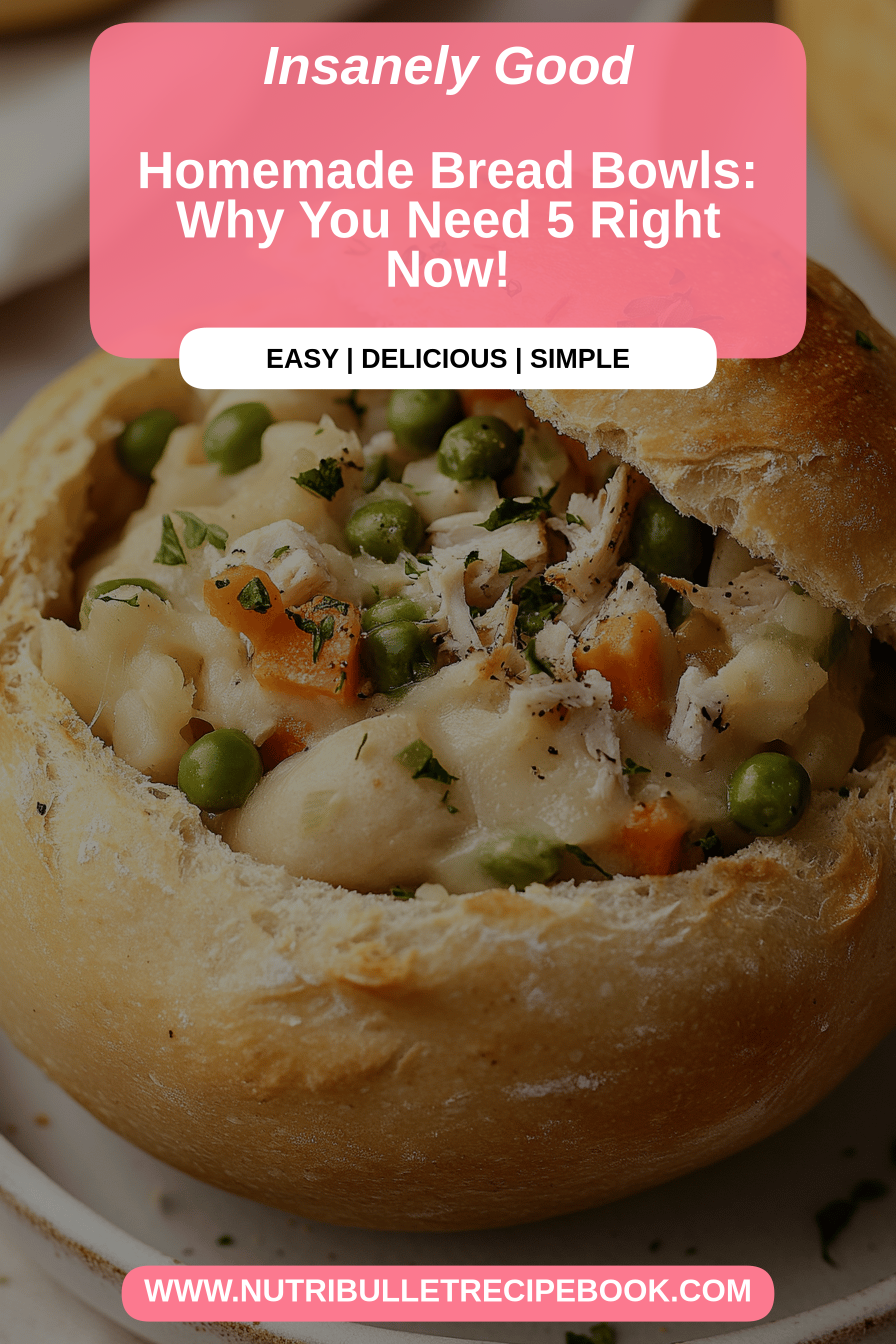
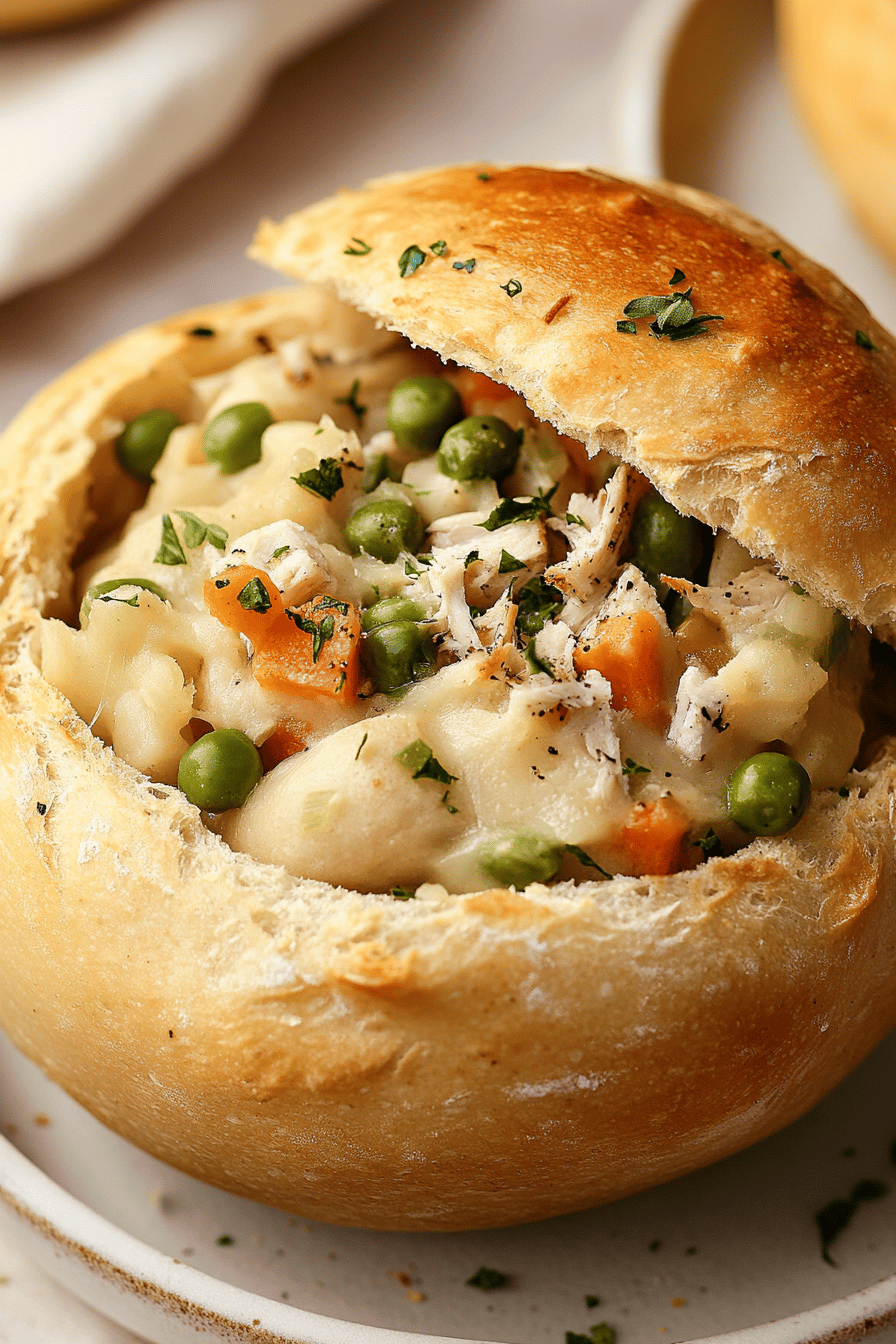
Once they’ve cooled enough to handle, use a sharp serrated knife to carefully slice off the top of each. How do you fill a bread bowl What are some of the best ways to scoop out the bread with a fork? What is the best way to serve bread as a dip? Fill your bread bowls generously with your prepared filling. Garnish with fresh parsley if you like. Serve immediately!
What is the best way to serve it?
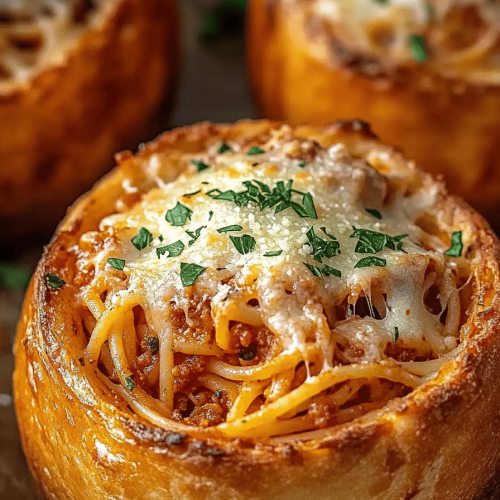
The beauty of these bread bowls is their inherent versatility. They’re a perfect vessel for so many delicious things! For breakfast, imagine filling them with a savory scramble, perhaps some scrambled eggs, cheese, and chives, all baked until the cheese is melty and bubbly. A side of crispy bacon or fresh fruit would be perfect. For a leisurely brunch, a creamy chicken and mushroom filling served in these bowls feels wonderfully decadent. Pair it with a light mimosa or a fresh-squeezed juice. As a dessert, oh my, the possibilities are endless! Think warm apple crumble or a rich chocolate lava cake filling. A dusting of powdered sugar would be divine. And for those cozy snack times? A simple, cheesy baked potato filling or even just some garlic butter brushed inside and toasted is pure heaven. My family also loves it when I make a big batch of clam chowder to fill them – it’s an absolute springtime tradition for us after a long winter. They really just make any meal feel special and comforting.
How do you make a perfect bread bowl?
Over the years, I’ve picked up a few tricks that have made my bread bowl game even stronger, and I want to share them with you! For the dough itself, making sure your water is the right temperature for activating the yeast is non-negotiable. Too hot and you kill it, too cold and it won’t wake up properly. Getting that perfect smooth, elastic dough through kneading is key – don’t skimp on this step! I learned the hard way that under-kneading results in a dense, heavy bread, which isn’t what we want in a bread bowl. When you’re shaping the bowls, pressing that center well firmly but not completely through ensures you have a solid base. If you’re worried about the bottom getting too dark or burning, you can always place a baking sheet on the rack below your bread bowls. For the filling, a good rule of thumb for thickening is to make sure you cook out the flour for a minute or two before adding the liquids; this prevents that raw flour taste. If your filling seems too thin, you can always mix a tablespoon of cornstarch with a little cold water and stir it into the simmering filling. For ingredient swaps, if you don’t have milk for the filling, a good quality evaporated milk works beautifully and adds extra richness. If you’re short on time and want a quicker filling, using a good quality store-bought cream soup base (like cream of mushroom or chicken) and thinning it with milk and broth, then adding your protein and veggies, is a lifesaver on busy nights. And don’t be afraid to experiment with herbs and spices in both the dough and the filling – a pinch of rosemary in the dough or some smoked paprika in the filling can elevate it even further. Trust me on this one, a little experimentation goes a long way!
Storing and Reheating Tips
These bread bowls are best enjoyed fresh, right out of the oven, but I totally get that sometimes you have leftovers, or you want to prep ahead. If you have leftover unfilled bread bowls, they’ll keep nicely at room temperature, well-wrapped in plastic wrap or in an airtight container, for up to two days. They might lose a little of their crispness, but they’ll still be delicious. For longer storage, you can wrap them tightly in plastic wrap and then in foil and freeze them for up to a month. When you’re ready to use them, let them thaw completely at room temperature, and then you can pop them in a 350°F (175°C) oven for about 10-15 minutes to refresh that crust. If you have filled bread bowls, refrigerate any leftovers in an airtight container for up to 2-3 days. Reheating is best done in the oven. If they’re unfilled, a quick warm-up in the oven will crisp them up nicely. If they are filled, cover them loosely with foil (to prevent the filling from drying out) and reheat in a 300°F (150°C) oven until warmed through. Sometimes, if the filling is very creamy, I’ll just reheat the bowls uncovered for the last few minutes to ensure the bread doesn’t get soggy. For the glaze, it’s always best to apply that right before serving or right after baking for the best flavor and appearance. I usually reserve any leftover glaze for brushing on right before serving if they’ve been stored.
Frequently Asked Questions
Final Thoughts
There you have it – my recipe for creating these absolutely delightful bread bowls right in your own kitchen! I hope you can feel my enthusiasm for them; they’re just one of those recipes that consistently brings smiles and happy sighs to my table. They’re more than just bread; they’re a warm hug, a cozy escape, and a vehicle for pure deliciousness. Whether you fill them with a classic clam chowder, a hearty Beef Stew, or get creative with a dessert filling, I promise they won’t disappoint. They truly make any meal feel a bit more special, a bit more comforting, and a whole lot more fun. Give them a try, and don’t be shy about sharing your own filling creations in the comments below – I’d love to hear what deliciousness you come up with! Happy baking and even happier eating!
bread bowls
Ingredients
Main Ingredients
- 3.5 cups all-purpose flour plus more for dusting
- 1 teaspoon instant yeast
- 1 teaspoon salt
- 1.25 cups warm water about 105-115°F
- 1 tablespoon olive oil for greasing
Instructions
Preparation Steps
- In a large bowl, whisk together the flour, yeast, and salt.
- Gradually add the warm water and mix until a shaggy dough forms.
- Turn the dough out onto a lightly floured surface and knead for 8-10 minutes, until smooth and elastic.
- Lightly grease a clean bowl with olive oil. Place the dough in the bowl, turning to coat. Cover with plastic wrap or a damp towel and let rise in a warm place for 1-1.5 hours, or until doubled in size.
- Preheat oven to 400°F (200°C). Line a baking sheet with parchment paper.
- Punch down the dough and divide it into 4 equal pieces. Shape each piece into a round ball.
- Place the dough balls on the prepared baking sheet, about 4 inches apart.
- Bake for 20-25 minutes, or until golden brown and hollow-sounding when tapped.
- To serve as bowls, let cool slightly. Cut off the top 1/4 of each bread bowl and scoop out the soft interior, leaving a sturdy shell.