Oh, this Beijing beef recipe! I swear, just the thought of it makes my mouth water. It’s one of those dishes that feels so special, like you’ve picked it up from your favorite takeout spot, but it’s actually ridiculously easy to make right in your own kitchen. I remember the first time I attempted it, I was a bit intimidated, thinking it would be this super complicated, multi-step process. But honestly? It’s a lifesaver on those evenings when you’re craving something satisfying and bursting with flavor, but you’ve got about a million other things to do. It’s not quite like a stir-fry, and it’s definitely not a stew – it’s in a category all its own, a glorious, saucy celebration of tender beef and vibrant seasonings. This Beijing beef recipe has become a staple in my rotation, and I’m so excited to share it with you!
What is Beijing Beef?
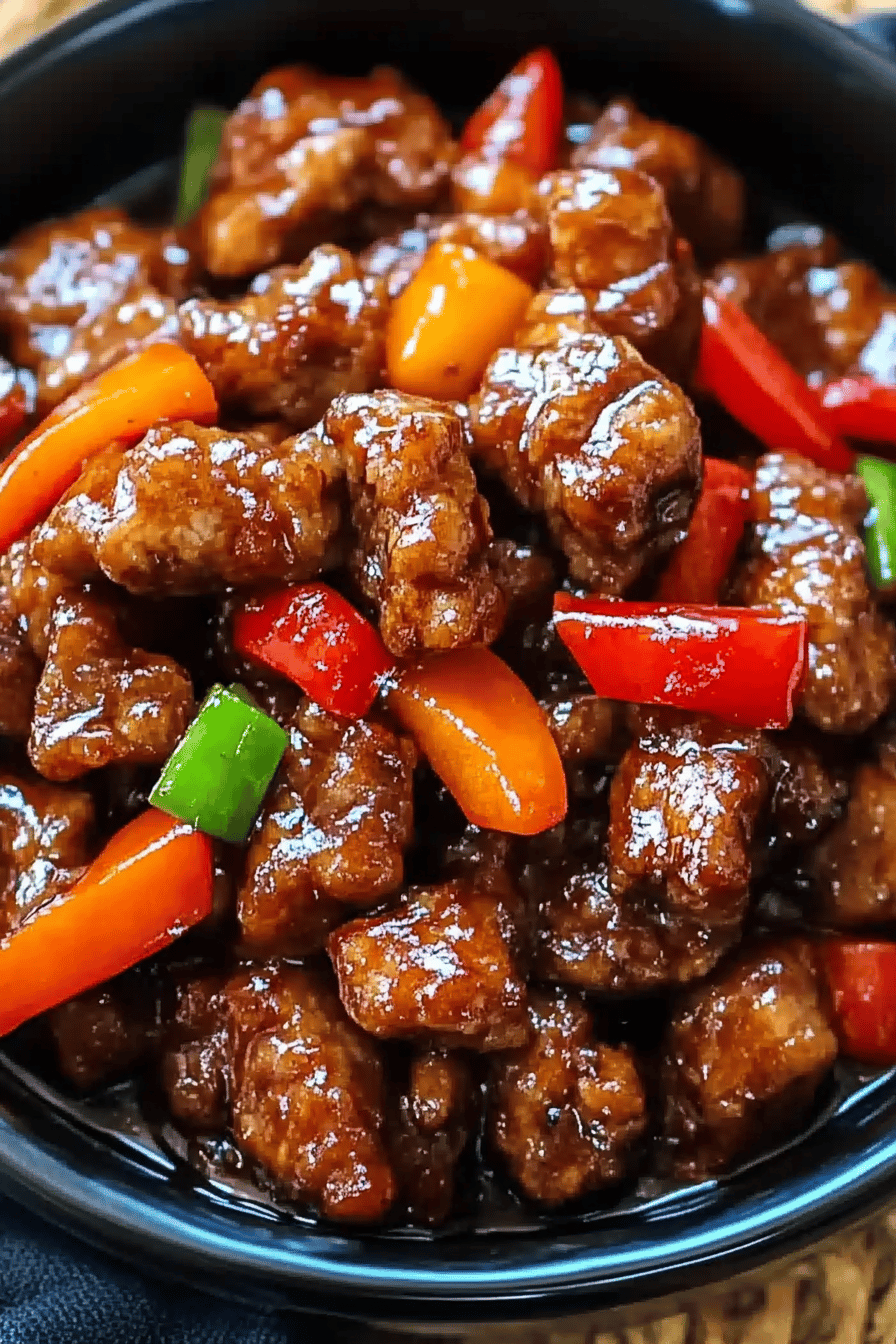
So, what exactly is this magical Beijing beef recipe? At its heart, it’s a flavor-packed dish where thinly sliced beef is coated and fried until perfectly crispy, then tossed in a sweet, savory, and slightly spicy sauce that coats every single piece. Think of it as the ultimate comfort food, but with a delightful Asian-inspired twist. The name “Beijing” conjures up images of bustling markets and authentic Chinese cuisine, and this dish certainly lives up to that. It’s not a super-spicy dish usually, but it has this wonderful depth of flavor that comes from the balance of ingredients. It’s essentially a dish designed to make you feel good, to satisfy that craving for something hearty and delicious without being overly complicated. It’s the kind of food that makes you feel like you’ve accomplished something great in the kitchen, even if you’ve just followed a few simple steps!
Why you’ll love this recipe?
There are so many reasons why this Beijing beef recipe has earned a permanent spot in my recipe binder, and I just know you’re going to feel the same way. Firstly, let’s talk about the flavor. Oh my goodness, the flavor! It’s this incredible symphony of sweet from the sugar and honey, savory from the soy sauce and oyster sauce, with a gentle warmth from the chili flakes that just makes your taste buds sing. It’s got that perfect balance that keeps you coming back for bite after bite. And the texture? The beef gets delightfully crispy on the outside and stays tender on the inside. It’s pure heaven!
What I also love most about this Beijing beef recipe is how surprisingly simple it is. I know “crispy fried beef” might sound daunting, but it’s truly manageable. The steps are straightforward, and with a little organization, you can have this on the table in under an hour, which is a win in my book any day of the week. It’s perfect for those busy weeknights when you don’t have a lot of time but still want a fantastic home-cooked meal. Plus, it’s incredibly cost-effective! You don’t need fancy ingredients; everything is readily available at most grocery stores. This makes it a budget-friendly option for feeding the whole family. And the versatility! You can serve this over fluffy white rice, with noodles, or even as a filling for lettuce wraps. It’s a dish that truly adapts to your needs and cravings.
How do I make Beijing Beef?
Quick Overview
Making this Beijing beef recipe is a breeze, honestly. You’ll quickly sear some thinly sliced beef until it’s golden brown and crispy, then toss it all together in a luscious, fragrant sauce. The magic happens as the sauce thickens and coats every piece of beef, creating that irresistible sticky glaze. It’s a process that emphasizes speed and flavor, ensuring you get a restaurant-quality dish without spending hours in the kitchen. The key is having your ingredients prepped and ready to go, so you can move from one step to the next smoothly.
Ingredients
For the Beef Marinade: For the Beef: For the Beef: For the Beef: For the Beef: For the Beef
1 pound flank steak or sirloin, thinly sliced against the grain (about 1/8-inch thick) – I always try to get a good quality cut, it makes a difference!
1 tablespoon soy sauce – for that essential umami depth
1 teaspoon cornstarch – this helps tenderize the beef and create a slight coating for crisping
1/2 teaspoon sesame oil – just a touch for nutty aroma
For the Batter & Frying:
1/4 cup all-purpose flour – the base of our crispy coating
1/4 cup cornstarch – for extra crispiness, don’t skip this!
1/4 teaspoon salt
1/4 teaspoon black pepper
Vegetable oil or canola oil, for frying (about 2-3 inches in a wok or deep pot)
For the Glaze:
1/4 cup soy sauce – this is our salty backbone
2 tablespoons oyster sauce – adds a wonderful richness and complexity
2 tablespoons rice vinegar – for that essential tanginess to balance the sweetness
2 tablespoons brown sugar – or honey, for that lovely caramel sweetness
1 tablespoon ketchup – a secret ingredient that adds a subtle sweetness and depth, trust me!
1 teaspoon sriracha or chili garlic sauce (or more, to taste!) – for that little kick!
1 teaspoon cornstarch mixed with 2 tablespoons water (cornstarch slurry) – to thicken our glorious glaze
Optional Garnishes:
Toasted sesame seeds
Sliced green onions
Step-by-Step Instructions
Step 1: Preheat & Prep Pan
First things first, let’s get our frying situation sorted. You’ll need a wok or a deep, heavy-bottomed pot. Pour in enough vegetable oil so that it comes up about 2-3 inches. We want to make sure the beef is submerged enough to get nice and crispy. Heat the oil over medium-high heat until it reaches about 350°F (175°C). If you don’t have a thermometer, you can test it by dropping a tiny pinch of the flour/cornstarch mixture in; it should sizzle immediately and float to the top. While the oil heats up, let’s prep our beef!
Step 2: Mix Dry Ingredients
In a shallow bowl or plate, whisk together the 1/4 cup all-purpose flour, 1/4 cup cornstarch, 1/4 teaspoon salt, and 1/4 teaspoon black pepper. This is what we’ll dredge the beef in before frying. Make sure it’s well combined; you want that even coating for maximum crispiness. This mixture is key to getting that delightful crunch that makes this Beijing beef recipe so addictive.
Step 3: Mix Wet Ingredients (Marinade)
In a medium bowl, combine the thinly sliced beef with 1 tablespoon soy sauce, 1 teaspoon cornstarch, and 1/2 teaspoon sesame oil. Toss everything together really well with your hands or a spoon. You want to make sure every single slice is coated. Let this marinate for about 10-15 minutes while you get the glaze ready. This short marination time helps tenderize the beef and ensures it gets beautifully browned when fried.
Step 4: Combine (Batter the Beef)
Now, take your marinated beef and add it to the bowl with the dry ingredients (from Step 2). Toss everything together until the beef is thoroughly coated. You might need to use your hands to really get into all the nooks and crannies. Don’t worry if it looks a bit clumpy; that’s good! This coating is what will give us that perfect crispy texture. Make sure each piece is well-covered.
Step 5: Prepare Filling (Make the Glaze)
While the beef is getting ready, whisk together all the glaze ingredients in a small bowl: 1/4 cup soy sauce, 2 tablespoons oyster sauce, 2 tablespoons rice vinegar, 2 tablespoons brown sugar, 1 tablespoon ketchup, and 1 teaspoon sriracha (or your preferred chili sauce). In a separate tiny bowl, mix 1 teaspoon cornstarch with 2 tablespoons water to create a slurry. Set both aside. This glaze is where all the magic happens, so getting it right is important!
Step 6: Layer & Swirl (Fry the Beef)
Carefully add the coated beef in a single layer to the hot oil. You might need to do this in batches to avoid overcrowding the pot, which can make the beef steam instead of fry. Fry for about 2-3 minutes per batch, or until golden brown and crispy. Use a slotted spoon or spider strainer to remove the beef and place it on a wire rack set over a baking sheet to drain. Repeat with the remaining beef. Once all the beef is fried, carefully drain most of the oil from the wok, leaving just about 1 tablespoon. Keep the heat on medium-high.
Step 7: Bake (Sauté Aromatics & Glaze)
Add the prepared glaze mixture to the wok with the remaining oil. Bring it to a simmer, stirring constantly. Once it starts bubbling, pour in the cornstarch slurry. Stir continuously until the sauce thickens to a syrupy consistency, which should only take about 30 seconds to a minute. You want it thick enough to coat the beef beautifully but not so thick that it becomes gloppy.
Step 8: Cool & Glaze
Add the fried, crispy beef back into the wok with the thickened glaze. Toss everything gently but quickly to ensure every piece of beef is coated in that delicious sauce. You want to do this just before serving so the beef stays nice and crispy. If you let it sit too long, the sauce will start to soften the coating. So, this is a quick final toss!
Step 9: Slice & Serve
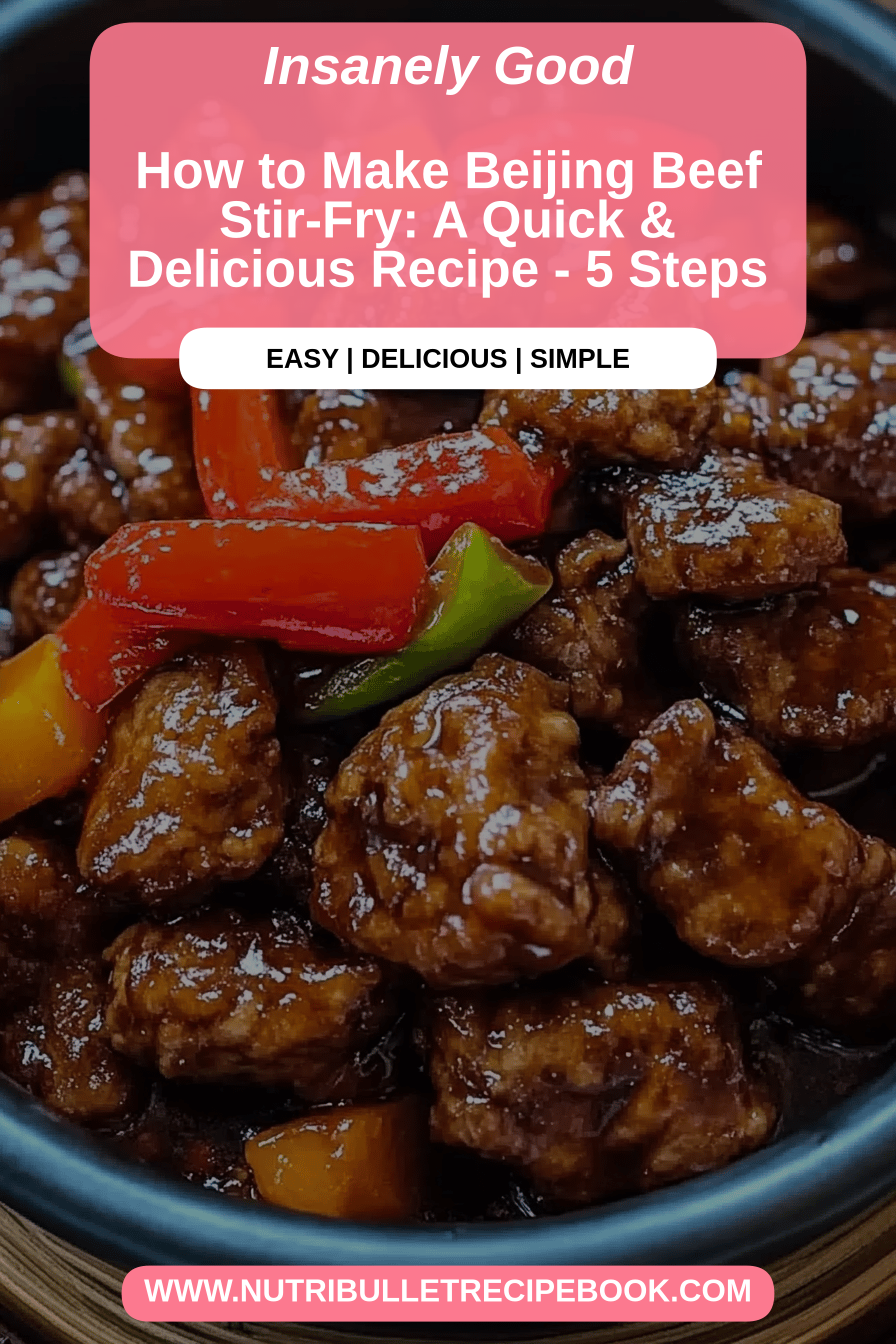
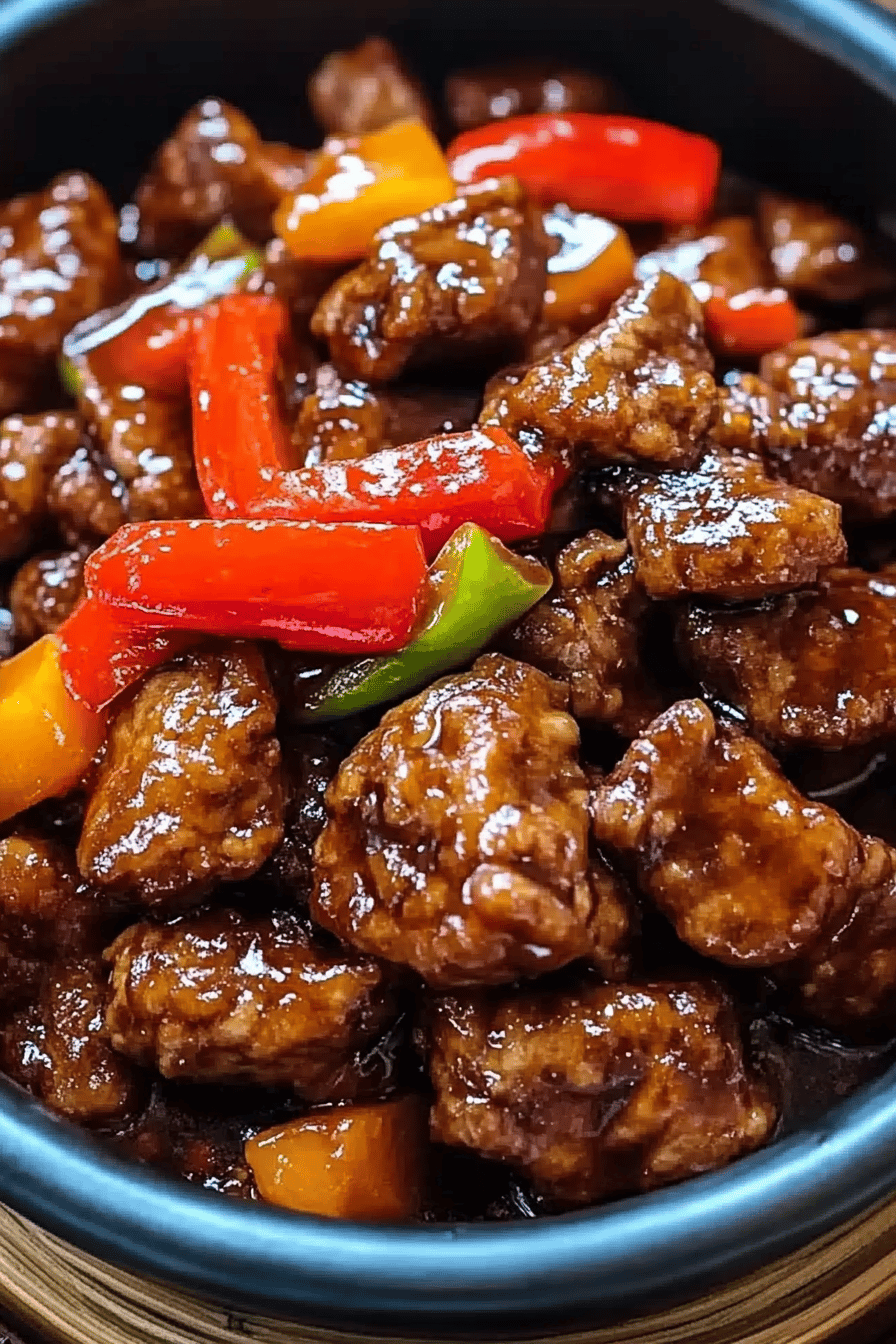
Serve your incredible Beijing beef recipe immediately over steamed white rice. Garnish with toasted sesame seeds and sliced green onions for a pop of color and extra flavor. The contrast between the fluffy rice and the saucy, crispy beef is just divine. This dish is best enjoyed fresh off the stove!
What to Serve It With
This Beijing beef recipe is a star all on its own, but pairing it with the right sides can elevate the whole meal. For a classic, comforting dinner, you can’t go wrong with a generous bed of fluffy steamed white rice. Jasmine rice is my personal favorite because its subtle floral aroma complements the savory glaze so well. If you’re looking for something a little different, consider serving it over brown rice for a nuttier flavor and added fiber, or even some quinoa if you’re feeling adventurous! For a lighter option, I sometimes serve it with some simple steamed or stir-fried vegetables. Broccoli is a fantastic choice – its slight bitterness is a lovely contrast to the sweetness of the beef. Snow peas or snap peas also work wonderfully, adding a crisp texture and fresh green flavor. Another idea I love, especially when I’m having friends over, is to serve it with some soft, steamed bao buns. You can spoon the beef into the buns for a delightful, handheld treat. It feels a bit like making your own gourmet sandwich! For a truly celebratory meal, a side of crispy spring rolls or some savory potstickers makes this Beijing beef recipe feel like a complete feast.
Top Tips for Perfecting Your Beijing Beef Recipe
I’ve made this Beijing beef recipe more times than I can count, and along the way, I’ve picked up a few tricks that I think really make a difference. First, when it comes to slicing the beef, make sure it’s at least partially frozen. This makes it SO much easier to get those thin, uniform slices against the grain. A dull knife can also be your friend here, as it helps prevent you from completely mushing the meat. Don’t be afraid to really get in there and toss the beef with the marinade and then again with the dry coating. You want every surface to be covered for that ultimate crispiness.
When you’re frying the beef, patience is key. Don’t overcrowd the pan! I know it’s tempting to get it all in there at once, but trust me, cooking in batches is essential. Overcrowding lowers the oil temperature, and instead of getting crispy beef, you’ll end up with soggy, sad pieces. We want that glorious crunch! Also, make sure your oil is hot enough before you add the beef. A good sizzle means you’re on the right track. For the glaze, whisking the cornstarch slurry really well is important to avoid lumps. And remember, you’re adding the beef to the glaze right at the very end, just for a quick toss. The goal is to coat it, not to let it soak and become mushy. If you’re making this for a crowd or know you’ll have leftovers (which is rare in my house!), you can fry the beef ahead of time and store it on a rack, then reheat it quickly in a hot oven or Air Fryer right before tossing it with the fresh glaze. This helps maintain that crucial crispiness. Lastly, taste your glaze before you add the cornstarch slurry. This is your chance to adjust the sweetness, spiciness, or tanginess to your liking. Maybe you like it a little sweeter, or perhaps you want more heat – now’s the time to tweak it!
Storing and Reheating Tips
Okay, so let’s talk about what happens if, by some miracle, you have leftovers of this amazing Beijing beef recipe. First off, I am impressed! My family usually devours it in minutes. But if you do find yourself with some, storing it properly is key to maintaining its deliciousness. The best way to store it is in an airtight container in the refrigerator. It will stay good for about 2-3 days. I find that the sauce tends to thicken up a bit more as it cools, which is totally normal. The biggest challenge with leftovers is keeping that wonderful crispiness we worked so hard to achieve. When it comes to reheating, my go-to method is to use a skillet over medium-high heat. Add a tiny bit of oil and stir-fry the beef for a few minutes until it’s heated through and has a chance to crisp up a little again. You can also use an oven or an Air Fryer! For the oven, spread the beef on a baking sheet and reheat at around 350°F (175°C) for about 5-8 minutes, until warmed through and slightly crisped. An air fryer is fantastic for this too – just a few minutes at a similar temperature should do the trick. I generally advise against microwaving if crispiness is your goal, as it tends to make things a bit soft and chewy. If you’re planning to store it and the beef is still a bit crispy from frying, wait until just before serving to toss it with the glaze if you can. This way, you retain maximum crunch. However, if it’s already sauced, reheating as described above is still your best bet for salvaging some texture.
Frequently Asked Questions
Final Thoughts
Honestly, making this Beijing beef recipe at home feels like unlocking a delicious secret. It’s that perfect combination of comforting, familiar flavors with an exciting, restaurant-worthy flair. I’ve made it for picky eaters, for dinner parties, and just for myself on a Tuesday night when I needed a culinary pick-me-up, and it’s always a hit. It truly proves that you don’t need to be a professional chef to create something spectacular. The crispy texture of the beef, combined with that irresistible sticky, slightly spicy, and perfectly sweet glaze, is something truly special. It’s a dish that brings smiles to the table and makes you feel good, inside and out.
If you’re someone who loves those sweet and savory flavor profiles, or if you’re just looking for a reliable, incredibly satisfying weeknight meal that tastes way more complex than it is, you absolutely have to give this Beijing beef recipe a try. It’s a winner, hands down. I can’t wait to hear what you think, and please, if you try it, let me know how it turns out in the comments below! I love hearing about your kitchen adventures and any little twists you might add. Happy cooking!
Beijing beef recipe
Ingredients
For the Beef
- 1 lb beef sirloin thinly sliced against the grain
- 2 tbsp soy sauce
- 1 tbsp cornstarch
- 1 tsp sesame oil
- 0.5 tsp black pepper
For the Sauce
- 0.5 cup hoisin sauce
- 0.25 cup ketchup
- 2 tbsp soy sauce
- 2 tbsp rice vinegar
- 2 tbsp brown sugar
- 1 tbsp sesame oil
- 1 tsp garlic minced
- 0.5 tsp ginger minced
- 1 tbsp cornstarch mixed with 2 tbsp water
For Stir-Frying
- 2 tbsp vegetable oil
- 0.25 cup green onions chopped
- 0.5 cup red chili flakes optional, for heat
Instructions
Preparation Steps
- In a bowl, combine beef with soy sauce, cornstarch, sesame oil, and black pepper. Toss to coat evenly and let marinate for at least 15 minutes.
- In a separate bowl, whisk together all sauce ingredients: hoisin sauce, ketchup, soy sauce, rice vinegar, brown sugar, sesame oil, minced garlic, and ginger. Set aside.
- Prepare the cornstarch slurry for the sauce by mixing 1 tbsp cornstarch with 2 tbsp water until smooth.
- Heat 1 tablespoon of vegetable oil in a wok or large skillet over medium-high heat. Add the marinated beef in a single layer and cook until browned and crispy. You may need to do this in batches to avoid overcrowding. Remove beef from the wok and set aside.
- Add the remaining 1 tablespoon of vegetable oil to the wok. Add chopped green onions and red chili flakes (if using) and stir-fry for about 30 seconds until fragrant.
- Pour the prepared sauce into the wok and bring to a simmer. Stir in the cornstarch slurry and cook, stirring constantly, until the sauce thickens.
- Return the crispy beef to the wok and toss to coat evenly with the thickened sauce.
- Serve immediately over steamed rice or noodles, garnished with extra green onions if desired.