There are comfort foods, and then there are *comfort foods*. You know the kind – the ones that wrap you up in a warm hug, transport you back to childhood, and just make everything feel right in the world. For me, that’s always been a killer mac and cheese. But lately, I’ve been on a mission to elevate it, to make it something truly special. And that’s how this baked broccoli mac and cheese came into my life. Seriously, if you’ve ever found yourself staring into the fridge after a long day, utterly drained but craving something incredibly satisfying, this is your answer. It’s got that nostalgic, creamy goodness of classic mac and cheese, but with a vibrant green pop from the broccoli that makes it feel just a *tiny* bit healthier, and honestly, way more interesting. It’s the dish my kids request by name, the one that disappears from the pot faster than you can say “seconds, please!” and the absolute champion when I need a meal that feels both impressive and ridiculously easy. Forget those bland, box mixes; this is the real deal, and it’s going to become your new favorite too.
What is baked broccoli mac and cheese?
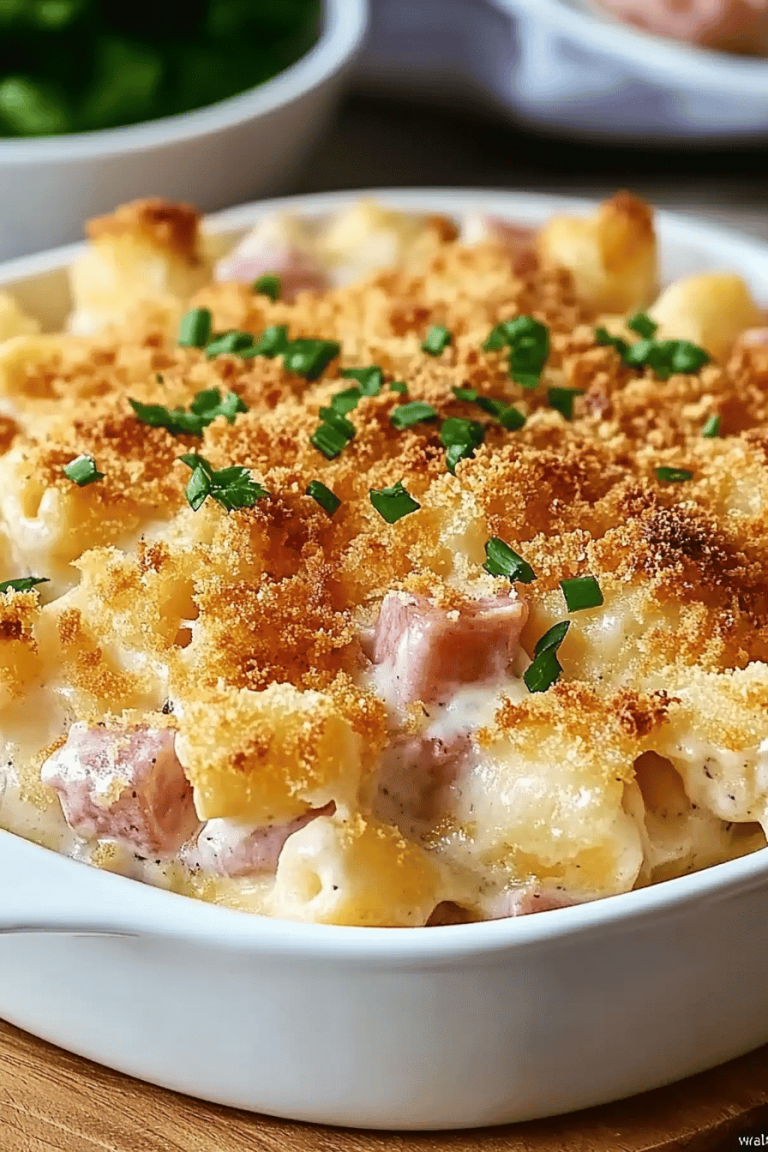
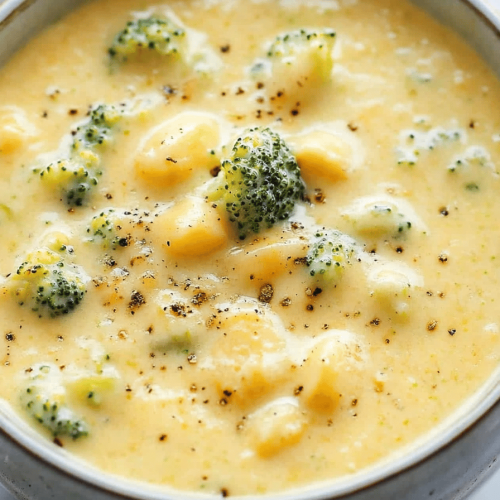
So, what exactly *is* baked broccoli mac and cheese? Think of it as the ultimate upgrade to your favorite childhood mac and cheese. We’re talking about tender pasta, all snuggled up in a rich, velvety cheese sauce, with bright, slightly crisp florets of broccoli mixed throughout. Then, the magic happens when we bake it all together. This final bake is what sets it apart. It creates this gorgeous, slightly golden crust on top, while the inside gets all bubbly and impossibly creamy. It’s not just a dish; it’s an experience. The name itself tells you exactly what you’re getting: comforting baked pasta, with that delicious broccoli twist. It’s the kind of meal that feels both decadent and wholesome, perfect for a chilly evening or a weekend treat. It’s essentially mac and cheese that decided to put on its Sunday best and get a little bit fancy, but without any of the fuss.
Why you’ll love this recipe?
Oh, where do I even begin with why you’ll adore this baked broccoli mac and cheese? First off, the flavor is just out of this world. We’re talking about a cheese sauce that’s so creamy and dreamy, it’s like a cheesy hug for your taste buds. The sharp cheddar provides a lovely bite, while a touch of Gruyère (if you can swing it!) adds a nutty depth that’s just divine. And the broccoli! It’s not just thrown in; it’s perfectly cooked so it still has a little bit of life to it, adding a fresh, vibrant counterpoint to all that richness. It’s like the perfect partnership – the creamy, cheesy pasta and the tender-crisp broccoli. What I love most, though, is how surprisingly simple this recipe is. Despite how fancy it tastes, it’s totally manageable, even on a weeknight. You don’t need a culinary degree for this one, I promise! It’s also incredibly budget-friendly. Pasta, cheese, broccoli – these are all things you probably have lurking in your pantry or can grab without breaking the bank. Plus, it’s so versatile. Serve it as a main dish with a simple salad, or as a show-stopping side dish for your next BBQ or holiday meal. It’s also the kind of dish that just *works*. It’s a guaranteed hit with picky eaters (the broccoli gets hidden in all that cheesy goodness!) and grown-ups alike. It truly stands out because it delivers all the comfort you crave without feeling heavy or bland. It’s the perfect marriage of simple ingredients and incredible results, and that’s what makes it a winner in my kitchen, time and time again.
How do I make Baked Broccoli Mac and Cheese?
Quick Overview
This baked broccoli mac and cheese is all about building layers of flavor and texture. We’ll start by making a luscious, homemade cheese sauce, then stir in perfectly cooked pasta and tender broccoli florets. Finally, we’ll bake it all until it’s bubbly and golden. The key is not to overcook the pasta initially, as it will continue to cook in the oven, and to get that sauce just right – smooth, creamy, and oh-so-cheesy. It’s a straightforward process that yields spectacular results, proving that amazing meals don’t have to be complicated.
Ingredients
For the Main Dish:
1 pound elbow macaroni or cavatappi pasta (cavatappi holds sauce so well!)
2 cups broccoli florets, blanched or lightly steamed until tender-crisp (about 2-3 minutes)
4 tablespoons unsalted butter
1/4 cup all-purpose flour
3 cups whole milk, warmed (warming it helps prevent lumps!)
1 teaspoon salt, plus more for pasta water
1/2 teaspoon black pepper
1/4 teaspoon nutmeg (optional, but it really enhances the cheese!)
4 cups shredded sharp cheddar cheese (a good quality sharp cheddar makes all the difference!)
1 cup shredded Gruyère cheese (optional, but highly recommended for that nutty flavor)
For the Topping (Optional, but SO good):
1/2 cup panko breadcrumbs
2 tablespoons melted butter
Pinch of paprika
Step-by-Step Instructions
Step 1: Preheat & Prep Pan
First things first, get that oven preheating to 375°F (190°C). You’ll want a good-sized baking dish – a 9×13 inch one is usually perfect for this amount. Lightly butter or spray it with cooking spray. This just ensures nothing sticks and makes for easier serving later on. If you’re doing the breadcrumb topping, you can also get a small bowl ready for that mixture.
Step 2: Cook the Pasta
Bring a large pot of generously salted water to a rolling boil. Add your pasta and cook it according to the package directions, but *al dente* is key here. We’re talking about 1-2 minutes less than the package suggests. The pasta will finish cooking in the oven, and nobody likes mushy mac and cheese! Drain the pasta well and set it aside. While the pasta cooks, you can quickly blanch your broccoli florets. Just pop them into the boiling pasta water for about 2 minutes until they’re bright green and tender-crisp, then drain them with the pasta or separately.
Step 3: Make the Cheese Sauce (The Heart of It!)
In a large saucepan or Dutch oven over medium heat, melt the 4 tablespoons of butter. Once it’s melted and looks bubbly, whisk in the 1/4 cup of flour. You’re making a roux, which is basically your thickening agent. Whisk constantly for about 1-2 minutes until it’s smooth and forms a pale, sandy paste. Don’t let it brown too much – we’re aiming for a béchamel, not a dark roux. Gradually whisk in the warmed milk, a little at a time, making sure to smooth out any lumps before adding more. Keep whisking until the sauce is smooth and starts to thicken, which should take about 5-8 minutes. You’re looking for a consistency that coats the back of a spoon nicely.
Step 4: Cheese It Up!
Once your sauce has thickened, remove the pan from the heat. Now for the best part: stir in the salt, pepper, and nutmeg (if using). Then, add your shredded cheeses – the cheddar and Gruyère, if you’re using it. Stir gently until all the cheese is melted and the sauce is lusciously smooth and creamy. Taste it at this point! Does it need a little more salt? A touch more pepper? This is your chance to get it perfect.
Step 5: Combine Everything
Add the drained pasta and the blanched broccoli florets to the cheese sauce. Stir gently until everything is evenly coated. You want every piece of pasta and every bit of broccoli to be swimming in that glorious cheesy goodness.
Step 6: Assemble for Baking
Pour the cheesy pasta and broccoli mixture into your prepared baking dish. Spread it out evenly. If you’re going for that irresistible crunchy topping, this is when you’d mix the panko breadcrumbs with the melted butter and paprika in a small bowl, then sprinkle it evenly over the top of the mac and cheese.
Step 7: Bake to Perfection
Pop the baking dish into your preheated oven. Bake for 20-25 minutes, or until the sauce is bubbly around the edges and the topping (if using) is golden brown and crispy. If you don’t have a topping, you’re looking for those delicious oven-baked bubbles of cheesy goodness.
Step 8: Rest & Slice
This is arguably the hardest part: letting it rest! Once it comes out of the oven, let it sit for about 5-10 minutes. This allows the sauce to set up just a little, making it easier to slice and serve. It also means you won’t burn your mouth on molten cheese!
Step 9: Serve It Hot!
Cut into generous portions and serve immediately. The aroma alone will have everyone gathered around. Enjoy that creamy, cheesy, broccoli-packed perfection!
What to Serve It With
This baked broccoli mac and cheese is pretty much a meal in itself, but it also plays wonderfully with a few friends! For a simple weeknight dinner, I often serve it with a big, crisp green salad. The acidity of a vinaigrette dressing cuts through the richness of the mac and cheese beautifully. Think mixed greens with cherry tomatoes, cucumber, and a lemon-Dijon dressing. If you’re feeling a bit more fancy, perhaps for a weekend brunch or a potluck, this mac and cheese is a fantastic side to grilled chicken or Pork Chops. It also holds its own next to a hearty steak. For a truly comforting meal, I love pairing it with some roasted vegetables like asparagus or Brussels sprouts – they echo the green theme and add another layer of deliciousness. My kids, when they’re feeling particularly indulgent, will sometimes have it alongside some crispy chicken tenders – a classic kid-pleaser combination. It’s just so versatile, making it a go-to for almost any occasion where comfort and deliciousness are the top priorities!
Top Tips for Perfecting Your Baked Broccoli Mac and Cheese
Over the years, I’ve picked up a few tricks that I think really make this baked broccoli mac and cheese sing. For starters, the broccoli itself: I always recommend blanching or lightly steaming it. This ensures it’s tender enough to eat easily within the pasta but still has a vibrant green color and a slight bite. Overcooked, soggy broccoli is a no-go in my book! When it comes to the pasta, remember that *al dente* is your best friend. It’s going to keep cooking in the oven, so if you cook it all the way through beforehand, you’ll end up with mush. I learned this the hard way after a few too many batches of sad, overcooked pasta! For the cheese sauce, warming the milk is a game-changer. It helps the flour incorporate smoothly and prevents those dreaded lumps. Seriously, this little step makes a huge difference in achieving that silky smooth texture. And don’t be afraid to mix your cheeses! While sharp cheddar is a must for that classic mac and cheese tang, adding something like Gruyère, fontina, or even a touch of smoked gouda can add incredible depth. I tested this with a blend of cheddar and Gruyère, and it was pure magic. I also discovered that using good quality, block cheese that you shred yourself melts much better than pre-shredded cheese, which can sometimes contain anti-caking agents that make the sauce a little grainy. When it comes to baking, keep an eye on it. Ovens can be finicky! You want it bubbly and golden, but if your oven runs hot, you might need to tent it with foil towards the end to prevent the topping from burning. Lastly, on the topping: panko breadcrumbs are my absolute favorite for their extra crispiness. Mix them with melted butter and a pinch of paprika for color and a hint of smoky flavor – it’s a small step that adds a lot of texture and visual appeal. Trust me, these little tips will take your baked broccoli mac and cheese from good to absolutely unforgettable!
Storing and Reheating Tips
One of the best things about this baked broccoli mac and cheese is how well it stores and reheats. If you find yourself with leftovers (which, let’s be honest, doesn’t happen often in my house!), make sure to let it cool down completely before storing. Once it’s cooled, transfer it to an airtight container. It’ll keep beautifully in the refrigerator for about 3-4 days. When you’re ready to reheat, there are a couple of ways to go. For individual portions, I love popping a serving in the microwave for about 60-90 seconds, stirring halfway through, until it’s warmed through and nice and creamy again. If you’re reheating a larger amount, placing it back in a baking dish in a preheated oven at around 350°F (175°C) for 15-20 minutes is ideal. You might want to add a tiny splash of milk or cream to the dish before reheating to help revive that creamy texture. If you’ve got any of that amazing crispy topping left, you might want to sprinkle a few more panko crumbs on top before you pop it in the oven for an extra crunch. For longer storage, freezing is definitely an option! Let the mac and cheese cool completely, then portion it into freezer-safe containers or wrap it tightly in plastic wrap and then foil. It should last in the freezer for up to 2-3 months. To thaw, transfer it to the refrigerator overnight and then reheat as you would the refrigerated leftovers. I usually advise against adding the breadcrumb topping if you plan to freeze it, as it can get a bit soggy upon reheating. Just add fresh breadcrumbs after it’s reheated for the best texture. The key is to store it properly to maintain that delicious, creamy texture.
Frequently Asked Questions
Final Thoughts
Honestly, this baked broccoli mac and cheese is more than just a recipe for me; it’s a little slice of happiness that I love sharing. It’s the kind of dish that brings people together, sparks smiles, and creates those warm, fuzzy feelings we all crave. It’s proof that comfort food can be both incredibly satisfying and surprisingly wholesome, especially with that beautiful green broccoli adding its vibrant touch. If you’re a fan of classic mac and cheese but looking for something a bit more exciting, or if you’re just in need of a truly fantastic, crowd-pleasing meal, this is your winner. Give it a try, and I promise, you’ll be hooked. I can’t wait to hear how it turns out for you, and I’m always curious to know about your own little twists! Let me know in the comments below what you think, and don’t forget to share your culinary triumphs!
Baked Broccoli Mac and Cheese
Ingredients
Main Ingredients
- 12 oz high fiber elbows like Ronzoni Smart Taste
- 1.5 tbsp butter
- 0.25 cup minced onion
- 0.25 cup flour
- 2 cups skim milk
- 1 cup fat free chicken broth vegetarians use vegetable broth
- 8 oz reduced-fat sharp cheddar about 2 cups shredded (Cabot 50%)
- salt and fresh pepper to taste
- 12 oz fresh broccoli florets about 3 cups (I used pre-cut bag)
- 2 tbsp grated parmesan
- 0.25 cup seasoned bread crumbs
- cooking spray
Instructions
Preparation Steps
- Cook pasta and broccoli together in a large pot of salted water, according to package directions for al dente (or slightly undercook by 2 minutes). Spray a baking dish with cooking spray.
- Preheat oven to 375°F (190°C).
- In a large, heavy skillet, melt butter. Add onion and cook over low heat about 2 minutes. Add flour and cook another minute, or until the flour is golden and well combined. Add milk and chicken broth and whisk, raising heat to medium-high until it comes to a boil; cook about 5 minutes or until the sauce becomes smooth and thick. Season with salt and pepper.
- Once the sauce is thick, remove from heat, add cheese and mix well until cheese is melted. Adjust salt and pepper to taste. Add the cooked macaroni and broccoli and mix well. Pour into the prepared baking dish. Top with grated parmesan and breadcrumbs. Lightly spray the top with cooking spray.
- Bake for 15-20 minutes, then broil for a few minutes to get the breadcrumbs golden brown.