There are certain smells that just instantly transport me back in time. For me, one of those smells is the comforting aroma of freshly baked goods wafting from the kitchen. It’s a smell that speaks of home, of warmth, and of pure, unadulterated joy. And if I’m being totally honest, my absolute favorite scent, the one that makes my heart do a little happy dance, is the golden-brown, slightly sweet, incredibly delicious perfume of empanadas. I know, I know, I’m a total sucker for them. They’re like little pockets of pure happiness, aren’t they? I’ve spent years perfecting my go-to empanada recipe, and let me tell you, when I discovered how to make them in my air fryer? Game. Changer. Seriously, if you’ve ever thought empanadas were too much work, or too messy, or just plain intimidating, I’m about to change your mind. These air fryer empanadas are my secret weapon for busy weeknights and weekend treats alike. They’re a revelation, a truly magical little pastry that’s surprisingly simple to whip up and impossibly delicious. They’re the perfect answer when that craving for something comforting and satisfying hits, and you want it pronto!
What are air fryer empanadas?
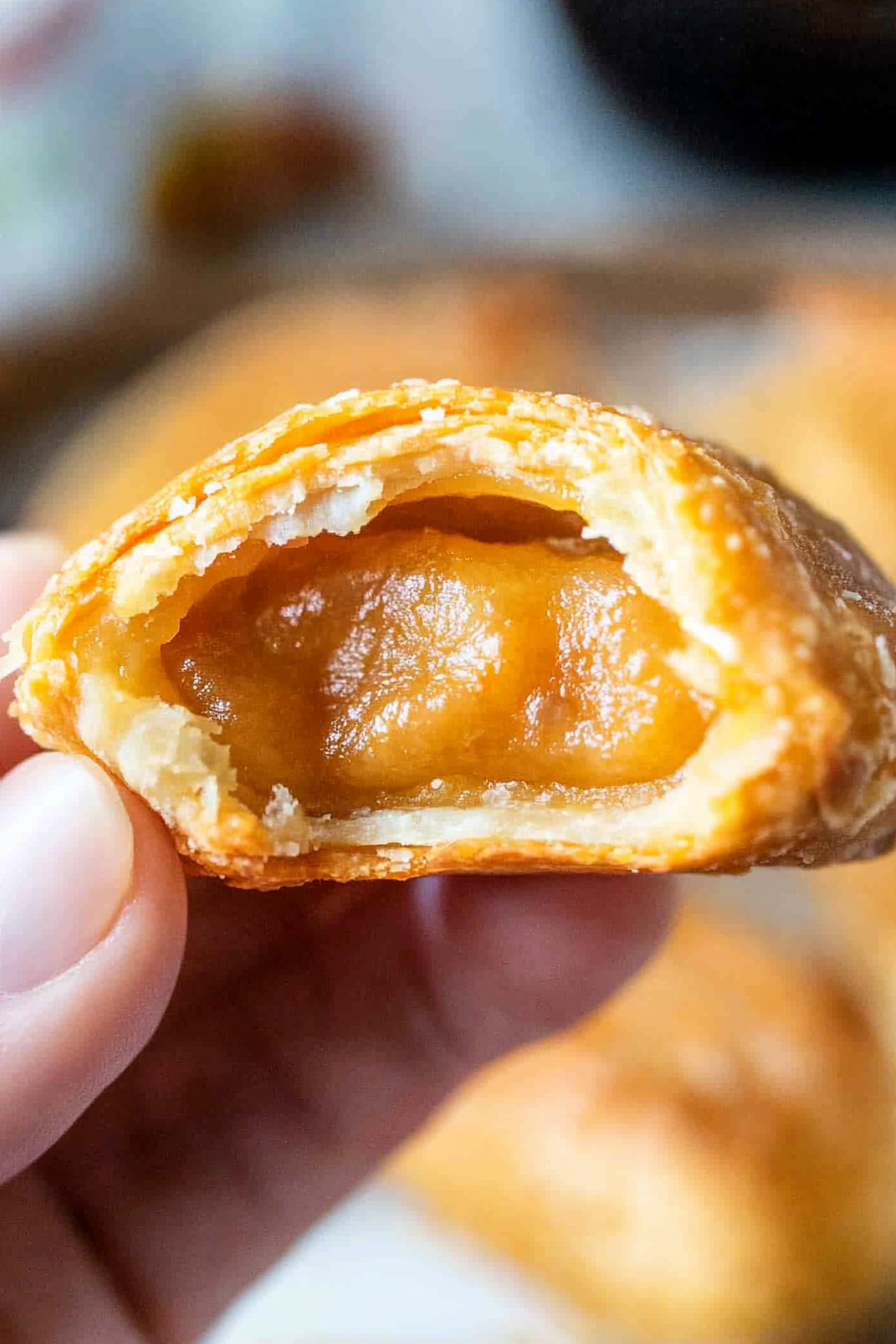
So, what exactly are these magical little things we’re talking about? Think of empanadas as the most delightful hand pies you’ll ever meet. They’re essentially a savory or sweet filling wrapped up in a delicious dough, then baked or fried until golden and irresistible. The name “empanada” actually comes from the Spanish verb “empanar,” which means “to bread” or “to coat in bread,” which perfectly describes that lovely crust. Historically, they’ve been a beloved staple across Spain, Latin America, and the Philippines, with each region boasting its own unique twists and fillings. My version, though, takes advantage of the modern marvel that is the Air Fryer. Instead of deep-frying or spending ages in a hot oven, we’re using the air fryer to achieve that perfect, crispy-crunchy exterior with way less oil and a fraction of the time. It’s like getting all the deliciousness of a traditional fried empanada, but with the ease and speed of air frying. They’re truly the best of both worlds, a brilliant fusion of tradition and modern convenience!
Why you’ll love this recipe?
There are so many reasons why this Air Fryer empanada recipe has become my absolute favorite, and I just know you’re going to adore it too. First off, let’s talk about the flavor explosion. Even with simple fillings, the combination of the tender, flaky crust and the warm, delicious interior is just divine. Whether you go for a classic beef or chicken filling, or something a little sweeter like apple cinnamon, the results are always spectacular. But what really seals the deal for me is the sheer simplicity of it all. Forget complicated doughs or long baking times. This recipe is designed to be as straightforward as possible, meaning you can have these beauties on the table in no time. It’s a lifesaver on those evenings when you’re short on time but still want to serve something homemade and impressive. And speaking of impressive, you’ll be shocked at how budget-friendly this is! All the ingredients are easily found in any grocery store, and you don’t need a ton of fancy extras to make these shine. I’ve found that I can feed the whole family a hearty snack or even a light meal without breaking the bank. Plus, the versatility is just incredible. You can customize the fillings to your heart’s content! That’s why this recipe is so special to me – it’s delicious, easy, affordable, and endlessly adaptable. It’s the kind of recipe that makes you feel like a kitchen rockstar, even if you’re just starting out.
How do I make air fryer empanadas?
Quick Overview
Get ready for the easiest empanadas of your life! In a nutshell, we’ll be whipping up a simple dough, preparing a flavorful filling (your choice!), assembling these delightful pockets, and then letting the magic of the Air Fryer do its thing. The whole process is surprisingly quick, and the results are unbelievably crispy and delicious. You get that satisfying crunch without the greasiness of deep-frying. It’s truly an “aha!” moment in the kitchen, and once you try it, you’ll wonder how you ever lived without it. It’s perfect for anyone who loves the idea of homemade empanadas but wants a fuss-free, speedy way to make them. You’ll be amazed at how quickly these go from start to finish!
Ingredients
For the Dough:
This dough is my go-to because it’s forgiving and bakes up beautifully tender with just the right amount of crisp. I always use all-purpose flour, but I’ve experimented with a blend of all-purpose and a touch of whole wheat for extra nuttiness – it works great! Make sure your butter is nice and cold; this is key for flakiness. Some folks like to add a pinch of sugar to the dough, and you absolutely can if you’re making a sweet filling, but for savory, I find it unnecessary. A good quality salt makes a difference, so use what you have that you enjoy!
* 2 ½ cups All-Purpose Flour
* 1 teaspoon Salt
* ½ cup (1 stick) Cold Unsalted Butter, cut into small cubes
* ½ cup Ice Water (you might not need it all)
For the Filling:
This is where you can really get creative! I’m giving you my favorite savory beef filling here, but I’ll talk about other options later. The trick with any filling is to make sure it’s not too wet. We want flavor, not sogginess! Cook your meat or vegetables thoroughly, and if there’s any excess liquid, drain it off. For the beef filling, I like to sauté onions and garlic until they’re fragrant and tender before adding the Ground Beef. A little bit of cumin and paprika adds just the right warmth. If you’re going sweet, think about chopped apples, berries, or even sweet potato, seasoned with cinnamon and a touch of brown sugar.
For the Egg Wash (Optional, but recommended for shine!):
This is super simple and gives the empanadas that gorgeous golden-brown sheen. It really elevates the presentation. Just one egg whisked with a tablespoon of water or milk is all you need.
Step-by-Step Instructions
Step 1: Preheat & Prep Pan
First things first, let’s get that air fryer ready to work its magic. You’ll want to preheat your air fryer to 375°F (190°C). This is crucial for getting that perfectly crisp exterior right from the start. While it’s heating up, line your air fryer basket with parchment paper specifically designed for air fryers if you have it, or just give it a good spray with cooking oil. This prevents any sticking and makes cleanup a breeze. I usually do this step first so everything else can flow smoothly. Don’t skip the preheating – it really makes a difference in the final texture!
Step 2: Mix Dry Ingredients
In a large bowl, whisk together your flour and salt. This ensures they’re evenly distributed throughout the dough. It seems simple, but it’s an important first step to a well-balanced dough. Just a good, thorough whisking is all you need here. No need to overthink this part!
Step 3: Mix Wet Ingredients
Now, add your cold, cubed butter to the flour mixture. You can use a pastry blender, a fork, or even your fingertips to cut the butter into the flour until it resembles coarse crumbs with some pea-sized pieces of butter still visible. Those little butter pockets are what create that flaky texture we all love. Then, gradually add the ice water, one tablespoon at a time, mixing until the dough just comes together. Be careful not to add too much water – you want a dough that’s slightly shaggy, not sticky. We’re not looking for a smooth dough here, just something that holds together.
Step 4: Combine
Turn the dough out onto a lightly floured surface. Gently knead it a few times, just until it forms a cohesive ball. Don’t overwork it! Overworking the dough will make it tough. Once it’s just combined, flatten it into a disc, wrap it tightly in plastic wrap, and pop it into the refrigerator for at least 30 minutes. This chilling time is super important. It allows the gluten to relax, making the dough easier to roll out, and it ensures the butter stays nice and cold for maximum flakiness.
Step 5: Prepare Filling
While the dough is chilling, let’s get your filling ready. For my classic beef filling: sauté a finely chopped onion and a couple of minced garlic cloves in a tablespoon of oil until softened. Add about 1 pound of ground beef and cook, breaking it up, until browned. Drain off any excess grease. Stir in 1 teaspoon cumin, ½ teaspoon paprika, salt, and pepper to taste. If you’re feeling fancy, a pinch of cayenne or a splash of Worcestershire sauce is nice too! Let the filling cool completely before you start assembling. This is key – a hot filling will make your dough tricky to work with and can even cause it to break.
Step 6: Layer & Swirl
Once your dough is chilled, lightly flour your work surface and roll out the dough to about 1/8-inch thickness. You can use a round cookie cutter (about 5-6 inches in diameter) or a small bowl to cut out circles. If you don’t have a cutter, you can just cut squares. Place about 2 tablespoons of your cooled filling onto one half of each dough circle, leaving a small border. Be careful not to overfill! Fold the other half of the dough over the filling to create a half-moon shape. Crimp the edges with a fork to seal them tightly. Make sure they’re sealed well so none of that delicious filling escapes during cooking!
Step 7: Bake
Carefully place your prepared empanadas into the preheated air fryer basket. Don’t overcrowd the basket; you want them to have a little space around them so the hot air can circulate. You’ll likely need to do this in batches. Brush the tops with your egg wash for that beautiful golden color. Air fry for 10-15 minutes, or until golden brown and crispy. The exact time will depend on your air fryer and the size of your empanadas, so keep an eye on them. I usually check around the 10-minute mark.
Step 8: Cool & Glaze
Once they’re done, carefully remove the empanadas from the air fryer and let them cool on a wire rack for a few minutes before serving. This allows the filling to set up a bit and prevents you from burning your mouth on molten deliciousness! If you’re making a sweet empanada, this is the time to drizzle on a simple powdered sugar glaze (powdered sugar mixed with a tiny bit of milk or lemon juice) or a sprinkle of cinnamon sugar. For savory ones, a little sprinkle of flaky sea salt is lovely.
Step 9: Slice & Serve
Serve your air fryer empanadas warm. They’re perfect on their own, or you can serve them with a side of your favorite dipping sauce. For savory empanadas, a chimichurri, salsa, or even a dollop of sour cream works wonders. For sweet ones, a scoop of ice cream or a side of whipped cream is pure heaven. Enjoy these little bites of joy!
What to Serve It With
These air fryer empanadas are so wonderfully versatile, they fit into almost any meal or occasion! For breakfast, I love them with a good cup of strong coffee. They’re not too sweet, so they feel right alongside your morning routine, especially if you’ve opted for a savory filling like ham and cheese. For a more substantial brunch, they’re fantastic alongside a fresh fruit salad and perhaps some scrambled eggs. Their elegant shape makes them feel a bit special, don’t you think? As a dessert, especially the sweet varieties, they’re an absolute dream. Imagine a warm apple cinnamon empanada with a scoop of vanilla bean ice cream – pure bliss! They’re also perfect for an after-dinner treat, a little something sweet to round off a meal. And of course, for those cozy snack times, they can’t be beat. I often make a batch just for the kids to have after school, and they disappear in minutes. My kids also love them as a fun, easy dinner alongside a big green salad. I’ve even packed them in lunchboxes, and they’re still delicious at room temperature. Honestly, they’re so good, you can serve them with pretty much anything and they’ll be a hit!
Top Tips for Perfecting Your Air Fryer Empanadas
I’ve made these air fryer empanadas more times than I can count, and over the years, I’ve picked up a few tricks that I just have to share with you. First, about prepping your zucchini if you decide to go that route for a filling: make sure to really squeeze out as much moisture as possible. You can do this by grating it, then tossing it with a bit of salt, letting it sit for 10-15 minutes, and then squeezing it dry in a clean kitchen towel or cheesecloth. This is crucial to avoid a soggy filling that can lead to a sad, soggy crust. When it comes to mixing the dough, remember what I said about not overworking it. The moment it just comes together is the moment you stop. Overmixing develops the gluten too much, making your empanadas tough instead of tender. You want that delicate crumb! For the swirl effect in sweet empanadas, don’t be afraid to get a little artistic. I like to drizzle my filling ingredients in stripes rather than just dumping them in. This helps create beautiful patterns when you fold them over. And if you’re ever unsure about your egg wash, just remember that it’s primarily for color and shine. If you forget it or don’t have an egg, a little milk or even melted butter brushed on top will still give you a nice golden hue. For ingredient swaps, I’ve tested almond flour in the dough for a slightly nutty flavor, but you might need a touch more liquid. And for fillings, don’t be afraid to experiment! Cooked lentils or black beans make a fantastic vegetarian savory filling. For baking, always remember that air fryers can vary. What takes 12 minutes in mine might take 10 in yours, or 14 in another. It’s always best to start checking around the 10-minute mark and adjust from there. You’re looking for that deep golden brown color. And for the glaze, if it’s too thick, add a tiny bit more liquid; if it’s too thin, add a little more powdered sugar. Consistency is key for that beautiful finish!
Storing and Reheating Tips
The best part about these air fryer empanadas is that they’re just as delicious, if not even better, the next day! If you have any leftovers (which is rare in my house!), storing them properly is key to maintaining their deliciousness. At room temperature, they’re generally good for about 2 days, especially if they’re just filled with cooked meat or vegetables and not dairy-heavy fillings. I like to keep them in an airtight container to prevent them from drying out. If you know you won’t be eating them within a couple of days, I highly recommend popping them into the refrigerator. They’ll stay fresh and tasty in the fridge for up to 4-5 days. Just make sure they’re in a sealed container or wrapped well. For longer storage, these empanadas freeze beautifully! You can freeze them either baked or unbaked. If freezing baked empanadas, let them cool completely, then place them on a baking sheet in a single layer until frozen, then transfer them to a freezer-safe bag or container. They’ll last up to 3 months this way. If freezing unbaked, assemble them, place them on a baking sheet until firm, then freeze and transfer to a bag. To reheat baked empanadas, pop them back into the air fryer at around 350°F (175°C) for 3-5 minutes until warmed through and crispy again. If reheating from frozen, add a few extra minutes. For unbaked empanadas, air fry them directly from frozen, but be prepared to add about 5-8 minutes to the cooking time. If you’ve made sweet empanadas with glaze, it’s always best to add the glaze *after* reheating, just before serving, to prevent it from getting sticky or melting off during the reheating process.
Frequently Asked Questions
Final Thoughts
Honestly, I could talk about these air fryer empanadas all day! They’re just one of those recipes that brings so much joy, both in the making and in the eating. That perfect flaky crust, the warm, flavorful filling, and the incredible convenience of the air fryer – it’s a combination that’s hard to beat. They’re proof that you don’t need complicated techniques or hours in the kitchen to create something truly special and satisfying. Whether you’re looking for a quick snack, a delightful brunch addition, or a sweet treat to end the day, these empanadas are your answer. I really hope you give them a try. They’ve become such a staple in my home, and I have a feeling they might just become a favorite in yours too. If you’re someone who loves my Easy Apple Crumble Pie or my Quick Cinnamon Roll Bites, I think you’ll find these empanadas right up your alley in terms of deliciousness and ease. I can’t wait to hear what you think! Let me know in the comments below how yours turned out, what fillings you tried, and any fun variations you came up with. Happy baking, and happy air frying!
Air Fryer Empanadas
Ingredients
Main Ingredients
- 2 boxes refrigerated pie crusts (15 oz boxes, 4 pie crusts total)
- 1 can apple pie filling (21oz can)
- 1 bag Kraft caramels (11oz bag)
- 4 tbsp butter
- 2 tbsp sugar
- 2 tsp cinnamon
Instructions
Preparation Steps
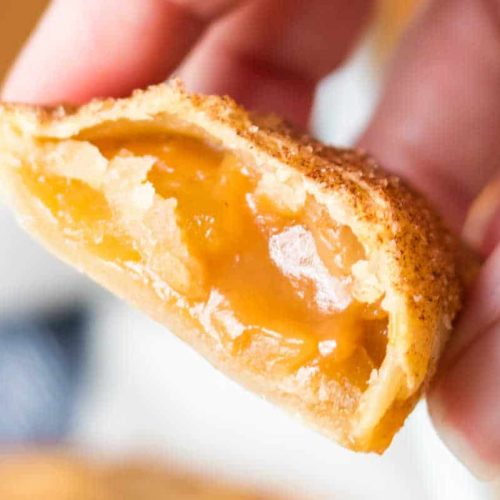
- Add apple pie filling and caramels to a medium saucepan over medium heat. Stir together until the caramels are melted. Remove from heat and set aside.
- Unroll each pie crust and using a large coffee mug, cut out 5 circles per pie crust so you end up with 20 circles of dough.
- Place a tablespoon of apple caramel filling into the middle of each dough round.
- Carefully fold over the circle and pinch the edges together to seal.
- Melt the butter and brush onto each empanada.
- Mix the sugar and cinnamon together and sprinkle over the empanadas.
- Working in batches, place the empanadas in the air fryer and air fry for 10 minutes at 330℉. Repeat with other batches.

