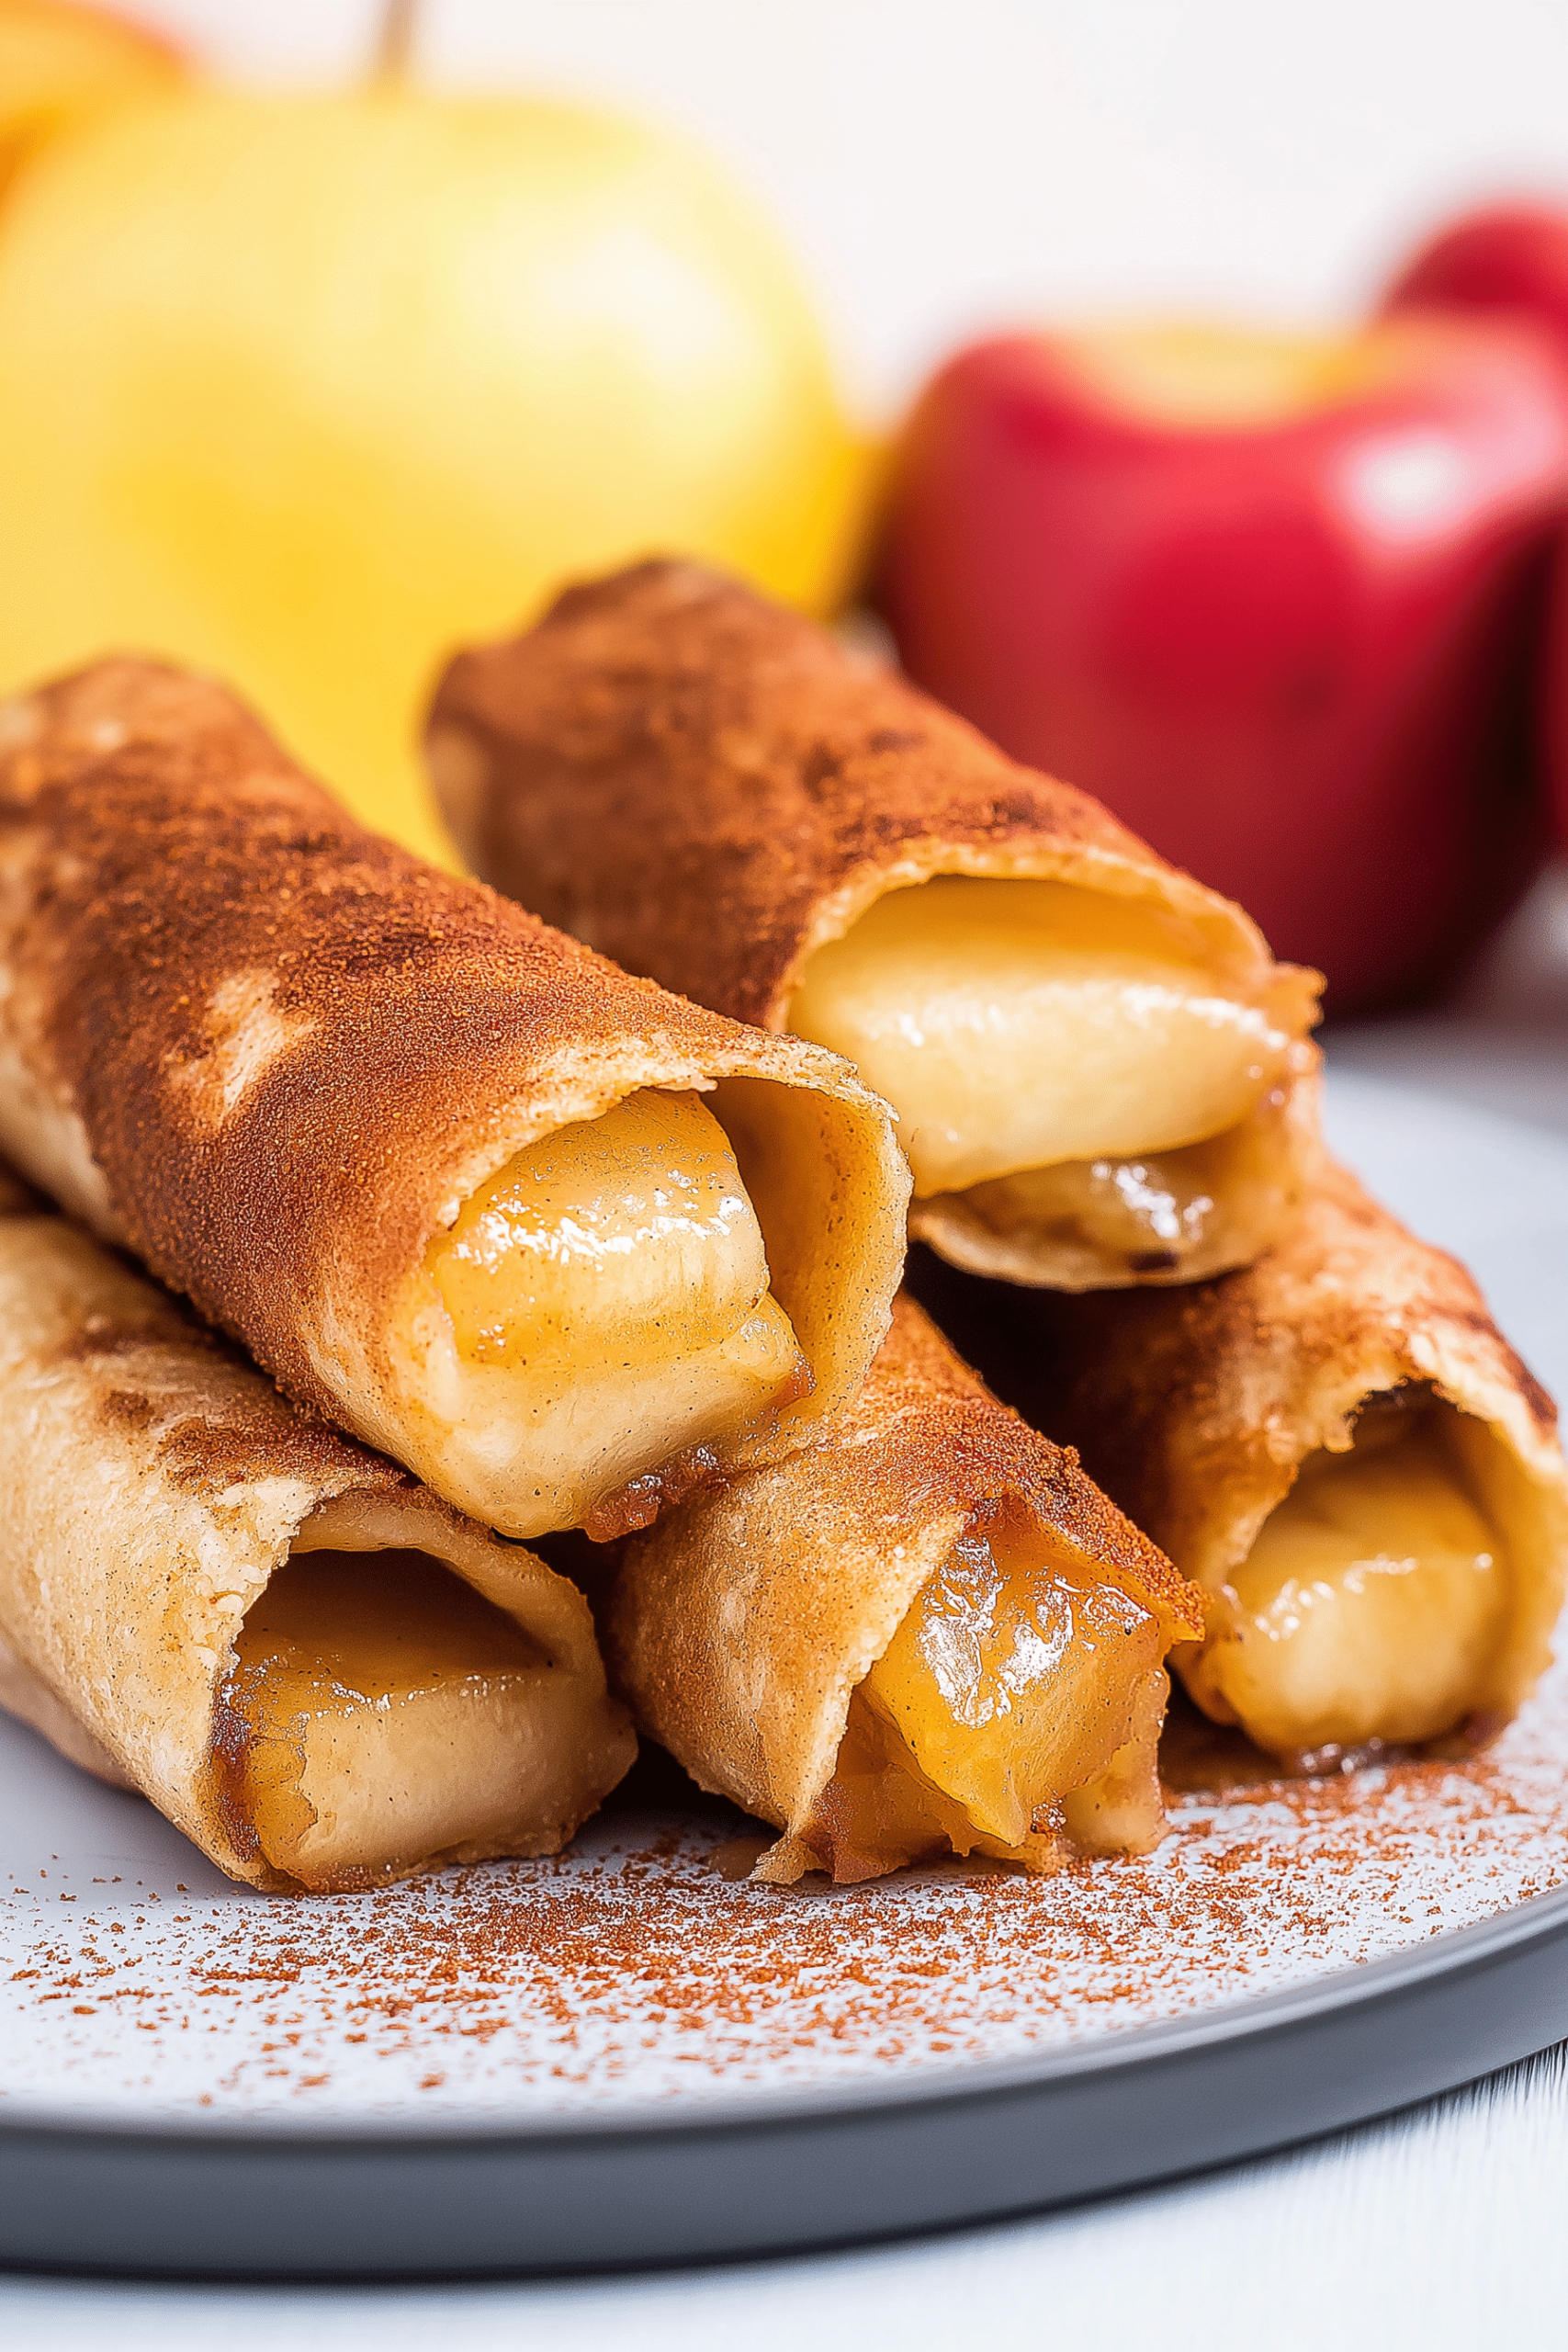
Oh, where do I even begin with these Air Fryer Apple Fries? If you’re anything like me, you probably have a few go-to recipes that just *work*. You know, the ones you can whip up on a weeknight without breaking a sweat, the ones that satisfy that sweet craving without you having to feel guilty, and most importantly, the ones that make your whole family light up. Well, these air fryer apple fries are absolutely one of those recipes for us. They’re a little bit sweet, a little bit spiced, and have this incredible texture that’s just… *chef’s kiss*. Honestly, they’re the closest thing I’ve found to those beloved apple fritters or apple doughnuts, but without all the deep-frying fuss. They’re just perfectly tender on the inside and delightfully crispy on the outside, and the smell that fills the kitchen while they’re cooking? Pure magic. My kids ask for these constantly, especially when there’s a chill in the air or we’re just craving something comforting. I first stumbled upon something similar years ago, and after a bit of tweaking, I landed on this version that’s become a staple. They’re seriously a lifesaver when that unexpected sweet tooth hits, or when you need a fun treat that feels special but is surprisingly simple to pull off.
What is an air fryer?
So, what exactly *are* Air Fryer Apple Fries? Think of them as a delightful mashup of baked apples and a lightly spiced, tender fritter, all made incredibly convenient by your air fryer. The “fries” part comes from how we slice them – long, appealing strips that are perfect for dipping. It’s essentially a simple batter that gets infused with the natural sweetness and warmth of apples, then air-fried to a perfect golden-brown crisp. It’s not heavy like a traditional deep-fried pastry, but it absolutely delivers on flavor and that satisfying texture we all crave. The name itself, “Air Fryer Apple Fries,” just sounds fun and approachable, doesn’t it? It’s less intimidating than, say, “apple doughnuts,” and it perfectly captures the essence of what you’re getting: a healthier, easier way to enjoy those comforting apple dessert flavors we all love.
Why you’ll love this recipe?
There are so many reasons why this recipe has earned a permanent spot in my recipe rotation, and I have a feeling it will in yours too! First and foremost, the **flavor** is just out of this world. You get that comforting, warm apple taste, perfectly complemented by a hint of cinnamon and nutmeg. It’s not overly sweet on its own, which I love, because it allows you to control the sweetness with a glaze or dip. And the texture! Oh, the texture. They’re wonderfully tender and slightly cakey on the inside, with a satisfyingly crisp exterior thanks to the Air Fryer magic. It’s a textural delight that’s hard to beat.
Then there’s the **simplicity**. Seriously, this is where this recipe truly shines for me. You don’t need any fancy techniques or hours of your time. Most of the ingredients are probably already in your pantry. It’s a one-bowl wonder for the batter, a quick chop for the apples, and then the Air Fryer does all the heavy lifting. This is a lifesaver on busy nights when you want to whip up something special for dessert or a snack without a lot of fuss.
And let’s talk about **cost-efficiency**. Apples are generally pretty budget-friendly, especially when they’re in season, and the other ingredients are pantry staples. Compared to buying specialty pastries or ordering dessert, this is a fraction of the cost, and you get so much more satisfaction from making it yourself.
The **versatility** is another huge plus. I’ll share some of my favorite ways to serve them, but honestly, they’re good just as they are. You can play around with the spices, add a touch of vanilla to the batter, or even experiment with different apple varieties. They’re also fantastic for breakfast if you make a lighter glaze, or perfect for a cozy afternoon snack. What I love most about these Air Fryer apple fries is that they deliver all the comfort and deliciousness of a more elaborate dessert, but with a fraction of the effort and cleanup. It’s a win-win-win in my book!
How do I make an air fryer for Apple Fries?
Quick Overview
Making these Air Fryer Apple Fries is surprisingly straightforward. You’ll simply combine your wet and dry ingredients to create a lightly spiced batter, gently fold in some diced apples, and then air fry them until they’re beautifully golden and cooked through. The whole process, from start to finish, takes less than 30 minutes, making it perfect for those times you need a quick treat. What makes this method so special is how the air fryer mimics the texture of deep-frying without all the oil and mess, giving you that irresistible crispiness that we all crave in a fried dessert, but in a much more convenient way.
Ingredients
For the Main Batter:
This is where we build that light, fluffy base. You’ll need:
- 1 cup All-Purpose Flour: This forms the structure of our fries. Make sure it’s fresh!
- 1/4 cup Granulated Sugar: Just enough to give a little sweetness to the batter itself. You can adjust this slightly based on your preference.
- 1 teaspoon Baking Powder: This is crucial for that lovely lift and tender texture. Don’t skip this!
- 1/2 teaspoon Ground Cinnamon: My absolute favorite spice for anything apple. It adds that warm, comforting flavor.
- 1/4 teaspoon Ground Nutmeg: Just a pinch to complement the cinnamon. Too much can be overpowering, so go easy!
- Pinch of Salt: This little bit of salt really balances out the sweetness and enhances all the other flavors.
- 1 large Egg: It acts as a binder and helps create that tender crumb.
- 1/2 cup Milk: I usually use whole milk for the best richness, but any milk (dairy or non-dairy like almond or oat) will work.
- 1 tablespoon Melted Butter or Oil: This adds a touch of richness and helps with browning. I often use melted unsalted butter.
- 1 teaspoon Vanilla Extract: For that extra depth of flavor.
For the Filling:
The star of the show! We want nice, tender apple pieces.
- 2 medium Apples: I love using Honeycrisp or Fuji apples because they hold their shape well and have a great sweet-tart balance. Gala or Granny Smith also work beautifully.
- 1 tablespoon Lemon Juice: To prevent the apples from browning while we prep everything else.
For the Glaze (Optional, but highly recommended!):
This adds that final touch of sweetness and makes them irresistible.
- 1/2 cup Powdered Sugar: The base for our simple glaze.
- 1-2 tablespoons Milk or Water: Just enough to get the right drizzling consistency.
- Optional: Pinch of Cinnamon: For a little extra spice kick.
Step-by-Step Instructions
Step 1: Preheat & Prep Pan
First things first, you’ll want to preheat your air fryer to 375°F (190°C). This is key to getting that nice crisp exterior. While it’s preheating, lightly grease your air fryer basket with cooking spray or a little oil. This prevents anything from sticking, which is a lifesaver when you’re dealing with batter.
Step 2: Mix Dry Ingredients
In a medium-sized bowl, whisk together the flour, granulated sugar, baking powder, cinnamon, nutmeg, and salt. Whisking them together thoroughly ensures that the leavening agent and spices are evenly distributed, which means you won’t get any surprise clumps of baking powder or intense spice pockets. You want a nice, uniform mixture.
Step 3: Mix Wet Ingredients
In a separate small bowl, whisk together the egg, milk, melted butter (or oil), and vanilla extract until everything is well combined. Make sure the melted butter isn’t too hot, so it doesn’t scramble the egg. A gentle whisk is all you need here.
Step 4: Combine
Pour the wet ingredients into the bowl with the dry ingredients. Gently fold them together with a spatula until just combined. Be careful not to overmix! Overmixing develops the gluten in the flour too much, which can result in tough fries. A few small lumps are perfectly fine and actually preferable for a tender texture. We’re aiming for a thick, pourable batter, kind of like pancake batter but a bit thicker.
Step 5: Prepare Filling
Now for the apples! Peel them if you prefer (I usually do for a smoother texture), core them, and then dice them into small, bite-sized pieces, about 1/2 inch. Toss them gently with the lemon juice to keep them from turning brown. This step is quick, but it makes a difference!
Step 6: Layer & Swirl
Gently fold the prepared apple pieces into the batter. Make sure they’re evenly distributed throughout. You want apple in almost every bite! Don’t overmix here either. Just a few gentle folds to get them incorporated.
Step 7: Bake
Carefully spoon the apple mixture into your preheated and greased air fryer basket. Try to spread it out into a somewhat even layer. You might need to work in batches, depending on the size of your air fryer, to avoid overcrowding. Overcrowding will steam the fries instead of crisping them up. Air fry for 10-14 minutes, flipping them halfway through with a spatula, until they are golden brown and cooked through. The exact time will vary depending on your air fryer model and how full the basket is. You’re looking for that beautiful golden-brown color and a firm, cooked interior.
Step 8: Cool & Glaze
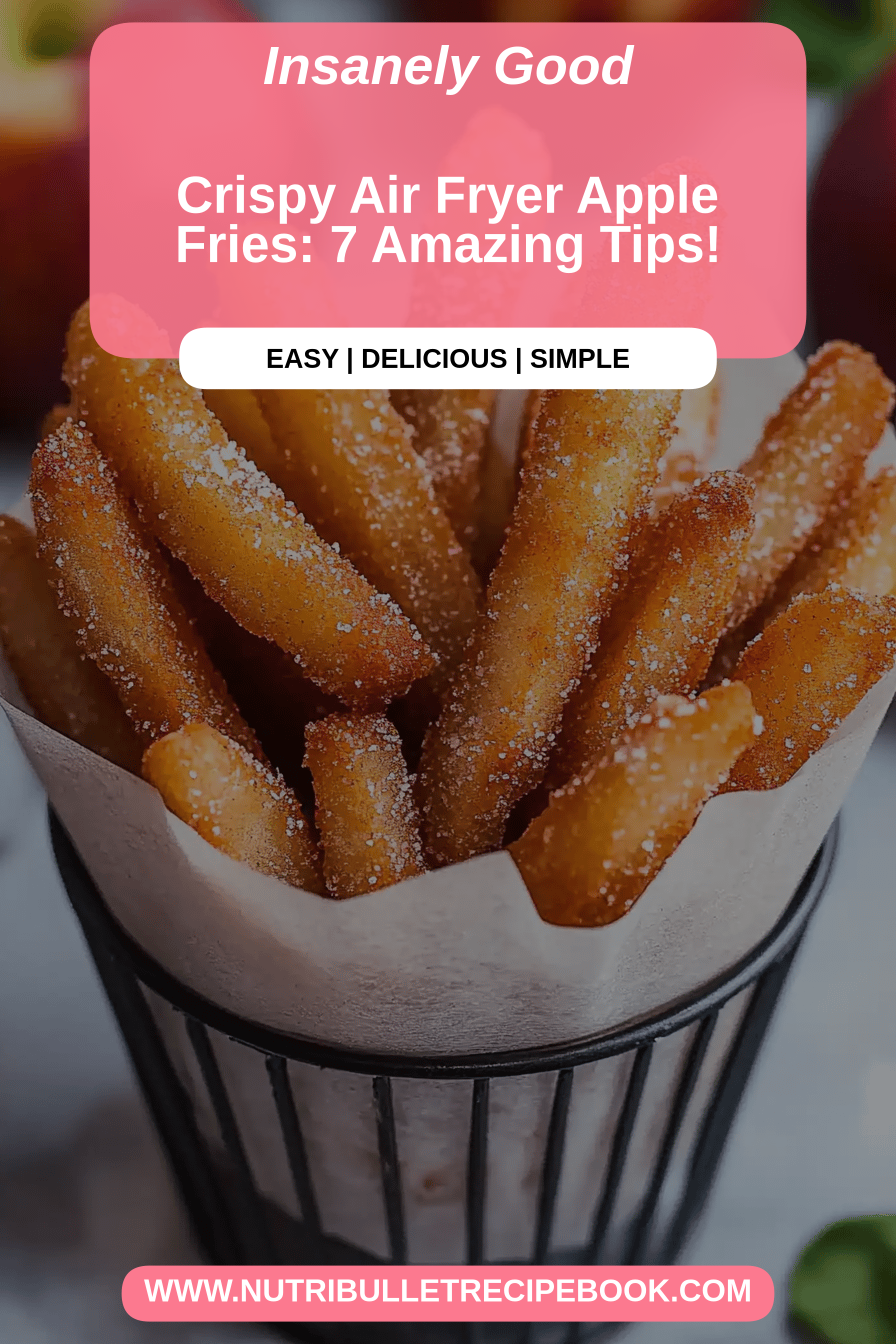
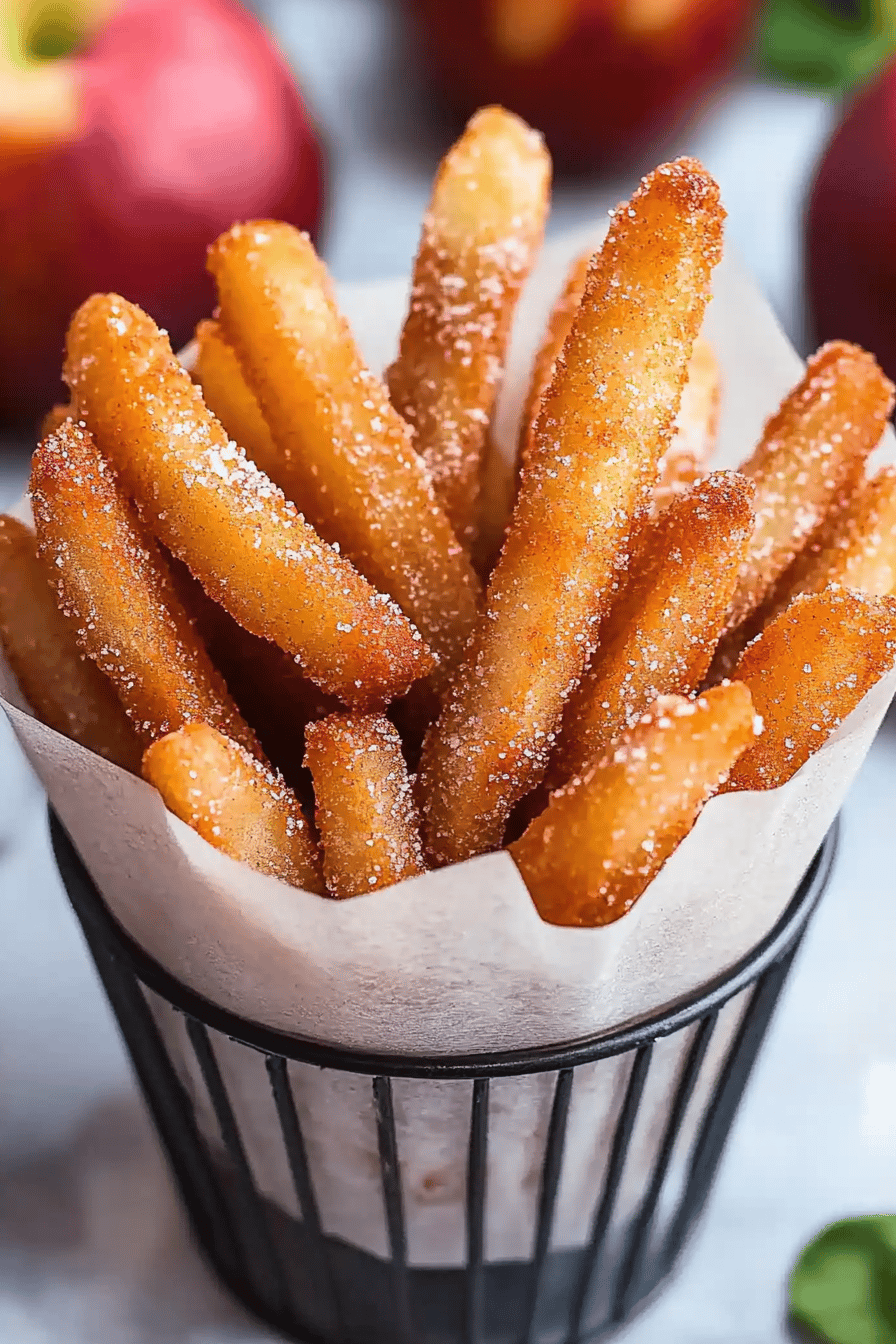
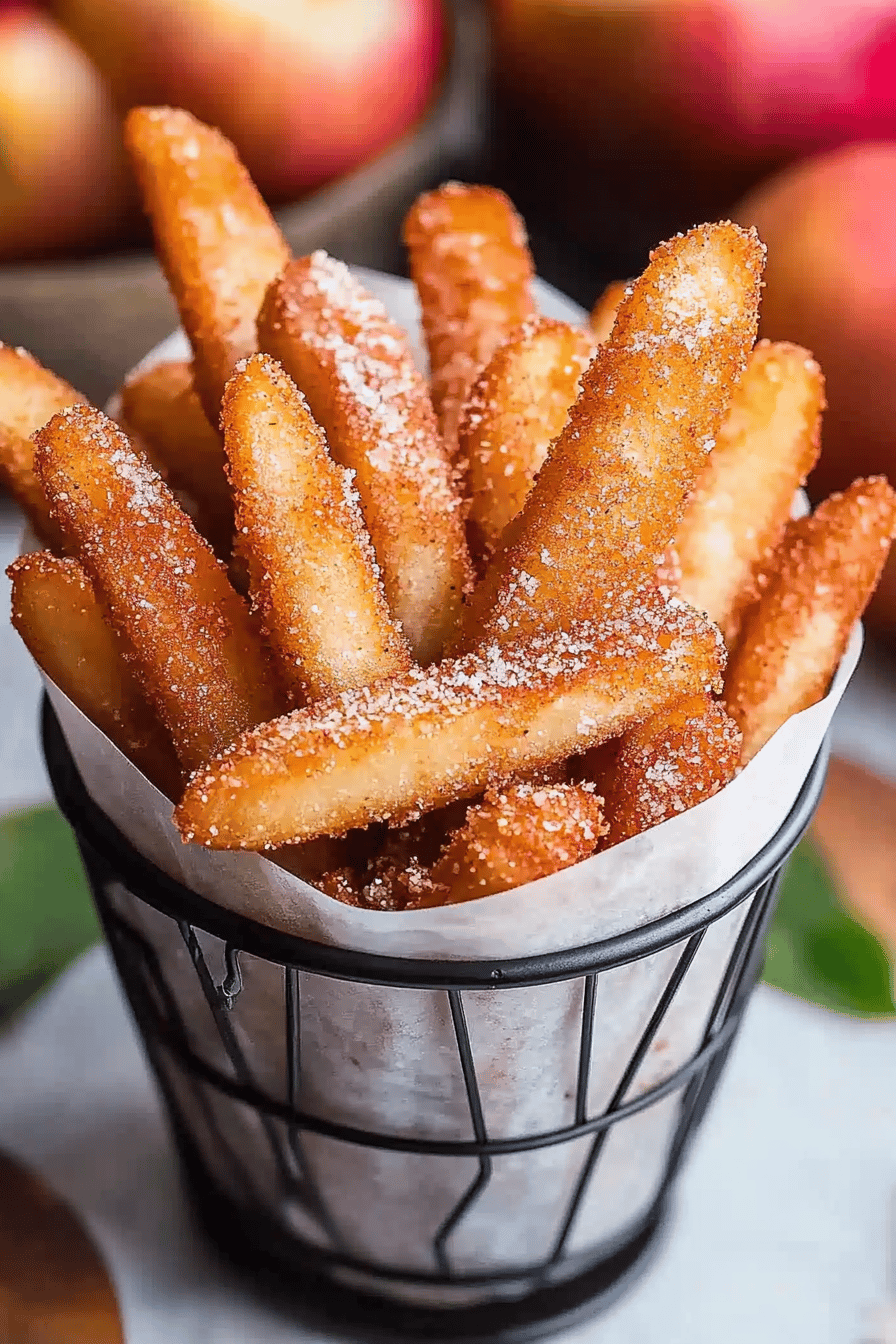
Once they’re done, carefully transfer the apple fries to a wire rack to cool slightly. While they’re cooling, whisk together the powdered sugar and milk (or water) in a small bowl until you have a smooth, drizzly glaze. Add more liquid a tiny bit at a time if it’s too thick, or more powdered sugar if it’s too thin. Drizzle the glaze over the slightly cooled apple fries. I like to do this while they’re still warm so the glaze melts just a tiny bit, but not so hot that it all slides off.
Step 9: Slice & Serve
If you made a larger batch, you might want to slice them into more defined “fry” shapes. Serve them warm! They are absolutely divine straight from the air fryer, with that warm apple center and crispy edges, topped with that sweet glaze. Trust me, they won’t last long!
What to Serve It With
These Air Fryer Apple Fries are wonderfully versatile, and honestly, they’re fantastic all on their own! But if you’re looking to make them part of a larger meal or a special occasion, here are a few ideas that my family absolutely adores:
For Breakfast: Believe it or not, these can be a delightful morning treat! Serve them with a light dusting of powdered sugar instead of the glaze, or use a very thin maple glaze. They pair beautifully with a hot cup of coffee or a warm mug of chai tea. For a fuller breakfast, I love serving them alongside some scrambled eggs and a side of turkey bacon. It feels indulgent but is still a balanced start to the day.
For Brunch: For a more festive brunch, I like to present these on a pretty platter. The glaze looks lovely drizzled artfully. They pair exceptionally well with other brunch favorites like mini quiches, fresh fruit salad, or even alongside some fluffy pancakes or waffles. A mimosa or a sparkling cider makes the perfect beverage companion.
As Dessert: This is perhaps their most natural habitat! Serve them warm with a dollop of whipped cream or a scoop of vanilla bean ice cream. They’re also divine with a caramel sauce drizzled over them, or even served alongside a slice of cheesecake. For a truly decadent dessert, try pairing them with a rich chocolate ganache dip. The warm apple flavor is a perfect ending to any meal.
For Cozy Snacks: On a rainy afternoon or a chilly evening, these are pure comfort. I often just make a small batch for my kids (and myself!) to enjoy with a glass of milk. They’re so quick to make, it’s the perfect antidote to that “I need something sweet right now” feeling. Sometimes, I’ll even make a simple dip with Greek yogurt and a touch of honey if we’re feeling a little healthier. They’re just so wonderfully comforting and satisfying.
Top Tips for Perfecting Your Air Fryer Apple Fries
Over the years of making these countless times, I’ve picked up a few tricks that I think really make a difference. Here are my top tips to ensure your Air Fryer Apple Fries turn out absolutely perfect every single time:
Apple Prep:
The type of apple you use really matters for texture. Firmer apples like Honeycrisp, Fuji, or Gala are my favorites because they don’t turn to mush when cooked. When dicing, aim for pieces that are not too large, about 1/2 inch. This ensures they cook through evenly with the batter. If you’re sensitive to apple skin, go ahead and peel them, but I often leave the skin on for a little extra fiber and a bit of texture. Just make sure to wash them thoroughly!
Mixing Advice:
The biggest mistake I see people make is overmixing the batter. Remember, we’re not making bread! Overmixing develops gluten, which leads to tough fries. Fold the wet and dry ingredients together until *just* combined. It’s okay, even good, to have a few little lumps. The batter should be thick enough to coat the apples without being runny, similar to a thick pancake batter. If it feels too thin, you can add a tablespoon more flour; if it’s too thick, a splash more milk.
Swirl Customization:
While these don’t have a distinct swirl like a cinnamon roll, you can play with the apple distribution. Make sure you fold the apples in gently so they don’t break down too much. You want distinct pieces of apple within the tender fry. Ensure the apples are well-drained of their lemon juice before adding to the batter to avoid excess moisture.
Ingredient Swaps:
For the flour, you can try a gluten-free all-purpose blend. I haven’t tested this extensively, but it generally works well in recipes like this. For the milk, any kind will do – almond, soy, oat, or even buttermilk for a slight tang. If you don’t have fresh butter, a neutral oil like canola or vegetable oil works perfectly. For the spices, feel free to adjust them to your liking. A pinch of cardamom or allspice can add a lovely twist!
Baking Tips:
Don’t overcrowd the air fryer basket! This is probably the most important tip. If you cram too many in, they’ll steam rather than crisp. Cook in batches if necessary. Start checking for doneness around the 10-minute mark, as air fryers can vary. They should be beautifully golden brown and feel firm to the touch. If they’re browning too quickly on top, you can tent them loosely with foil. Make sure your air fryer is preheated properly; a hot start is crucial for crispiness.
Glaze Variations:
The glaze is simple, but you can elevate it! Add a tiny bit of maple syrup for a different flavor, a drop of almond extract, or even a bit of orange zest. For a thicker, more frosting-like glaze, use less liquid. For a thinner glaze, add more. If you prefer not to glaze, a simple dusting of powdered sugar or a drizzle of warm honey is also delicious. Another great alternative is a thin drizzle of melted chocolate!
Storing and Reheating Tips
These Air Fryer Apple Fries are truly best enjoyed fresh, warm from the air fryer. That’s when they have that perfect crispy exterior and tender interior. However, life happens, and sometimes you might have leftovers (though I can’t imagine how!). Here’s how to store and reheat them to keep them as delicious as possible:
Room Temperature: If you happen to have a few left and they’re not yet glazed, you can keep them at room temperature for a few hours. Store them in an airtight container. However, I wouldn’t recommend leaving them out for too long, especially if the weather is warm, as they can become a bit soft. For best results, aim to eat them within a few hours.
Refrigerator Storage: Once cooled completely, store any leftovers in an airtight container in the refrigerator for up to 2-3 days. They will soften considerably in the fridge as moisture from the apples and batter gets released. While they won’t be as crispy as when freshly made, they are still quite tasty, especially if reheated.
Freezer Instructions: I don’t typically freeze these because their texture changes quite a bit after freezing and thawing. If you absolutely must freeze them, I would recommend freezing them *before* glazing. Let them cool completely, then place them in a single layer on a baking sheet lined with parchment paper and freeze until solid. Once frozen, transfer them to a freezer-safe bag or container. They should last in the freezer for about 1-2 months. Thaw them overnight in the refrigerator before reheating.
Glaze Timing Advice: It’s generally best to glaze them right before serving or once they’ve cooled slightly if you’re eating them within a few hours. If you know you’ll be storing them (especially in the fridge), I recommend storing the un-glazed fries and adding the glaze just before serving. Reheating can sometimes make the glaze sticky or melt it away if it’s applied too early.
Reheating: The best way to reheat these to regain some crispiness is in the air fryer or a toaster oven. Reheat at around 350°F (175°C) for 3-5 minutes, or until warmed through and slightly crisped up again. Microwaving will make them soft and slightly rubbery, so I avoid that if possible. If you reheated them from frozen, allow them to thaw first and then reheat as described.
Frequently Asked Questions
Final Thoughts
So there you have it – my go-to recipe for Air Fryer Apple Fries! I truly hope you give these a try. They’re such a simple way to bring a little bit of joy and comfort into your kitchen, and they always seem to be a huge hit, whether it’s for a quick dessert, a special breakfast, or just because! The combination of tender apples, warm spices, and that delightful crispness is just pure happiness in every bite. They’re proof that you don’t need to spend hours in the kitchen or use complicated ingredients to create something truly delicious and satisfying.
If you enjoyed these air fryer apple fries, you might also love my Air Fryer Cinnamon Sugar Doughnut Bites or my Quick Apple Crumble. They both hit that comforting sweet spot! I’m always so curious to hear how my recipes turn out for you all, so please, if you make these, leave a comment below and let me know what you think! Did your family devour them? Did you try any fun variations? I love seeing your creations and hearing your own kitchen stories. Happy air frying, and I can’t wait to hear from you!

Air Fryer Apple Fries
Ingredients
Main Ingredients
- 3 large apples Fuji or Honeycrisp apples cored and sliced into fries
- 2 tablespoons coconut oil melted
- 1 teaspoon cinnamon
- 0.5 teaspoon nutmeg
- 2 tablespoons maple syrup
Instructions
Preparation Steps
- Preheat your air fryer to 375°F (190°C).
- In a large bowl, toss the apple fries with melted coconut oil, cinnamon, and nutmeg until evenly coated.3 large apples Fuji or Honeycrisp apples
- Arrange the apple fries in a single layer in the air fryer basket. Cook for 10-15 minutes, flipping halfway through, until golden brown and slightly softened.
- Drizzle with maple syrup just before serving.3 large apples Fuji or Honeycrisp apples