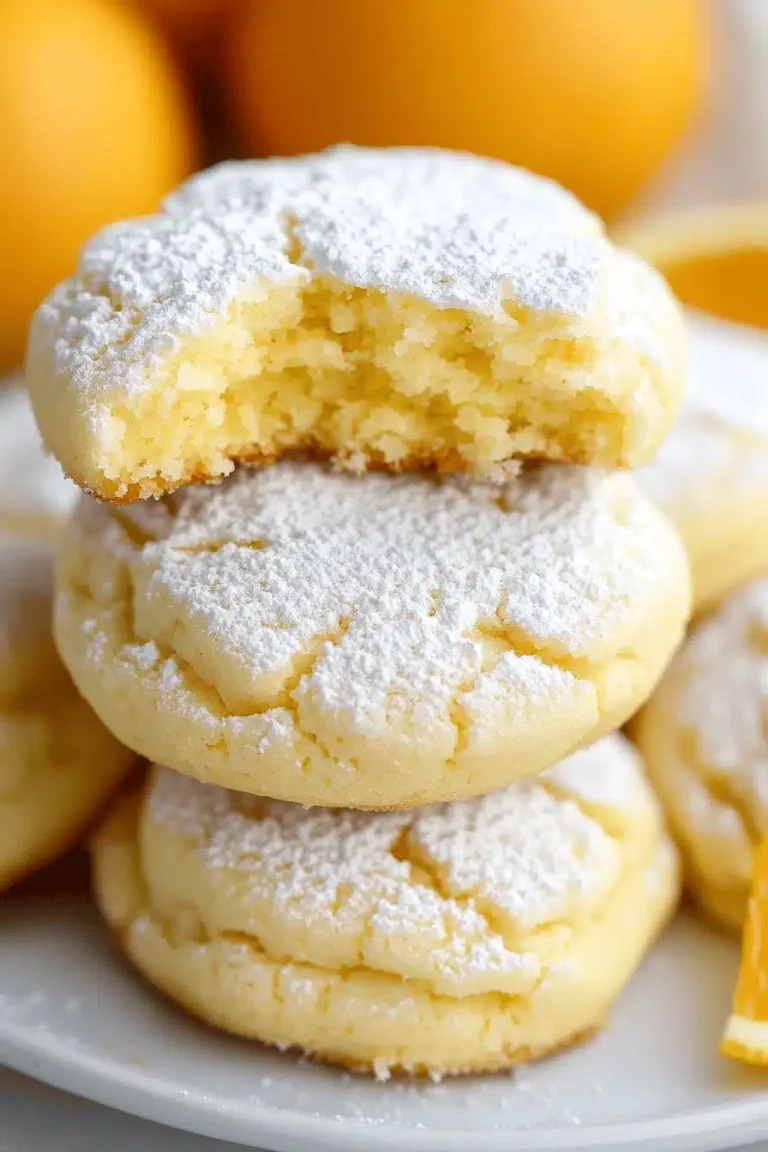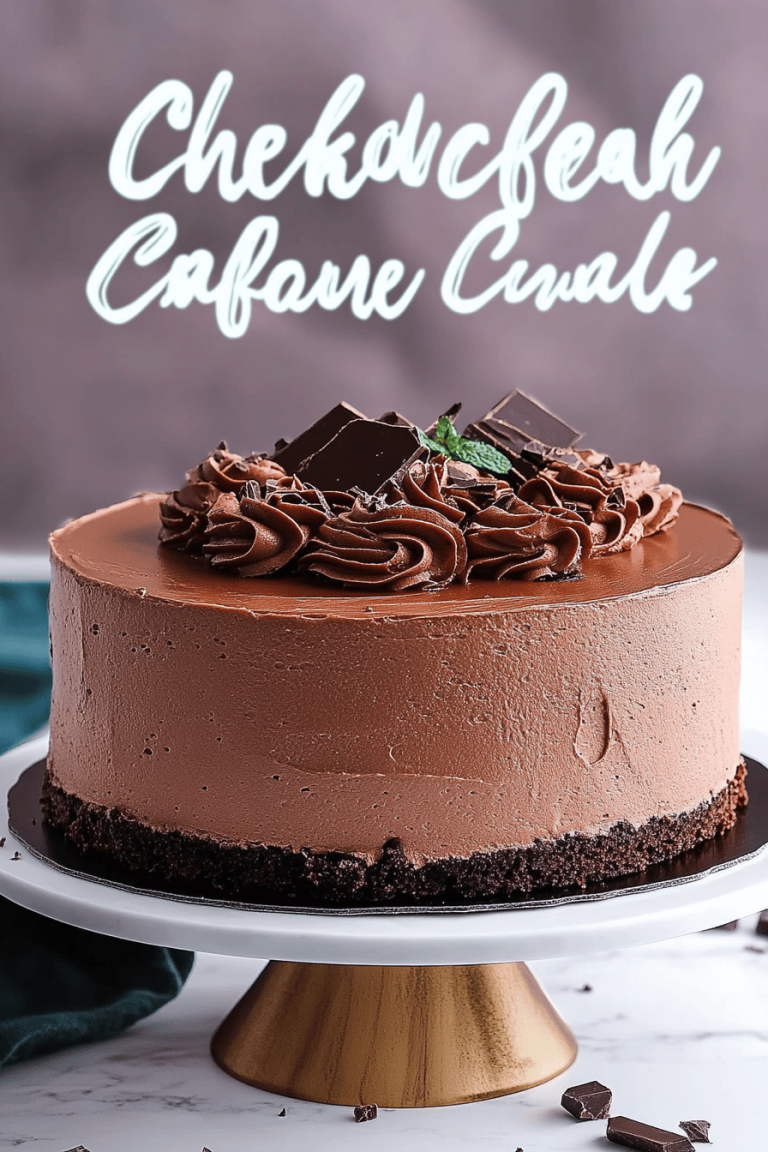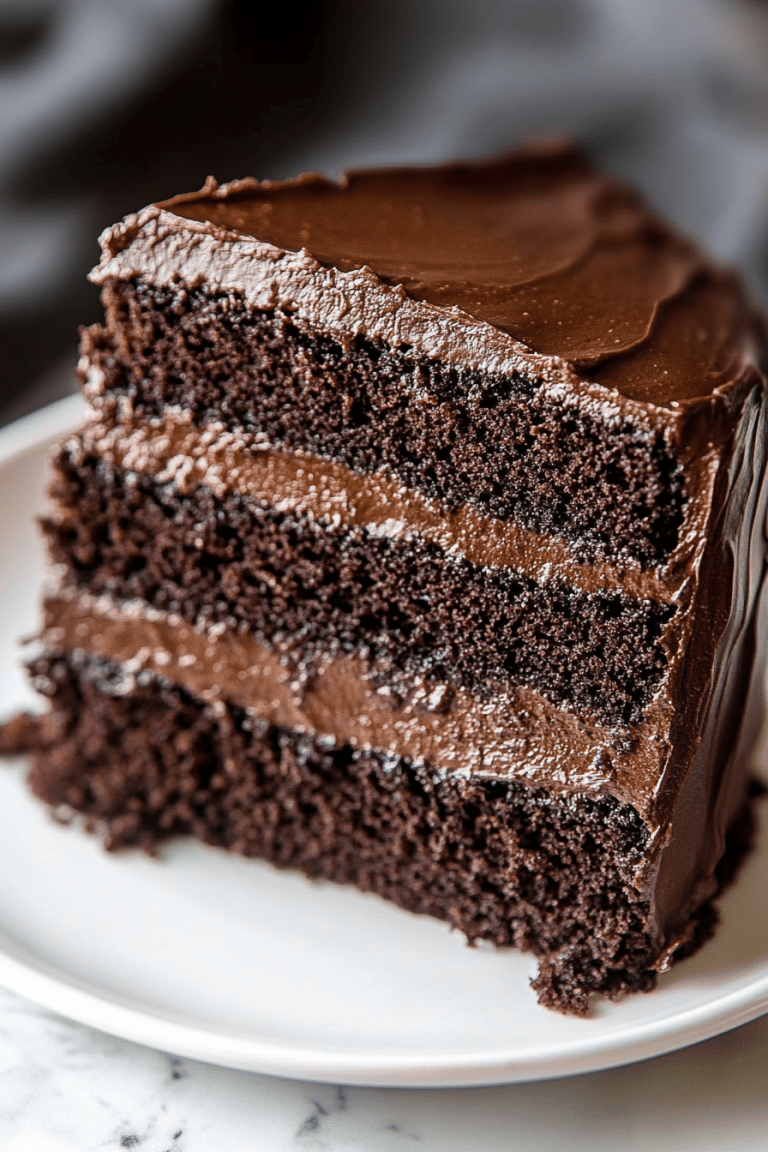
I still remember the first time I made a cookies and cream cake—my kids’ eyes lit up like it was the best thing they’d ever tasted. The house smelled like a bakery but without the fuss, and every bite was a little celebration of crunchy Oreos hidden in moist, tender cake, topped with that dreamy, silky cream glaze. It’s the kind of dessert that sneaks into your heart the way a childhood favorite does—comforting, familiar, but with a little sparkle of something special. If you’ve ever fallen for a good cookies and cream ice cream, imagine that same magic turned into cake form, but easier and even more indulgent. Honestly, this cake has become my go-to when I want to impress but don’t want to spend hours in the kitchen. My friends swear it beats fancy pastry any day, and my kids? Well, they’re forever asking for seconds (and thirds).
What is cookies and cream cake?
Think of a cookies and cream cake as a love letter to that classic cookies and cream combo everyone knows and adores. It’s essentially a soft, fluffy cake packed with crushed chocolate sandwich cookies swirled into the batter, creating these delightful pockets of crunchy cookie bits and rich vanilla cake that melt together beautifully. The name’s a nod to the iconic ice cream flavor, but this is fully baked, often layered with a luscious cream filling or glaze that’s creamy and just a little bit sweet. The contrast between the crunchy cookie crumbs and smooth, velvety frosting is what makes this dessert feel so nostalgic and totally crave-worthy. It strikes just the right balance — not too heavy, not too dry — perfect for any sweet tooth lookin’ for a little fun.
Why you’ll love this recipe?
What I love most about this cookies and cream cake is how effortlessly it hits all the right spots. The flavor is pure joy—rich and chocolaty from those cookie bits with a subtle vanilla undertone that keeps it balanced. Plus, the creaminess—it’s like biting into a piece of your favorite ice cream sandwich, just more cake-y and freshly baked.
But here’s the real kicker: it’s ridiculously simple to make. No need for fancy tools or long-winded techniques. You just crumble some cookies, mix your batter, fold the crumbs in, and bake. Hands down, this is one of the easiest cakes I’ve ever whipped up that actually feels impressive when it comes out of the oven. It’s a total lifesaver on busy weeknights or last-minute celebrations when you want to bring something sweet but don’t have the time or energy for complicated recipes.
Also, it’s budget-friendly. I usually keep a stash of sandwich cookies for impromptu baking sessions, and honestly, grabbing a few basic pantry staples means this cake won’t blow your grocery budget. The versatility is another big win. I’ve served it at birthday parties, family brunches, casual coffee catch-ups, and even as a sweet afternoon snack. It’s that flexible.
If you’re a fan of classic vanilla or chocolate cakes but want to jazz things up a bit, this one’s for you. It reminds me a bit of a chocolate chip cake but with a fun, crunchy twist that keeps everyone guessing what the secret ingredient is. Trust me, once you make this, it’ll become your dessert to go to when you want something familiar but with just a little extra excitement.
How do I make a cookie and cream cake?
Quick Overview
Making this cookies and cream cake is as straightforward as they come. You start by prepping your dry and wet ingredients separately, then gently fold crushed cookies into the batter so you still get those sweet, crunchy chunks without losing any fluffiness. The batter goes into a well-greased pan, and while it bakes, you prepare a simple cream glaze that gets poured over once it’s cooled just enough to soak in but not melt away. The process is quick, the cleanup minimal, and the payoff huge. The beauty is that you don’t have to be a baking pro to get great results—the cake turns out moist with just the right crumb every time.
Ingredients
For the Main Batter:
- 2 cups all-purpose flour – I always sift this to keep the cake light and airy.
- 1 ½ teaspoons baking powder – this is your best friend for that soft rise.
- ½ teaspoon baking soda – helps with extra lift and tenderness.
- ¼ teaspoon salt – balances sweetness.
- ¾ cup unsalted butter, softened – makes all the difference in moistness and flavor.
- 1 ½ cups sugar – you can tweak this if you like it less sweet.
- 3 large eggs – room temperature eggs give a better texture.
- 1 tablespoon vanilla extract – the aroma here is heaven.
- 1 cup buttermilk – keeps it moist and tangy; I’ve tried almond milk but prefer buttermilk’s richness.
- 1 ½ cups crushed chocolate sandwich cookies – save some for decorating the top!
For the Filling:
- 1 cup heavy cream – whipped into soft peaks for that light cloud-like filling.
- 2 tablespoons powdered sugar – just enough sweetness, don’t overdo.
- 4-5 crushed sandwich cookies – fold in gently for texture.
- Optional: a teaspoon of vanilla or even a splash of coffee liqueur for an adult twist.
For the Glaze:
- 1 cup powdered sugar – for smooth sweetness.
- 2-3 tablespoons milk – adjust for consistency; start with less to get that perfect drizzle.
- ½ teaspoon vanilla extract – keeps it cozy and classic.
- Crushed cookies for topping – adds that signature crunch and visual appeal.
Step-by-Step Instructions
Step 1: Preheat & Prep Pan
Set your oven to 350°F (175°C). Grease a 9-inch round cake pan with butter and dust it lightly with flour or use parchment paper on the bottom. This prevents sticking but also makes for a nice, even crust on the edges. I’ve learned that a well-prepped pan really saves you from panicking when trying to unmold the cake later.
Step 2: Mix Dry Ingredients
In a large bowl, whisk together the flour, baking powder, baking soda, and salt. Sifting is optional but I like to do it—it helps get rid of lumps and keeps the cake airy. Mixing them first ensures your cake rises evenly and that you don’t get any weird pockets of baking soda or flour in the batter, which I once discovered was the culprit behind a dense patch in my cake.
Step 3: Mix Wet Ingredients
In a separate bowl, beat the softened butter and sugar until creamy and fluffy—this takes a few minutes and is key for a light texture. Add eggs one at a time, making sure each is fully incorporated before adding the next. Stir in vanilla extract. Alternately add the dry ingredients and buttermilk, starting and ending with the dry mix. The batter should be smooth, creamy, and a little thick but still pourable.
Step 4: Combine
Fold the crushed cookies gently into the batter. Make sure you don’t overmix here; you want those cookies to stay in nice little clusters instead of breaking down completely. This step is where the magic happens—those cookie chunks give you little crunchy bites of happiness throughout the cake.
Step 5: Prepare Filling
Whip the heavy cream and powdered sugar until soft peaks form (you don’t want it too stiff). Fold in the crushed cookies carefully so the cream stays fluffy but gains that addictive crunch. If you’re feeling fancy, a splash of vanilla or a hint of coffee liqueur can take it from “yum” to “wow”.
Step 6: Layer & Swirl
Pour half of the batter into your prepared pan. Dollop the cookie cream filling on top in spoonfuls, then pour the remaining batter over. Use a spatula or skewer to gently swirl the layers, creating a marbled effect that looks gorgeous and guarantees every bite is a surprise of flavors. Don’t overdo it—you want visible swirls, not a total mix.
Step 7: Bake
Bake for about 40-45 minutes, but start testing at 35 minutes if your oven runs hot. The cake is done when a toothpick inserted in the center comes out mostly clean with a few moist crumbs (those cookie bits can fool you!). I learned the hard way that opening the oven too early makes it sink, so try to keep the oven closed during those last minutes.
Step 8: Cool & Glaze
Let the cake cool in the pan for 15 minutes, then transfer to a wire rack. The glaze should be poured when the cake is warm but not hot, so it seeps in nicely without running off entirely. Mix powdered sugar, milk, and vanilla until smooth, adding milk a little at a time until you get a thick but pourable glaze. Drizzle generously, then sprinkle crushed cookies on top for that final flourish.
Step 9: Slice & Serve
Use a serrated knife to slice through the cake gently (the crumbs can be delicate). It’s best served at room temperature to let the glaze and cream meld perfectly into each bite. This cake looks lovely on a simple white plate or a rustic wooden board—either way, expect a few “oohs” from your guests.
What to Serve It With
For Breakfast: This cake pairs wonderfully with a strong cup of black coffee or a vanilla latte. Slice a small piece for a morning treat, perhaps alongside a handful of fresh berries to cut through the sweetness.
For Brunch: Serve it with a fresh fruit salad and a side of whipped cream for a light yet indulgent spread. Bubbly mimosas or a chilled iced tea complement the cake’s creamy notes well, making it feel festive but still relaxed.
As Dessert: Top individual plates with a scoop of vanilla bean ice cream or even a drizzle of chocolate syrup. A few mint leaves or crushed nuts add an elegant touch that elevates this humble cake into something special enough for dinner guests.
For Cozy Snacks: When the craving hits in the afternoon, grab a mug of your favorite hot chocolate or milk and enjoy a generously thick slice. This cake disappeared in minutes at my house during one particularly rainy day—it’s perfect for those moments when you want comfort food that’s fun and nostalgic.
One of my favorite family traditions is serving this cake at birthday parties with homemade cookies and cream milkshakes alongside it. It turns snack time into a celebration without any pressure.
Top Tips for Perfecting Your Cookies and Cream Cake
Cookie Prep: Always crush the cookies fairly coarsely—if they’re too fine, the batter turns a bit grey and you lose the satisfying bite. Keep a few whole ones aside for decorating. Freshness matters too; I never use stale cookies because they don’t soften nicely during baking and can throw off the texture.
Mixing Advice: When folding the cookies into the batter, don’t rush. Too much stirring breaks down the cookies and makes the cake dense. I learned this the hard way when I wasted a batch because I was too impatient. A light hand ensures every bite has those delightful crunchy surprises.
Swirl Customization: Let your inner artist out! The swirls don’t have to be perfect, but a gentle back-and-forth movement works best to create a pretty marbling effect that makes the cake feel almost homemade bakery-level fancy. Experiment with swirling different ratios of batter to filling to find your perfect balance.
Ingredient Swaps: I’ve tested this with almond milk and coconut milk, which make the cake slightly denser but add a subtle nutty note. For gluten-free, a 1:1 all-purpose gluten-free blend works, just be gentle with mixing. Butter can be swapped with coconut oil, but it changes the flavor distinctly, so taste expectantly!
Baking Tips: If your oven runs on the hotter side, lower the temperature a bit and bake a little longer to avoid a crusty exterior and undercooked middle. Center your cake rack to promote even baking. Always test doneness with a toothpick, since every oven behaves a little differently.
Glaze Variations: If you want a tangier glaze, stir in a teaspoon of cream cheese or lemon juice into the powdered sugar mixture. For chocolate fans, dip crushed Oreos in melted dark chocolate before sprinkling for an extra decadent touch. It’s one of those little things that will have your friends asking for the recipe!
Storing and Reheating Tips
Room Temperature: Cover your cookies and cream cake loosely with parchment paper or a cake dome. It keeps well for up to 2 days, holding onto that fresh-baked softness and moisture without drying out.
Refrigerator Storage: Store in an airtight container if you want to keep it up to 5 days. Because of the cream filling and glaze, refrigeration is best if you’re planning to keep it longer. Just remember to let the cake come to room temp before serving to bring out all the flavors.
Freezer Instructions: You can freeze this cake wrapped tightly in plastic wrap and foil for up to 2 months. Thaw it slowly overnight in the fridge, then let it sit out for an hour before slicing and serving. I find freezing softens the cookie bits a bit, but the cake bounces back nicely.
Glaze Timing Advice: If you’re freezing, it’s best to add the glaze after thawing to keep it fresh and glossy. For same-day serving, add the glaze once the cake is cooled but still slightly warm for that perfect drippy effect.
Frequently Asked Questions
Final Thoughts
Cookies and cream cake holds a special place on my recipe list because it’s the kind of dessert that’s both nostalgic and endlessly adaptable. It’s the perfect combination of crunchy cookie pieces and soft cake, layered with creamy goodness that makes it feel like a treat you actually deserve. I honestly can’t count how many times I’ve made this—whether for a simple family dinner or a big birthday bash—and it never fails to bring smiles all around the table. Plus, it’s one of those recipes where a small tweak here or there makes it your own without losing that classic charm.
If you’re a fan of dippin’ cookies in milk, or that classic cookies and cream ice cream, this cake is just waiting for you to bake it. I’d love to hear how yours turns out or any fun twists you give it—drop a comment, rate it, or share your variations. Happy baking, my friend! Your kitchen is about to smell incredible, and that first bite? Pure magic.
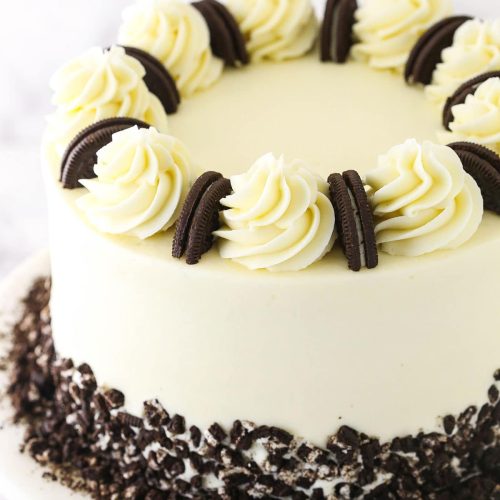
Cookies and Cream Cake
Ingredients
Main Ingredients
- 2.25 cups all-purpose flour
- 2.5 tsp baking powder
- 0.5 tsp salt
- 0.5 cup unsalted butter room temperature
- 0.5 cup vegetable oil
- 1.5 cups granulated sugar
- 4 large eggs
- 1 cup buttermilk
- 1 tbsp vanilla extract
- 3 cups Oreos, chopped about 24 Oreos
- 3 cups unsalted butter room temperature, for frosting
- 12 cups powdered sugar
- 1 tbsp vanilla extract for frosting
- 6 tbsp water or cream for frosting, add more if needed
- salt to taste
- 3.5 cups Oreos, chopped for decorating
Instructions
Preparation Steps
- Preheat oven to 350°F. Prepare three 8-inch cake pans by greasing sides and lining bottoms with parchment paper.
- In a medium bowl, mix together the flour, baking powder, and salt. Set aside.
- In a large bowl, beat the butter, vegetable oil, and sugar until light and fluffy, about 3-4 minutes.
- Add eggs one at a time mixing well after each addition, scraping down sides as needed.
- Add half the dry ingredient mixture and mix until just combined.
- Mix in the buttermilk and vanilla extract until fully combined.
- Add the remaining dry ingredients and mix until smooth, being careful not to overmix.
- Fold chopped Oreos into the batter gently.
- Divide the batter evenly into the prepared pans and bake for 18-23 minutes or until a toothpick inserted comes out with a few crumbs.
- Allow cakes to cool 2-3 minutes in pans then transfer to wire racks to cool completely.
- For the buttercream: beat butter until smooth. Gradually add half the powdered sugar and beat until smooth.
- Add vanilla extract, 4-5 tablespoons water or cream, and salt; mix until smooth.
- Slowly add remaining powdered sugar, mixing until creamy. Add more water or cream if needed for desired consistency.
- Level cake tops with a serrated knife to create flat layers.
- Place first cake layer on a serving plate or cake board.
- Spread about 1 cup of frosting over the first layer and sprinkle with 1/2 cup chopped Oreos, gently pressing them into the frosting.
- Add the second cake layer and repeat with another cup of frosting and 1/2 cup Oreos.
- Top with final cake layer and frost the outside of the entire cake smoothly.
- Press chopped Oreos into the sides of the cake before the frosting crusts over.
- Pipe swirls of frosting around the top edge of the cake, placing half an Oreo between each swirl for decoration.