There’s something magical about the way homemade ice cream smells as it churns quietly in the kitchen — that sweet hint of vanilla mingling with freshly cracked eggs and cream. I’ll admit, I was always a bit intimidated by making it from scratch, but once I tried this simple homemade ice cream recipe, it became an absolute staple at my house. The velvety texture and rich flavor blow store-bought versions out of the water, and the best part? You control every ingredient, so no weird preservatives or artificial stuff sneaking in. Plus, my kids ask for it constantly, especially on those hot afternoons when the sun feels like it’s baking the whole neighborhood. If you think making your own ice cream sounds complicated or time-consuming, this easy homemade ice cream will totally surprise you. It’s way easier — and frankly more satisfying — than you’d expect.
What is home made ice cream?
Think of homemade ice cream as the ultimate comfort dessert you craft yourself, right in your own kitchen. It’s essentially a creamy frozen treat made from a basic custard or cream base, sweetened and flavored however you like, then churned until it hits that perfect scoopable consistency. The “homemade” bit means it’s made without the mass-produced shortcuts you find in commercial ice creams — no stabilizers, no mystery ingredients. Historically, ice cream was churned by hand in wooden buckets with salt and ice, turning milk and cream into magic over hours. Today, thankfully, most of us use an ice cream machine (or trusty freezer method) to get that creamy texture with way less elbow grease. Making your own means you can personalize every batch — vanilla bean, chocolate swirl, fresh berries, or even something wild like lavender honey. It’s less about perfection and more about savoring the process and the flavor.
Why you’ll love this recipe?
What I love most about this homemade ice cream recipe is how incredibly rich and silky it tastes — far beyond anything I’ve found in a pint at the store. You really get to taste the cream and fresh ingredients, and the flavor adjusts beautifully to whatever you throw in (I once stirred in homemade caramel sauce and it changed everything). The simplicity is another huge win. This recipe only takes a few basic ingredients, and between mixing, chilling, and churning, you’re only actively involved for a handful of minutes — the machine does the heavy lifting. It’s also surprisingly budget-friendly since you can pick cream and milk that fit your budget, and flavor diverts are endless depending on what you have on hand. Plus, it’s versatile enough for any occasion — a casual treat on a weeknight, an impressive homemade gift, or the crown jewel of a summer party. If you’re a fan of other frozen desserts like gelato or sherbet, you’re going to appreciate how this one hits that balance between creamy and refreshing. Honestly, once you make this homemade ice cream, you might find it impossible to go back to the store-bought stuff!
How do I make homemade ice cream?
Quick Overview
Here’s the gist: you start by making a simple custard base using cream, milk, sugar, and egg yolks (the secret to that velvety texture). Then you flavor it — vanilla is classic, but this is your playground. The key step is chilling the custard thoroughly before pouring it into an ice cream maker, which churns it to creamy perfection by incorporating air and preventing iciness. After churning, a quick cold rest in the freezer firms everything up for the ideal scoop. It sounds fancy but trust me, it’s straightforward and totally worth every lick.
Ingredients
For the Ice Cream Base: For the base: For the base: For the base: For the base: For the base: For the base: For
- 2 cups heavy cream — fresh and full-fat is key for creaminess
- 1 cup whole milk — helps balance richness without heaviness
- 3/4 cup granulated sugar — adjust a bit if you like less sweet
- 5 large egg yolks — this is what gives it that luscious, custardy texture
- 1 tablespoon pure vanilla extract or 1 vanilla bean, split and scraped — fresh beans take this to another level
Optional Flavor Add-ins:
- Fresh berries (stirred in after churning)
- Fudge or caramel swirls
- Chopped nuts or cookie crumbs
- Spices like cinnamon or cardamom for a twist
Step-by-Step Instructions
Step 1: Heat the Milk and Cream
Pour milk and cream into a medium saucepan. If you’re using a vanilla bean, add the seeds and pod now so those fragrant little specks infuse while heating. Warm everything gently over medium heat until just steaming and nearly boiling at the edges—don’t let it scorch! This step wakes up all the lovely flavors.
Step 2: Whisk the Egg Yolks and Sugar
While the milk mixture is warming, whisk the egg yolks and sugar in a bowl until they’re pale and thick, almost like a custard. This part is crucial — it’s what creates the creamy, melt-in-your-mouth texture that homemade ice cream is famous for.
Step 3: Temper the Eggs
Slowly pour a little of the hot milk and cream into the yolks while whisking continuously—this is called tempering and keeps your eggs from scrambling. Once tempered, pour the yolk mixture back into the saucepan. This is where things start getting magical.
Step 4: Cook the Custard Base
Stir constantly over medium-low heat until the mixture thickens enough to coat the back of a spoon (around 170-175°F if you use a thermometer). When you run your finger through the coating on the spoon, the line should hold — that’s your cue to stop cooking, so you don’t curdle your custard.
Step 5: Cool the Custard
Remove from heat, strain through a fine mesh sieve into a clean bowl to catch any cooked egg bits, then stir in vanilla extract if you didn’t use a bean. Let the custard cool at room temp, then cover and chill in the fridge for at least 4 hours — overnight is even better because it improves texture and flavor.
Step 6: Churn the Ice Cream
Once cold, pour the custard into your ice cream maker and churn according to the manufacturer’s instructions (usually about 20-30 minutes). You’ll see it thicken from a liquid to a soft-serve texture — this is the fun part where it all comes alive!
Step 7: Freeze to Firm Up
Transfer the churned ice cream into a freezer-safe container, press a piece of plastic wrap or parchment paper directly onto the surface to prevent ice crystals, then freeze for at least 3 hours to set fully.
Step 8: Scoop and Serve
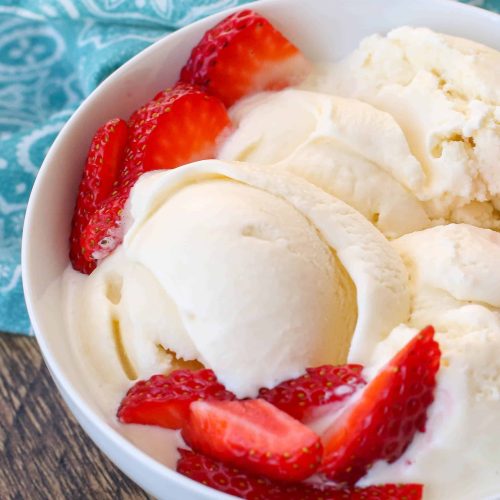
Take your homemade ice cream out about 10 minutes before serving to soften slightly for easier scooping. Dive in and enjoy that first cool, creamy spoonful!
What to Serve It With
For Breakfast: Ever tried a scoop of vanilla homemade ice cream alongside warm cinnamon-spiced waffles or drizzled over French toast? The contrast of hot and cold in the morning is pure joy, and a strong cup of coffee or chai rounds it off beautifully.
For Brunch: Set up a little sundae bar with fresh fruits, chopped nuts, and bite-sized pastries. Frozen berries or tangy citrus segments add a fresh pop, plus a mimosa or light sparkling wine if you’re feeling fancy.
As Dessert: You can’t go wrong serving a generous scoop with a drizzle of homemade chocolate ganache or caramel sauce. If you want to impress, add toasted pecans or a sprinkle of flaky sea salt — it takes the whole thing to a new level.
For Cozy Snacks: When life gets hectic and you need a sweet break, a scoop straight from the freezer is like an instant little vacation. Pair with a hot mug of tea or a rich espresso for a comforting pick-me-up to melt the stress away.
At family get-togethers, this ice cream always vanishes first — I swear, it’s like magic. Everyone has their own favorite toppings — my husband is all about classic hot fudge, while my kids load theirs with sprinkles and crushed cookies.
Top Tips for Perfecting Your Homemade Ice Cream
Egg Prep: I always separate the yolks carefully so no whites sneak in — those can alter texture. Whisking yolks and sugar until they’re really pale makes a smoother custard. Don’t rush this!
Tempering: This step is a game-changer. Add that hot milk bit by bit while whisking vigorously. I learned the hard way — pour too fast and you end up with scrambled eggs. Slow and steady wins the creaminess race.
Chilling the Base: Don’t skip chilling the custard it lets the flavors develop and makes churning easier. Overnight in the fridge is my secret for extra smooth ice cream.
Churn Time: The ice cream should thicken but not freeze solid in the machine — once it reaches a soft-serve texture, it’s done. Over-churning can make it grainy, so get to know your equipment.
Ingredient Swaps: I’ve tried using half-and-half for lighter ice cream or almond milk for dairy-free versions — almond milk was surprisingly creamy but a little less rich. Coconut milk can also give a tropical twist but watch sugar levels to balance sweetness.
Flavor Twists: Adding fresh herbs like mint or basil infuses a lovely fresh taste. Mixing in swirls of homemade fruit jam or gooey caramel right after churning keeps the flavors distinct and the texture delightful.
Freezing Tips: After transferring to a container, pressing plastic wrap right on the surface helps prevent ice crystals — a small step that makes a big difference. I once forgot this step and ended up with a less-than-smooth finish.
Storing and Reheating Tips
Room Temperature: Homemade ice cream isn’t built for sitting out long since it melts quickly. If you’re serving, keep portions in the freezer and only bring out what you’ll eat immediately.
Refrigerator Storage: Honestly, refrigeration will just soften the ice cream but won’t keep it frozen. Best to avoid leaving it in the fridge for extended periods.
Freezer Instructions: Store your ice cream in airtight containers or bowls with tight-fitting lids. Press plastic wrap on the surface before sealing to keep it extra fresh. Properly sealed, this ice cream stays great for up to two weeks — after that, it starts losing its creaminess and texture.
Glaze Timing Advice: If you want to add a chocolate or caramel glaze, it’s best to do it just before serving, especially if the glaze sets hard. For longer storage, keep glaze separate and spoon it on top when you’re ready to eat.
Frequently Asked Questions
Final Thoughts
Making homemade ice cream was a total game-changer for me — it’s one of those recipes that feels fancy but really comes together with simple ingredients and a little patience. The taste and texture are unmatched, and it turns any ordinary day into a celebration. Plus, it’s such a joy watching family and friends enjoy something so lovingly crafted. If you’ve ever thought ice cream felt intimidating, this recipe will show you otherwise. I’m extra proud because it’s one I keep coming back to, tweaking flavors, and sharing with everyone who visits. Give it a try, experiment with your favorite flavors, and don’t forget: the best part is the memories you make in the process. Happy scooping, and I can’t wait to hear how yours turns out!
homemade ice cream
Ingredients
Main Ingredients
- 1.75 cups heavy cream
- 1.25 cups whole milk
- 0.75 cups sugar
- 0.125 teaspoons fine sea salt
- 1 tablespoon vanilla extract or 1 vanilla bean split in half lengthwise
Instructions
Preparation Steps
- Pour 1 cup of the heavy cream into a saucepan and add the sugar and salt. If using a vanilla bean, scrape the seeds into the mixture and add the pod to the saucepan.
- Warm the mixture over medium heat just until the sugar dissolves. Remove from heat and add the remaining cream, milk, and vanilla extract if using. Whisk to combine and chill in the refrigerator.
- When ready to churn, remove the vanilla pod, whisk mixture again, and pour into the ice cream maker. Churn according to the manufacturer's instructions.
- Serve immediately or transfer the ice cream to an airtight container and freeze until ready to serve.