I still remember the first time I tried to make fried chicken at home—it was a complete disaster. The crust was soggy, the chicken was dry, and my kitchen looked like a small grease explosion had taken place. But after countless attempts (and a little mess cleanup), I nailed a fried chicken recipe that my whole family simply devours in minutes. There’s something about the crackling, golden coating paired with tender, juicy chicken inside that just hits all the right comfort-food notes. Honestly, it’s way better than takeout if you ask me. This fried chicken is not just a classic—it’s a bit of magic in your skillet, and it’s surprisingly easy once you get the hang of it. I swear by this recipe for those lazy weekends, family dinners, or even when the kids are begging for that extra crispy snack.
What is fried chicken?
Think of fried chicken as the holy grail of home cooking: crispy, salty, and golden all over, with juicy, tender meat inside. It’s essentially pieces of chicken coated in a seasoned flour mixture and deep-fried or pan-fried until that crust becomes irresistibly crunchy. The name’s pretty straightforward, but the endless variations in spices, coatings, and frying techniques make it endlessly fun and delicious. Fried chicken has roots all over the world, but the version we all know and love—Southern fried chicken—became famous for its soul-satisfying crunch and rich, buttery flavor. At home, it’s a go-to comfort meal that feels like a warm hug on a plate, and the best part is you can tweak it to your liking without ever feeling intimidated.
Why you’ll love this recipe?
Let me tell you why this particular fried chicken recipe sits on a throne in my kitchen. First off, the flavor—oh my goodness, the seasoning hits every note. There’s a perfect balance of saltiness and a subtle kick of black pepper and paprika that lingers just a little, teasing your taste buds. It’s crusty without being too thick, and that golden crunch makes every bite sing. What I love most about this recipe is its simplicity. No fancy equipment needed, and the ingredients are things you likely already have in your pantry—nothing extravagant or intimidating here.
Cost-efficiency is another big win. Chicken thighs or drumsticks work wonderfully here, and they’re usually easy on the wallet. Plus, because the recipe is so flavorful, you don’t have to go crazy with expensive spices or ingredients. It’s versatile, too. Whether you want to whip it up for a picnic, pair it with mashed potatoes for Sunday dinner, or even shred the leftovers for sandwiches, it holds up beautifully. I’ve often swapped a few spices or tried it with buttermilk brine, and it’s just as satisfying every time. And believe me, this fried chicken recipe has helped me win “best dish” bragging rights more than once at family gatherings.
How do I make fried chicken?
Quick Overview
Here’s the lowdown: you’ll marinate the chicken to lock in moisture (buttermilk is the magic ingredient here), then coat it in a seasoned flour mix for that perfect crunch. After that, it’s all about frying to a crispy golden brown while keeping the inside juicy. What makes this method special is the balance of seasoning in both the marinade and the coating—each bite bursts with flavor. Trust me, this isn’t like the greasy versions you find at some restaurants. It’s crispy, flavorful, and surprisingly straightforward, even if you’re new to frying chicken at home.
Ingredients
For the Marinade:
- 4 boneless, skin-on chicken thighs (or drumsticks if preferred) – thighs stay juicy
- 1 ½ cups buttermilk (or plain yogurt thinned with milk) – tenderizes and adds tang
- 1 teaspoon salt
- 1 teaspoon black pepper
- 1 teaspoon garlic powder
- 1 teaspoon smoked paprika – gives a subtle smoky depth
For the Coating:
- 1 ½ cups all-purpose flour – the base of your crunchy crust
- 1 teaspoon salt
- 1 teaspoon black pepper
- 1 teaspoon cayenne pepper (optional, for a little heat)
- 1 teaspoon onion powder
- 1 teaspoon dried thyme or oregano for an herbal twist
For Frying:
- Vegetable oil or peanut oil – enough for about 2 inches deep in your skillet
Step-by-Step Instructions
Step 1: Marinate the Chicken
First things first, toss your chicken pieces in a large bowl with the buttermilk, salt, pepper, garlic powder, and smoked paprika. Give them a thorough stir to make sure every inch is coated. I always marinate mine for at least 4 hours, but even overnight in the fridge works wonders. The buttermilk literally melts the proteins, making the meat tender as can be and infusing some tangy flavor that’s subtle but memorable.
Step 2: Prepare Your Flour Coating
In a large shallow dish, whisk together the flour, salt, pepper, cayenne, onion powder, and dried herbs until evenly combined. This step may seem simple, but the way you mix your coatings directly affects the texture, so don’t rush it. If you want an extra thick crust, you can double dredge the chicken (dip twice in flour), but I usually stick to one coating—less mess, still plenty crispy.
Step 3: Coat the Chicken
Take each battered chicken piece from the marinade and let the excess drip off before dredging it in the flour mix. Press the flour gently onto every side to create that beautiful crust, but avoid shaking off all the flour—you want a bit to stick on for max crunch. Good rule of thumb: less shaking, more sticking.
Step 4: Heat Your Oil
In a heavy-bottomed skillet or cast iron pan, pour in enough oil to cover about 2 inches deep and heat it over medium-high heat until it reaches about 350°F (you can test by dropping a pinch of flour in—if it sizzles immediately, you’re good to go). Be patient here; neither too hot nor too cool oil yields the best results. If it’s too hot, the chicken will burn on the outside and stay raw inside; too cool, and you’ll end up greasy.
Step 5: Fry the Chicken
Carefully place chicken pieces in the oil without overcrowding. I usually work in batches to keep the temperature steady. Fry them for about 10-12 minutes, turning occasionally, until they’re deep golden and crisp. A simple fork test or a meat thermometer (165°F internal temp) tells you when they’re done. If you have to, finish thicker pieces in the oven at 350°F for 10 minutes after frying to ensure they’re cooked through.
Step 6: Drain and Rest
Once your chicken is perfectly golden and crispy, transfer it to a rack set over a baking sheet or paper towels to drain excess oil. I find the rack method preferable because it keeps the crust crisp. Let it rest for 5 minutes—the flavors settle, and the juices redistribute inside, making every bite juicy.
Step 7: Serve and Enjoy
Serve hot, with a squeeze of fresh lemon if you want that little zing, or alongside your favorite dipping sauces. You’ll notice that satisfying crunch the second you bite in, followed by tender, juicy meat that’s packed with flavor. This recipe pretty much guarantees “seconds!” from everyone around the table.
What to Serve It With
For Breakfast: Fried chicken and waffles are an unbeatable combo (trust me!). Serve with a drizzle of maple syrup and freshly brewed coffee for a morning surprise that turns heads. I love how the sweetness cuts through the savory crunch.
For Brunch: Pair with a simple arugula salad tossed in lemon vinaigrette to balance richness. A mimosa or a light beer elevates things if you’re brunching on a weekend. The salty-sour combo is delightful.
As Dinner: Classic mashed potatoes, creamy coleslaw, and a side of cornbread form a comforting trio. Whenever I serve this combo, my whole family feels like they’ve stepped into a Southern diner.
For Cozy Snacks: Leftover fried chicken reheated and served with spicy honey or hot sauce works beautifully for casual nights when you just want to kick back. My kids actually ask for this more often than fresh-cooked!
Top Tips for Perfecting Your Fried Chicken
Marinade Magic: Don’t skip the buttermilk soak! I once tried skipping it to save time, and the chicken came out tough and dry. The acid breaks down proteins, tenderizing the meat and adding subtle tang.
Flour Mixture Balance: Playing with the cayenne and smoked paprika lets you tailor the heat and smokiness to your preference. For a kid-friendly batch, tone down the spice, but if you love bold flavors like I do, add an extra pinch of cayenne.
Oil Temperature: This can make or break the whole dish. Use a thermometer if possible. If the oil is too cool, the chicken absorbs oil and feels greasy. Too hot and you’ll burn the crust while leaving the inside raw. I learned this the hard way after several almost-burnt batches.
Don’t Overcrowd: Fry in small batches. Overcrowding drops the oil temperature and results in soggy chicken. It’s tempting to toss all the pieces in, but patience here pays off with that crispy crust everyone loves.
Rest on a Rack: Slabs of paper towels work in pinch, but a wire rack is best for airflow and keeping that crust crunchy.
Experiment with Spice Rubs: I sometimes add a teaspoon of ground mustard or a dash of dried sage depending on my mood. It’s a fun twist each time, so don’t be afraid to mix it up.
Storing and Reheating Tips
Room Temperature: Fried chicken is best enjoyed fresh, but you can safely leave it out covered for up to 2 hours. Leaving it uncovered invites sogginess fast.
Refrigerator Storage: Store leftover fried chicken in an airtight container or wrapped tightly in foil for 3-4 days. To keep that crispy skin, place pieces on a wire rack inside the fridge instead of stacking them.
Freezer Instructions: For longer storage, freeze the fried chicken in individual portions wrapped in plastic wrap and then tin foil or freezer bags. It’ll last up to 3 months. Thaw in the fridge overnight before reheating.
Reheating: Oven reheating at 375°F for 10-15 minutes helps bring back crispiness better than a microwave, which tends to make the crust chewy or soggy. I pop the chicken straight on a wire rack to let the heat circulate evenly.
Frequently Asked Questions
Final Thoughts
I honestly can’t stress enough how this fried chicken recipe has become a cornerstone in my kitchen. It’s the one I turn to when I want something comforting that still feels special. The crispy exterior combined with juicy, flavorful meat has won over even the pickiest eaters in my house, and it’s disappeared in minutes at every family gathering. If you’re someone who loves a bit of crunch and depth in your chicken, this recipe is a little slice of heaven. Don’t be afraid to play with the spices or drizzles to make it yours—once you get this down, you might just find yourself craving fried chicken on the regular. Please share your experiences or any twists you try in the comments—I love hearing your stories! Happy cooking, and here’s to many crispy, joyful meals ahead!
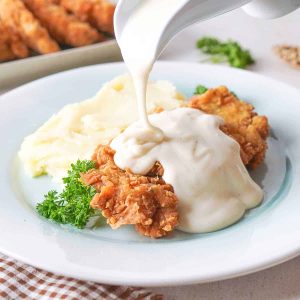
fried chicken
Ingredients
Main Ingredients
- 6 pieces thin sliced chicken breasts or 3 chicken breasts sliced in half horizontally
- 2 cups all-purpose flour
- 2 teaspoons baking powder
- 1 teaspoon baking soda
- 1 teaspoon salt
- 1 teaspoon black pepper
- 1 teaspoon garlic powder
- 0.5 teaspoon Italian seasoning
- 1.5 cups buttermilk
- 1 large egg
- 1 tablespoon hot sauce
- to fry vegetable oil for frying
- 0.25 cups unsalted butter for white gravy
- 0.33 cups all-purpose flour for white gravy
- 2 cups milk for white gravy
- to taste salt and pepper for white gravy
Instructions
Preparation Steps
- Heat 1/2 inch of vegetable oil in a large skillet over medium-high heat.
- In a large bowl, whisk together 2 cups flour, baking powder, baking soda, salt, pepper, garlic powder, and Italian seasoning.
- In a separate bowl, beat the egg with buttermilk and hot sauce.
- Pat chicken breasts dry. Dredge each piece in the flour mixture, then dip in the buttermilk mixture, then again coat in the flour mixture.
- Fry chicken in hot oil 3 to 5 minutes per side until golden brown and cooked through. Drain on paper towels.
- For the gravy, melt butter in a saucepan over medium heat. Whisk in flour and cook 1 minute.
- Gradually whisk in milk and cook until thickened. Season with salt and pepper to taste.