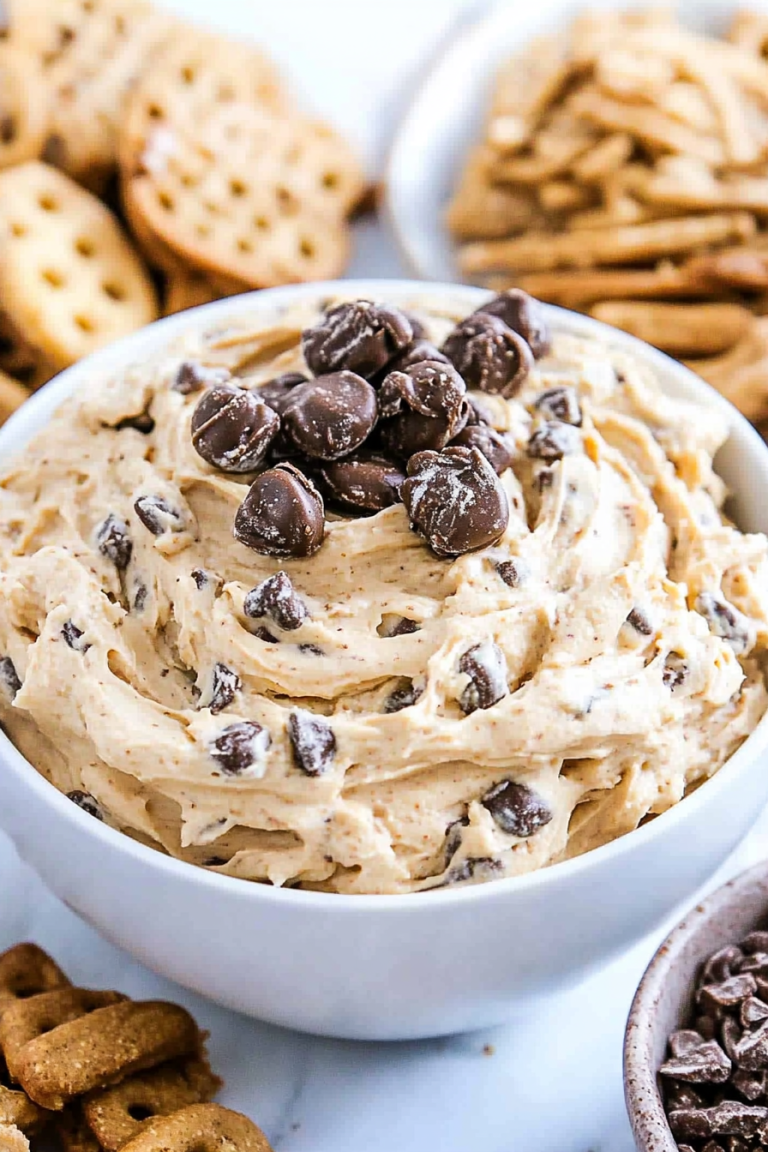
There’s something about peanut butter fudge that just takes me straight back to my grandma’s cozy kitchen on chilly autumn afternoons. The sweet, nutty aroma that fills the room, that first creamy bite melting slowly on your tongue—it’s like a little moment of bliss wrapped up in a tiny square. When I first made this peanut butter fudge recipe, I was honestly blown away by how simple it was yet bursting with such rich, old-fashioned flavor. If you’ve ever tried your hand at classic fudge made with chocolate chips or marshmallows, then you already know the magic, but this one’s got that deep, indulgent peanut butter punch that just can’t be beat. It’s quick enough for a last-minute treat, but feels special enough to share with family or friends on a lazy Sunday.
What is peanut butter fudge?
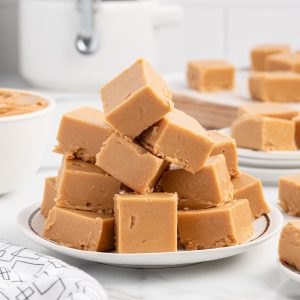
Think of peanut butter fudge as the sticky-sweet cousin of the traditional chocolate fudge you grew up loving, but with that irresistible, salty-sweet peanut butter twist. It’s essentially a creamy, melt-in-your-mouth confection made from sugar, butter, and plenty of peanut butter, stirred to silky perfection and left to set into thick, dreamy squares. The name comes from its rich peanut butter flavor mixed into the fudge base, giving you that perfect balance between sweet and nutty. While fudge might sound intimidating because of all those candy thermometer stories, peanut butter fudge is a little easier, often made using the stovetop method without the fuss. It’s one of those charming old-fashioned sweets that’s a staple at potlucks, holiday gatherings, and anytime you really need to spoil yourself a bit.
Why you’ll love this recipe?
What I love about this peanut butter fudge recipe is how it hits all the right notes without demanding a ton of fancy ingredients or time—
- Flavor: That creamy, luscious peanut butter blended with just the right amount of buttery sweetness is pure comfort food. It has just enough salt in it to enhance the peanut butter but not so much that it’s overpowering.
- Simplicity: Honestly, I’ve tried fudge recipes that require candy thermometers, precise timing, and mad skills, but this one skips all that drama. A quick melt-and-stir on your stovetop means you can whip this up while chit-chatting with friends or catching up on your favorite podcast.
- Cost-Efficiency: What is the best way to measure cost-effectiveness? No need to stockpile expensive chocolate chunks or fancy nuts—just peanut butter, sugar, butter, and a bit of vanilla. It’s an affordable indulgence, especially great when you want to treat the family without busting the budget.
- Versatility: Peanut butter fudge isn’t just a sweet treat on its own. Spread out some with a sprinkle of sea salt, chop it up into bites for lunchboxes, or even layer it in your favorite ice cream for a seriously decadent dessert. Plus, you can easily tweak it—with chocolate chips stirred in, or swap the peanut butter for almond butter if that’s your thing.
I always do this fudge when I need a quick, no-fuss dessert that feels like I made something special. My kids seriously ask for this all the time, and the smell alone brings everyone running to the kitchen—it disappears in minutes during our family game nights. If you adore peanut butter and crave a sweet that’s simple but rich, this one’s a lifesaver!
How to Make Peanut Butter Fudge
Quick Overview
This peanut butter fudge recipe is as easy as melting a few ingredients together, stirring until smooth, and letting it set in the fridge. No candy thermometer required, no endless stirring—all you’ll need is a good spatula and a bit of patience while it chills. The hardest part? Waiting for it to firm up so you can finally enjoy those creamy, buttery squares. I love how you get silky texture without complicated steps, making it totally approachable for even your first fudge attempt.
Ingredients
For the Main Batter:
- 2 cups granulated sugar (I use organic to avoid that overly harsh sweetness)
- 1/2 cup whole milk (feel free to swap with almond or oat milk, it actually makes it silkier!)
- 1/4 cup unsalted butter (room temperature is best for smooth blending)
- 1/2 cup creamy peanut butter (natural or classic, just make sure it’s nice and smooth)
- 1 tsp vanilla extract (fresh is key—don’t skimp!)
For the Filling:
- Extra peanut butter for swirling (about 1/4 cup)
- Optional: Chopped peanuts or mini chocolate chips for texture pops
For the Glaze:
- 1/2 cup powdered sugar
- 2-3 tbsp milk or cream
- A drop of vanilla or a pinch of salt to balance sweetness
This glaze keeps it extra shiny and adds a hint of extra sweetness, but you can totally leave it off if you want it more rustic.
Step-by-Step Instructions
Step 1: Preheat & Prep Pan
Grab a 9×9-inch baking dish and line it with parchment paper, letting the edges hang over for easy fudge removal later. Don’t forget to lightly grease the parchment with butter or spray—it helps prevent sticky situations. The coolest part? No oven needed here—just a stovetop method, so your oven stays free for other cooking adventures!
Step 2: Mix Dry Ingredients
In a medium saucepan, combine the granulated sugar and milk. I usually stir these together gently just to get them evenly mixed. This helps prevent the sugar from settling as the mixture heats. The texture before heating is pretty gritty, but it’ll smooth out beautifully in the next step.
Step 3: Mix Wet Ingredients
Add the butter and peanut butter straight to the saucepan with the sugar and milk. Doing this early lets the fats meld beautifully while warming, which I learned after way too many batches where the butter didn’t melt fully and left pockets of grease. Stir continuously over medium heat to combine, watching closely so it doesn’t burn.
Step 4: Combine
Keep stirring until the mixture comes together and looks glossy, about 5-7 minutes. You’ll notice the peanut butter start to soften and swirl around—it’s like peanut buttery magic unfolding. Because this fudge isn’t super-fussy, there’s no need to hurry or rush the stirring, but don’t stop or it might scorch.
Step 5: Prepare Filling
While the mixture is still warm, dollop a few spoonfuls of extra peanut butter randomly over the top and gently swirl it through with a knife or skewer. This little trick created those gorgeous ribbons I’m obsessed with, and it also cranks the flavor right up. For extra fun, sprinkle chopped peanuts or chocolate chips now.
Step 6: Layer & Swirl
Pour your peanut butter mixture into the prepared pan, then use a damp spatula to smooth the top. The swirl from the filling should peek through artfully, giving you that homemade, irresistible look. Trust me, the rustic swirls will make this so much more inviting.
Step 7: Bake
Now, the secret—there’s no baking! Just set the fudge pan aside and let the magic happen by chilling it in the fridge for at least 3-4 hours, or overnight if you can wait that long. This slow cooling is what firms it into those perfect squares that hold together yet melt in your mouth. Patience here is golden.
Step 8: Cool & Glaze
Once set, whisk together your powdered sugar and milk glaze until silky, then pour over the top. I like to drizzle it slowly and then gently spread with a spatula to get a shiny, sweet finish. This step adds a beautiful shine and a bit of crunch if you let it set a bit longer. If you prefer it more rustic, you can skip this.
Step 9: Slice & Serve
Use the parchment edges to lift the fudge out of the pan. Cut into small squares with a sharp knife warmed under hot water—even baking scissors work wonders here for neat edges. Serve chilled or at room temperature; the texture changes slightly but all delicious. These little bites love being shared, especially with a warm mug of coffee or cold glass of milk nearby.
What to Serve It With
For Breakfast: Pair a small square with your morning coffee or a creamy latte and some fresh fruit. I like to have this as a sweet pick-me-up during weekend brunches, where it feels like a tiny dessert but also a satisfying energy boost.
For Brunch: Serve alongside warm scones or muffins with a drizzle of honey. Add in a colorful fruit platter and a pot of freshly brewed tea for a lovely afternoon treat with friends. The fudge’s richness balances well with tart berries and crisp apples.
As Dessert: Top your peanut butter fudge with a spoonful of whipped cream or a scoop of vanilla ice cream. Try sprinkling with crushed pretzels or a drizzle of melted dark chocolate to elevate those salty-sweet vibes. This combination has become a family favorite after Sunday dinners.
For Cozy Snacks: I love cutting the fudge bite-sized for easy snacking straight from the fridge. It’s perfect for movie nights with the family or when you need a little sugar fix without the fuss of baking.
My family has this tradition where we make a batch of fudge and nibble on it all week during busy school mornings and lazy weekend afternoons. It’s like having a secret stash of comfort always within arm’s reach.
Top Tips for Perfecting Your Peanut Butter Fudge
Peanut Butter Quality: Use a creamy peanut butter with natural oils, but if it separates, stir it well before measuring. I’ve found that the creamier the peanut butter, the silkier the fudge turns out. Avoid chunky peanut butter unless you want intentional texture.
Mixing Advice: Don’t rush the stirring process; stirring too fast or too slow can either burn the mixture or make it grainy. I learned early on to keep a moderate, steady stir and watch the texture carefully—the mixture will go from lumpy to perfectly smooth.
Swirl Customization: Be playful with your swirls! Use a toothpick or the tip of a butter knife to drag the peanut butter filling in different directions for pretty marbling. It really lifts the presentation and makes it feel homemade. I sometimes mix in a bit of melted chocolate into the swirls for extra drama.
Ingredient Swaps: Feel free to experiment—try almond butter or cashew butter for a new twist but remember that different nut butters can alter firmness and sweetness levels. If you’re gluten-free, this recipe is naturally safe as is, but always double-check your peanut butter brand.
Baking Tips: Since there’s no baking, watch the stovetop temperature to prevent scorching. Medium heat works best—too high and the sugar can crystallize or burn, which ruins the texture. Keep your saucepan clean and stir continuously.
Glaze Variations: If you want to switch things up, try a drizzle of melted dark chocolate instead of powdered sugar glaze or dust the fudge with a light sprinkle of sea salt before chilling for contrast. I once tossed in a dash of cinnamon to the glaze and it was unexpectedly delightful.
Honestly, through countless batches, I’ve realized patience is the biggest secret—letting the fudge cool fully without poking or stirring after pouring makes all the difference. Trust me on this one; try it once and you’ll see why I keep making this endlessly.
Storing and Reheating Tips
Room Temperature: Store your peanut butter fudge in an airtight container at room temp for up to 3 days. Make sure it’s in a cool, dry place away from sunlight to keep it from melting or getting sticky.
Refrigerator Storage: I usually pop leftovers in the fridge wrapped tightly in parchment or wax paper inside a sealed container. It stays fresh for about 1-2 weeks this way and keeps that perfect firmness. Just let it come to room temp before serving for softer bites.
Freezer Instructions: Peanut butter fudge freezes super well! Wrap each square individually in plastic wrap, then place all wrapped pieces in a freezer-safe container or zip bag. Freeze for up to 3 months. To thaw, move to the fridge overnight or sit at room temperature for an hour before enjoying.
Glaze Timing Advice: If you’re storing fudge for more than a few days or freezing, wait to add the glaze until just before serving. The glaze holds best fresh and can sometimes crack or discolor if frozen.
I always label mine with dates, especially since it’s so tempting to nibble away and forget! Following these storage tips keeps my fudge tasting fresh and creamy no matter when I grab a piece.
Frequently Asked Questions
Final Thoughts
This peanut butter fudge always feels like a little celebration in my kitchen—effortless yet incredibly satisfying. The texture is perfect: smooth, creamy, and just firm enough to pick up and savor without losing that melt-in-your-mouth quality. I keep coming back to this recipe because it’s quick to make, forgiving if you stray slightly, and always earns rave reviews from my family and friends. It’s one of those treats that sparks warm memories and creates new ones, perfect for gifting or keeping all to yourself.
If you love this, I highly recommend trying my peanut butter swirl brownies or chocolate peanut butter no-bake cookies—they’re close cousins with similar comforting vibes. Feel free to share how yours turned out or any tweaks you made; I love hearing from fellow peanut butter fudge fans. Happy baking (and snacking!), and don’t forget to stash some away for that 10pm sweet tooth moment.
peanut butter fudge
Ingredients
Main Ingredients
- 1 tablespoon water for the 8x8 pan to keep parchment paper in place
- 1 cup unsalted butter
- 1.5 cups creamy peanut butter (NOT natural or no-stir varieties)
- 2 teaspoons vanilla extract
- 3.25 cups powdered sugar sifted
- unit M&M's optional for garnish
Instructions
Preparation Steps
- Cut parchment paper using the bottom of an 8x8 baking dish as a template to help smooth fudge and protect it while chilling.
- Measure enough parchment paper to hang over the pan edges to lift fudge out later.
- Pour 1 tablespoon water into the bottom of the 8x8 pan to keep parchment paper in place.
- Line the 8x8 pan with parchment paper.
- In a microwave-safe bowl, add butter and peanut butter; microwave for 60 seconds then stir well.
- Add vanilla extract and stir until fully incorporated.
- Gradually add powdered sugar one cup at a time, stirring between additions until smooth with no lumps or white streaks.
- Pour the fudge mixture evenly into the prepared pan and smooth with a spatula.
- Place the pre-cut parchment paper on top of the fudge to smooth the surface, then refrigerate for 2 hours to chill.
- After chilling, remove top parchment, pre-score fudge into pieces without cutting through the pan.
- Use parchment overhang to lift fudge out onto a cutting board.
- Warm a sharp knife with hot water, dry it, and slice fudge into pieces using the pre-score lines.
- Decorate each piece with 2-3 red and green M&M's for a festive touch.
- Store fudge in an airtight container; keeps 3-4 days at room temperature or 1 week refrigerated.