You know that moment when the smell of rich, chocolatey brownies swirling through your kitchen makes everyone hit pause on whatever they’re doing? That’s exactly what happens every time I make my Oreo Brownies. My kids literally begging for “just one more” slice has become a bedtime ritual, and honestly, I don’t argue—it’s that good. Imagine the fudgy, velvety texture of classic brownies but with those delightful little Oreo cookie chunks hidden inside, sometimes topped off with that luscious creamy filling swirled throughout. It’s basically a dessert that feels like a hug and a celebration rolled into one. And if you’re the kind of person who loves brownies but wishes they had a bit more crunch and a twist of nostalgia, this is *the* recipe for you. Trust me, these Oreo Brownies will steal your snack time heart faster than a double shot espresso on a lazy Sunday morning.
What is oreo brownie?
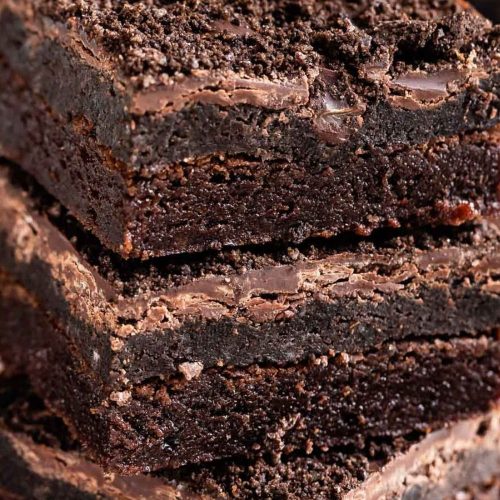
Think of Oreo Brownies as the lovechild of two beloved classics: fudgy chocolate brownies and those iconic black-and-white sandwich cookies we all adore. It’s essentially a batch of rich, dense brownie batter mixed with, sprinkled over, or even layered alongside broken Oreo pieces, creating this incredible texture balance—soft, chewy chocolate bites with crunchy cookie bits throughout. The name “Oreo Brownies” is pretty straightforward, but what really makes them stand out is how they turn a familiar dessert into something extra special by tossing in that signature cookie crunch and creaminess. It’s like your ordinary brownies took a little vacation to Oreo land and came back with a serious upgrade. They’re approachable, cozy, and—let’s be honest—utterly addictive. Whether you’re baking for a family gathering or just sneaking bites during Netflix binges, they fit right in.
Why you’ll love this recipe?
What I love about these Oreo Brownies is the way they blend incredible flavors with effortless simplicity.
- Flavor: These brownies pack a double punch—deep, moist, chocolaty goodness with the perfectly nostalgic crunch of Oreos. The cream filling peeks through like a secret treasure, making each bite unique and endlessly crave-worthy.
- Simplicity: Look, I’m not about fussy desserts. This recipe doesn’t demand weird ingredients or fancy techniques. I always find myself whipping it up when time’s tight or when I’m craving a weekend treat with a hint of nostalgia. It’s basically foolproof.
- Cost-efficiency: What is the best way to measure cost-efficiency? Chocolate, Oreos, eggs, sugar, flour… these are pantry staples almost everyone has on hand or can grab easily. No need for fancy imports or exotic flavors. This one’s budget-friendly but feels indulgent enough for a party.
- Versatility: I’ve done this as a quick after-school snack, a potluck centerpiece, and even jazzed it up for birthday parties by adding nuts or swapping the classic Oreos for mint-flavored ones. You can customize it a million ways and never get bored.
If you’re a fan of fudgy brownies or those quick Oreo-studded cookie bars, this recipe kind of hits both spots. Over the years, I’ve tested ways to make it less crumbly, more moist, and always found that little tweaks (like using melted butter instead of oil) bring out the flavor better. Honestly, my kids ask for this more than any other dessert, so it’s earned a permanent spot in my book.
How to Make Oreo Brownies
Quick Overview
Making these Oreo Brownies feels like a tiny kitchen celebration every time. You mix up your classic brownie batter, fold in chunks of Oreos (or even layer some whole cookies if you’re feeling fancy), then bake until cakey-fudgy perfection. The magic happens when you swirl in some creamy filling or add a quick glaze on top, making every bite a delightful interplay of textures and flavor. This recipe is straightforward enough to whip up in under 45 minutes, which is a lifesaver when those late-night sweet cravings hit hard.
Ingredients
For the Main Batter:
- 1 cup (2 sticks) unsalted butter, melted – I always go for real butter; it adds that rich, creamy depth.
- 2 cups granulated sugar – sweet but not overbearing; you can adjust if you want it less sweet.
- 4 large eggs – I like to bring them to room temp; it helps blend everything smoother.
- 1 teaspoon vanilla extract – fresh vanilla makes a surprising difference here, trust me.
- 1 cup all-purpose flour – sift it beforehand to avoid lumps and keep the brownies tender.
- 3/4 cup unsweetened cocoa powder – use good quality cocoa for that intense chocolate flavor.
- 1/2 teaspoon baking powder – just enough for a little lift but keeps it dense.
- 1/4 teaspoon salt – balances the sweetness.
For the Filling:
- 15-20 Oreo cookies (regular or Double Stuf, your call!) broken into chunks – bigger pieces add a fun crunchy texture, but you can crush to desired size.
- Optional: extra cream filling scraped from Oreos for swirling in the batter.
For the Glaze:
- 1 cup powdered sugar – sifted for smoothness.
- 2-3 tablespoons milk or cream – add gradually to get the right drizzle consistency.
- 1/2 teaspoon vanilla extract – for that hint of warmth.
You can skip the glaze if you prefer, but I love how it adds a little sweet shine and extra moisture on top.
Step-by-Step Instructions
Step 1: Preheat & Prep Pan
Start by heating your oven to 350°F (175°C). I like to grease a 9×13-inch pan generously with butter or line it with parchment paper. Parchment saves me from wrestling to get the brownies out afterward, plus it makes slicing cleaner. You don’t want any sticking disasters here!
Step 2: Mix Dry Ingredients
In a medium bowl, whisk together the flour, cocoa powder, baking powder, and salt until evenly combined. This is your base, so sifting or thoroughly whisking makes sure no chunks of baking powder or cocoa clump in spots. Fresh cocoa really enhances the warmth of the chocolate flavor, so don’t skimp.
Step 3: Mix Wet Ingredients
In a larger bowl, combine the melted butter and sugar first. Whisk them together until you see a glossy, smooth mixture with a slight graininess from the sugar. Then, beat in the eggs one at a time—this step is worth taking your time on so the batter’s nice and smooth—and finally, add the vanilla. The batter should be shiny and thick.
Step 4: Combine
Gradually fold the dry ingredients into the wet mixture with a spatula. Don’t overdo it—stop stirring the moment you see no more flour. Overmixing can lead to tough brownies, and that’s the last thing anyone wants. The batter should be dense and fudgy, not runny.
Step 5: Prepare Filling
Break your Oreos into chunks—this is where you get to be creative. I usually keep some large pieces for crunch, but sometimes I crush a handful for texture. If you want that little swirl of cream, gently scrape it out with a knife and separate it in a small bowl; it softens and blends beautifully when added.
Step 6: Layer & Swirl
Pour half the brownie batter into the prepared pan. Sprinkle about half the Oreo chunks evenly over the top, then dollop spoonfuls of the cream filling over the Oreos (if using). Pour the remaining batter over everything, then add the last Oreo pieces on top. Now for the fun part: take a knife or skewer and gently swirl the cream filling through the top—watch those beautiful black and white ribbons appear! It’s part art, part messy joy.
Step 7: Bake
Bake in the preheated oven for 30-35 minutes. Start checking around 28 minutes by inserting a toothpick in the center—it should come out with a few moist crumbs, not raw batter. Oven temperatures vary, so trust your nose and eyes: when the brownies smell deeply chocolatey and the edges start pulling away slightly, it’s go time.
Step 8: Cool & Glaze
Once out of the oven, let your Oreo Brownies cool completely in the pan. This can take a good hour, but don’t rush—cutting too soon will cause crumbling. If you want to add the glaze, whisk together powdered sugar, milk, and vanilla until smooth and drizzle over the cooled brownies. They look like a bakery delicacy with that shiny touch.
Step 9: Slice & Serve
Use a sharp knife dipped in hot water and wiped dry before slicing for cleaner cuts. Serve at room temperature or lightly warmed with a glass of cold milk or your favorite coffee. I like to pile mine on colorful plates and see the smiles light up around the table. Bonus: these keep well and taste even better the next day!
What to Serve It With
For Breakfast: Try pairing these brownies with a robust cup of coffee or a creamy latte. They’re indulgent enough to feel like a weekend treat but simple enough to enjoy in a laid-back morning setting—my kids love dipping them in cold milk while sitting at the breakfast nook.
For Brunch: Serve brownies on a platter with fresh berries and whipped cream on the side. A mimosa or slightly bitter tea balances the sweetness beautifully, making it a great crowd-pleaser for casual get-togethers.
As Dessert: Warm a brownie slightly and top with vanilla ice cream and a drizzle of caramel or chocolate sauce. The melty Oreos inside paired with ice cream create a dreamy end to any meal.
For Cozy Snacks: When the weather’s a little gloomy and you just want something comforting, these brownies alongside a warm mug of hot chocolate or chai tea become your new best friend. I love wrapping one up for mid-afternoon at the park or school drop-off—it’s surprising how much joy these simple treats bring.
One fun tradition in our house is serving these brownies at movie nights—everyone grabs a warm, gooey piece and settles in. No one complains that dessert is too complicated or that the cookies are missing their crunch.
Top Tips for Perfecting Your Oreo Brownies
Oreo Prep: I learned early on that crushing Oreos too finely loses that delightful crunch. I like a mix of chunk sizes so every bite feels different. Also, if you separate out some cream filling, be gentle stirring it in so it swirls visibly rather than fully blending into the batter.
Mixing Advice: Resist the urge to overmix once dry ingredients hit the wet. A few streaks of flour left behind are totally fine; they’ll disappear while baking. This keeps the brownies tender and fudgy instead of cakey.
Swirl Customization: Use a butter knife or toothpick to create loose, artistic swirls. Too much swirling can cause the cream to blend completely with batter, losing that beautiful black-and-white marbling effect. I rotate the pan as I swirl for even designs.
Ingredient Swaps: I’ve tried using coconut oil instead of butter and it changes the mouthfeel to a slightly nuttier vibe, still tasty but less rich. Almond or oat milk in your glaze makes it silkier. Gluten-free flour blends also work here but keep an eye on texture and bake times—maybe add a bit more moisture.
Baking Tips: Make sure your oven racks are centered, and if your oven runs hot, knock 5 degrees off. Start checking a few minutes before the recommended time—brownies overbaked dry out fast. The toothpick test with moist crumbs is your best friend.
Glaze Variations: Swap vanilla for a splash of coffee or mint extract in your glaze for fun seasonal twists. If you prefer no glaze, dust a little cocoa powder or powdered sugar on top to keep things simple.
Over time, I realized that little tweaks make a big difference for the final brownie vibe. Trust your senses—the smell, the look, the feel—because baking is half science, half art, and fully a joy.
Storing and Reheating Tips
Room Temperature: Keep your brownies in an airtight container or covered tightly with plastic wrap for up to 3 days. This preserves their fudgy texture, and honestly, most times in my house they disappear before then!
Refrigerator Storage: If you prefer them chilled or want to extend freshness, store in an airtight container for up to a week. I usually take them out 30 minutes before serving so they soften slightly—cold brownies can be a touch firm.
Freezer Instructions: Wrap brownies tightly in plastic wrap and place them in a freezer-safe bag or container. They keep well for 2 to 3 months. Thaw overnight in the fridge or at room temp for a few hours, and warm gently in the microwave for a fresh-baked feel.
Glaze Timing Advice: For best results, add glaze once brownies have cooled completely. If freezing, glaze after thawing to avoid melting or runny drips. If you prefer, you can freeze brownies without the glaze and add it fresh for serving day—it looks and tastes much better!
Frequently Asked Questions
Final Thoughts
Honestly, these Oreo Brownies are one of those desserts that just feel like home. The first time I made them, the house filled with the smell of warm chocolate and cookies, and I couldn’t help but sneak a piece before dinner. They’re a go-to for birthdays, “just because” treats, or when I need a quick pick-me-up without dialing up the fuss. Plus, the combination of that fudgy batter and crunchy Oreos brings all the cozy feels—simple, nostalgic, and bursting with flavor. If you try these, drop a comment on how they turned out or any fun twists you made—I always love hearing your stories! And if you’re curious about similar recipes, check out my chocolate chip cookie bars or classic fudge brownies; they’re good companions in the kitchen. Happy baking, and don’t forget to save me a slice!
Oreo Brownies
Ingredients
Main Ingredients
- 0.667 cup vegetable oil
- 1.333 cup granulated sugar
- 0.667 cup unsweetened cocoa powder
- 2 large eggs
- 1 teaspoon vanilla extract
- 0.5 teaspoon salt
- 0.5 cup all-purpose flour
- 25 pieces Oreo Cookies
- 4 ounces cream cheese
- 1 cup chocolate chips
- 1 tablespoon vegetable oil
Instructions
Preparation Steps
- Preheat oven to 350°F. Line a 9x9-inch pan with foil and spray with nonstick cooking spray.
- Place vegetable oil in a large bowl. Stir in sugar and cocoa powder until smooth using a wooden spoon.
- Add eggs, vanilla extract, and salt. Stir to combine, then slowly mix in flour. Batter will be thick. Spread batter into prepared pan.
- Bake for 21-25 minutes or until the brownies just lose the glossy sheen around the edges and a toothpick inserted 1 inch from the edge comes out clean. Cool completely before topping.
- Finely crush Oreo cookies in a food processor. Remove 2 tablespoons of crumbs for topping. Add cream cheese and pulse until combined and smooth, scraping down sides as needed. Spread over brownies and press to compact.
- Melt chocolate chips and 1 tablespoon vegetable oil in a microwave-safe bowl in 30-second increments, stirring until smooth. Spread evenly over Oreo truffle mixture. Sprinkle reserved Oreo crumbs on top. Chill to set before slicing into bars.