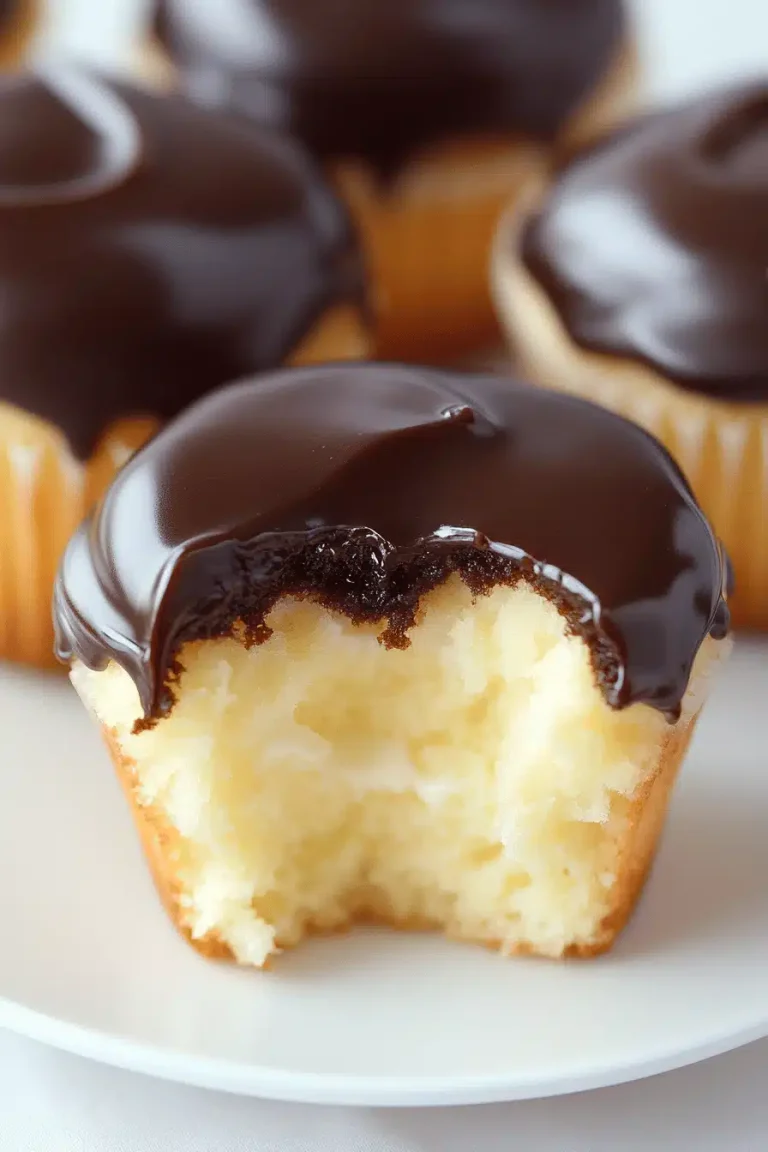
There’s something truly magical about the smell of chocolate cupcakes baking in the oven—it’s like a warm hug on a chilly afternoon. I can still remember when I first made this recipe years ago for my daughter’s birthday; the house was filled with that rich, chocolatey aroma, and the whole family eagerly gathered around the kitchen counter, waiting for me to frost these little delights. Chocolate cupcakes have always been my go-to comfort bake, especially when I want something quick yet indulgent. If you’re anything like me, you crave that perfect balance between moist crumb and deep chocolate flavor—but without the fuss of a complicated cake. These chocolate cupcakes hit that sweet spot every time, and I’ve found they’re even better than some of those boxed ones we grew up with. Plus, they’re utterly kid-friendly, which means double points in my book!
What is chocolate cupcake?
Think of chocolate cupcakes as the sweet, smaller cousins of traditional chocolate cake—bite-sized pockets of chocolatey goodness that you can enjoy without getting a fork and plate involved. They’re essentially individual mini cakes baked in cupcake liners, usually soft and moist with a delicate crumb, often topped with frosting or glaze. The beauty of chocolate cupcakes is how approachable they are—you don’t need to be a baking pro to get a great batch popping out of your oven. The name is straightforward, but beneath that simplicity lies endless variations and personal touches, like fillings or swirls of frosting that elevate them from everyday treats to something truly special. I love how they can be dressed up or down, fitting in perfectly at birthday parties, casual weekends, or even just a late-night snack when you’re craving something sweet but don’t want to bake a whole cake.
Why you’ll love this recipe?
What I love most about this chocolate cupcake recipe is how it nails that rich, deep chocolate flavor without being dense or dry. You get a moist crumb that practically melts in your mouth, plus a perfect hint of sweetness that’s balanced just right—not too sugary, not too bitter. It’s the kind of recipe I reach for when I want a quick, dependable dessert that everyone loves, whether it’s a potluck, a school event, or simply nursing a late-night craving. Believe me, these cupcakes have disappeared in minutes at my house more times than I can count! They come together with everyday pantry staples—so no special trips to the store—and they don’t require any complicated whipping or tempering. That’s a lifesaver on busy weeknights when I want something homemade but fast.
Another thing that makes these so versatile is how well they adapt. I’ve played around with adding a dollop of peanut butter in the centers or swirling some raspberry jam into the batter, and both were hits. Plus, the glaze can switch things up completely: sometimes I go for a rich, luscious chocolate ganache, other times a simple dusting of powdered sugar for a lighter touch. If you’re into other chocolate desserts, this recipe packs a similar vibe to my favorite chocolate fudge brownies but with a lighter feel—think everything you want in chocolate without feeling weighed down afterward. Honestly, I think the ease, flavor, and the cozy “just-made” warm feeling make these cupcakes an absolute keeper.
How do I make chocolate cupcakes?
Quick Overview
The whole process here is delightfully straightforward: you start by prepping your pans and warming up the oven, mix your dry ingredients in one bowl and wet ingredients in another, then gently fold them together to keep the batter tender. What makes this method special is keeping the mixing simple so your cupcakes stay fluffy, not tough. I always tell my friends—don’t overthink this part! The batter goes into the liners, and into the oven they go for about 18 minutes. The whole kitchen fills with that irresistible chocolate scent, and before you know it, it’s time to cool and glaze. I love that it’s quick enough for an afternoon treat and special enough to impress guests.
Ingredients
For the Main Batter:
- 1 cup all-purpose flour (I always use a light spooning technique to avoid packing it tight)
- ¾ cup granulated sugar (you can dial back a little if you prefer less sweet)
- ½ cup unsweetened cocoa powder (go for Dutch-processed for a deeper flavor)
- 1 teaspoon baking powder
- ½ teaspoon baking soda
- ¼ teaspoon salt
- 1 large egg (room temperature is best for an even mix)
- ½ cup whole milk (I’ve experimented with almond milk, and it actually makes the crumb a bit creamier)
- ¼ cup vegetable oil (keeps them super moist)
- 1 teaspoon vanilla extract (fresh vanilla makes a difference here)
- ½ cup boiling water (yes, boiling! It intensifies the cocoa flavor and keeps the batter smooth)
For the Filling:
- ½ cup cream cheese (softened, for a dreamy, tangy surprise)
- ¼ cup powdered sugar (sifted to avoid lumps)
- Optional: 1 tablespoon mini chocolate chips or chopped nuts for texture
For the Glaze:
- ½ cup semi-sweet chocolate chips
- 2 tablespoons unsalted butter
- 1 tablespoon light cream or milk (adjust for a shiny, pourable consistency)
- Optional: pinch of salt to balance sweetness
Step-by-Step Instructions
Step 1: Preheat & Prep Pan
Preheat your oven to 350°F (175°C) and line a standard muffin tin with cupcake liners. I always use plain white liners because they make the rich chocolate color pop, but feel free to get festive with your favorite designs. Also, I give the liners a little spray of non-stick oil—this helps release the cupcakes cleanly without messing up the texture.
Step 2: Mix Dry Ingredients
In a large bowl, sift together the flour, sugar, cocoa powder, baking powder, baking soda, and salt. Sifting here is key—it helps everything blend evenly and gives you that light, tender crumb. You want the mixture to look uniform without any lumps of cocoa or clumps of flour hanging around. Plus, it’s oddly satisfying.
Step 3: Mix Wet Ingredients
In a separate bowl, whisk the egg, milk, vegetable oil, and vanilla extract together until smooth. This step comes together quickly, and you’ll notice the mixture becomes silky and light in color. Now, don’t skip the boiling water here—the minute you pour it in, whisk quickly so your mixture becomes thin but lush with cocoa goodness. This technique makes all the difference and keeps your cupcakes from drying out.
Step 4: Combine
Slowly pour the wet mixture into the dry ingredients and fold gently with a spatula until just combined. I always remind myself to fold gently—overmixing can toughen the crumb, and that’s not what these cupcakes are about. If there are a few streaks of flour left, that’s perfectly fine; the batter will even out during baking.
Step 5: Prepare Filling
While the batter rests, whip together the cream cheese and powdered sugar until smooth and fluffy. You can toss in mini chocolate chips or nuts here if you want a fun texture surprise. This filling creates a luscious little center that makes these cupcakes extra unforgettable.
Step 6: Layer & Swirl
Spoon about one tablespoon of batter into each cupcake liner, then add a small dollop of your cream cheese filling right in the center. Top with another scoop of batter until the liner is about two-thirds full. For fun, give each filled cupcake a gentle swirl with a skewer or toothpick to marble the filling slightly into the chocolate batter—it looks gorgeous once baked!
Step 7: Bake
Pop the tray into your preheated oven and bake for 17-20 minutes. I always check mine by inserting a toothpick near the cupcake’s edge—not straight in the middle where the filling sits—to make sure it comes out clean or with just a few moist crumbs. Oven temps vary, so start checking around 17 minutes to avoid overbaking. The smell at this point really gets me every time—it’s like a little promise of cozy, sweet moments ahead.
Step 8: Cool & Glaze
Once out of the oven, let the cupcakes cool in the pan for about 5 minutes before transferring them to a wire rack. While they cool, melt the chocolate chips and butter together, stirring constantly for a smooth, glossy glaze—add cream to adjust thickness if needed. I love glazing while the cupcakes are slightly warm so the glaze sets beautifully with a shiny finish. It’s that little extra touch that makes these cupcakes look stunning and taste divine.
Step 9: Slice & Serve
If you’re a neat freak like me, you can slice off a tiny dome from the top of each cupcake for a flat surface before glazing, but it’s not necessary. Serve them at room temperature, maybe with a dollop of whipped cream or a sprinkle of cocoa powder for presentation flair. These cupcakes are great warm, but they also hold up the next day, which is handy when you want a quick treat without baking again.
What to Serve It With
For Breakfast: These chocolate cupcakes are surprisingly good with a strong, black coffee or a creamy latte—perfect if you need a little morning indulgence without the guilt of a whole cake. Adding some fresh berries on the side makes it feel a bit more balanced and adds a fresh pop of color.
For Brunch: Serve with a small scoop of vanilla ice cream or a drizzle of homemade caramel sauce for a slightly upscale feel. Pair with sparkling water with a splash of lemon or a mild herbal tea to cut through the richness.
As Dessert: After dinner, I love serving these cupcakes with fresh whipped cream or a pinch of flaky sea salt sprinkled over the glaze to enhance the chocolate. They also pair wonderfully with a glass of red wine or a rich stout beer, if you’re in the mood for something different.
For Cozy Snacks: These cupcakes are a lifesaver during Netflix marathons or a rainy day indoors. I often make a batch and stash half in the fridge for mid-afternoon pick-me-ups, served with a steaming cup of chai or hot chocolate. My kids ask for seconds—no exaggeration.
Top Tips for Perfecting Your Chocolate Cupcakes
Cocoa Prep: Always sift your cocoa powder to avoid bitter lumps. I’ve wasted good batches trying to stir in clumps—they ruin the smooth texture! Also, using Dutch-processed cocoa really ups the flavor game.
Mixing Advice: Resist the urge to overmix—fold gently until you see no obvious flour streaks. The batter will be a little thin due to the boiling water, and that’s exactly what you want—thin batter means extra moist cupcakes.
Swirl Customization: When swirling the cream cheese filling, don’t go overboard or the batter will turn from marbled to muddy. Gentle twisting with a toothpick creates just enough pattern without blending everything together.
Ingredient Swaps: Try swapping whole milk for almond or oat milk for a subtle nutty twist; it actually makes the crumb even softer. You can replace half the oil with melted butter for a richer taste, but be mindful it may change the texture slightly.
Baking Tips: Use the middle rack for even heat distribution and rotate your tray halfway through baking to avoid hot spots. If your oven runs hot, lower the heat to 325°F and add extra baking time, watching closely to avoid dry edges.
Glaze Variations: Feel free to mix in a splash of espresso or your favorite liqueur (hello, Irish cream) to the glaze for an adult twist. If you want something lighter, a quick cocoa powder dusting or a simple vanilla glaze can be just as enticing.
I’ve burned these cupcakes a couple of times in rush moments, so I keep a timer going no matter what. Also, letting the batter rest for a few minutes before baking really helps the cocoa to bloom, enhancing that chocolate intensity you want.
Storing and Reheating Tips
Room Temperature: Store cupcakes in an airtight container at room temperature for up to two days. Make sure they’re covered well to keep the moisture locked in – I like to use upside-down bowls if I’m out of containers. This keeps the cupcakes soft without drying out.
Refrigerator Storage: Because of the cream cheese filling and chocolate glaze, I usually refrigerate leftovers if not eaten within two days. Place them in an airtight container and bring to room temperature for about 30 minutes before serving to revive their full flavor and softness—microwaving for 10 seconds also works if you’re in a hurry.
Freezer Instructions: These cupcakes freeze beautifully! Wrap each individually in plastic wrap and place in a freezer bag or airtight container for up to 3 months. To thaw, leave them overnight in the fridge or bring to room temp for a couple of hours. Add glaze fresh after thawing for best results.
Glaze Timing Advice: If freezing or refrigerating, I recommend glazing cupcakes right before serving to keep that glossy finish and avoid sticky or hardened surfaces. If you must glaze beforehand, keep them refrigerated and enjoy within 24 hours.
Frequently Asked Questions
Final Thoughts
If I’ve convinced you to give these chocolate cupcakes a whirl, you’re in for a warm, cozy treat that’s easy to make yet feels so indulgent. There’s a reason this recipe has made its way into my regular rotation—it’s consistently reliable, delicious, and full of that nostalgic chocolate bliss we all crave sometimes. Whether you’re baking for your kids’ school events, your next dinner party, or just because you deserve a sweet pick-me-up, these cupcakes have got your back. Don’t be shy about experimenting with fillings and glazes to make them your own—I’m always thrilled to hear how readers put their spin on this classic. So grab your whisk, preheat that oven, and set a timer—you’re about to make your kitchen smell amazing and your loved ones smile. Happy baking, and I can’t wait to hear how yours turn out!
chocolate cupcakes
Ingredients
Main Ingredients
- 2 cups all purpose flour
- 2 cups granulated sugar
- 0.75 cups unsweetened cocoa powder
- 2 teaspoons baking soda
- 1 teaspoon baking powder
- 0.5 teaspoons salt
- 1 teaspoon cinnamon optional
- 3 cups finely grated zucchini lightly drained
- 1 cup vegetable oil
- 4 large eggs room temperature, lightly beaten
- 0.75 cups mini semi-sweet chocolate chips up to 1 cup optional
Instructions
Preparation Steps
- Preheat oven to 350°F. Line cupcake pans with liners. This recipe makes roughly 26-28 cupcakes.
- In a large bowl, sift together flour, sugar, cocoa powder, baking soda, baking powder, salt, and cinnamon.
- Make a well in the center of dry ingredients, add eggs and oil, mixing by hand until combined. Batter will be thick.
- Fold in grated zucchini and chocolate chips with a spatula, batter will loosen up with moisture from zucchini.
- Use an ice cream scoop to fill cupcake liners about two thirds full.
- Bake for 15 to 18 minutes or until a toothpick inserted comes out mostly clean.
- Allow cupcakes to cool completely before frosting or serving.