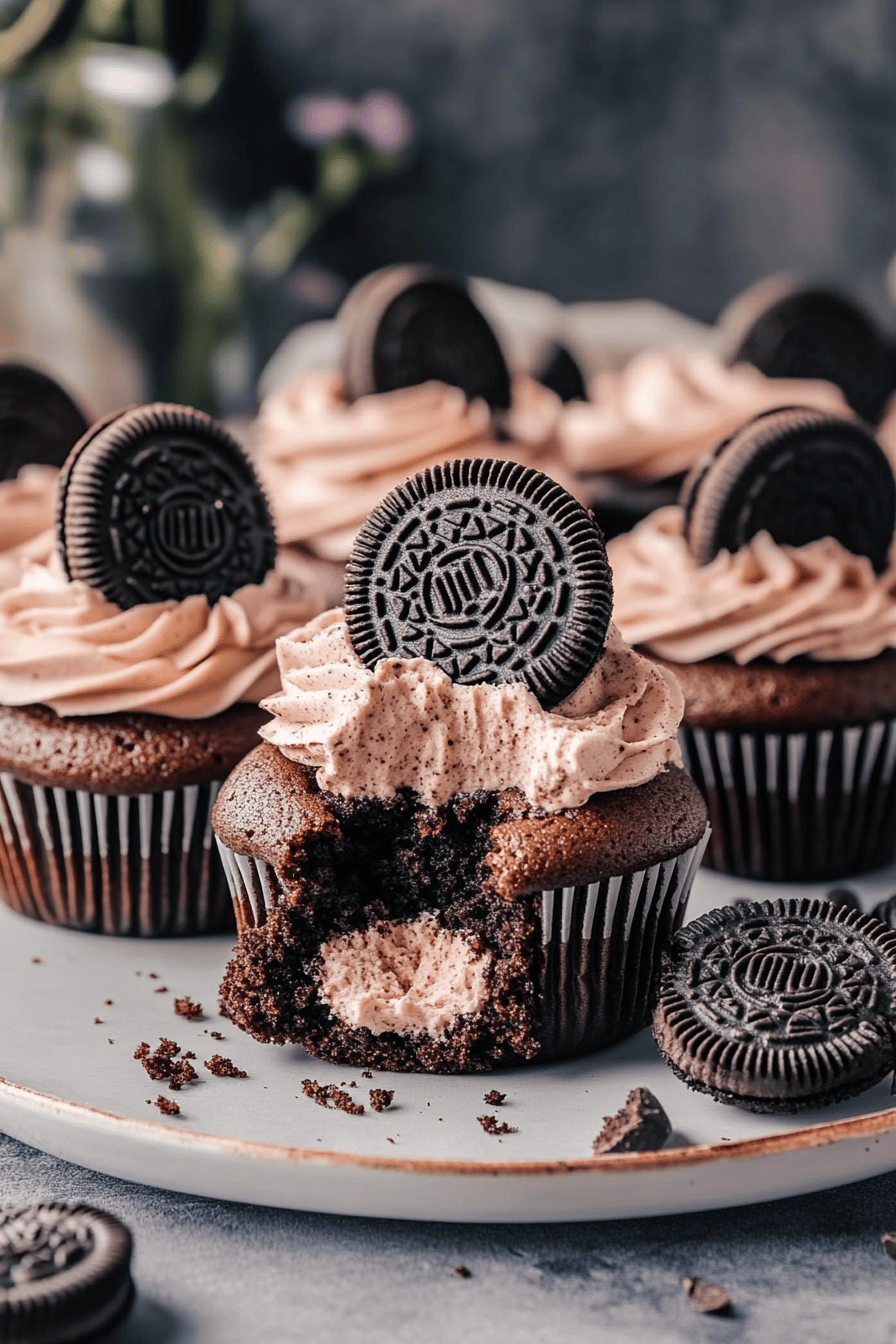
There’s something almost magical about the way the smell of chocolate and stout mingling in the oven pulls everyone into the kitchen—even before the first cupcake hits the plate. These chocolate stout cupcakes hold a special place in my heart because they’re more than just a treat; they’re a little moment of joy after a busy day. I first made these on a chilly autumn evening when my kids begged for a “grown-up” dessert that still felt cozy and familiar. The result? Moist, rich cupcakes with a subtle depth from the stout beer, balanced perfectly by a silky glaze that melts on your tongue. Honestly, if you love a classic chocolate cupcake but always find them a bit too heavy or one-note, this recipe might just be your new go-to. It’s like the regular chocolate cupcake grew up, put on a fancy jacket, and still managed to feel like home.
What is chocolate stout cupcake?
Think of chocolate stout cupcakes as chocolate cupcakes with a little twist—one that’s both unexpected and totally comforting. The “stout” refers to stout beer, a dark, rich, slightly bitter beer that adds a deep, roasted flavor to the batter. It’s essentially a chocolate cupcake, but the stout makes it richer and more complex, almost like a secret ingredient that transforms the ordinary into something special. These cupcakes are tender and moist thanks to the beer, which also cuts through the sweetness in the best way possible. It’s kind of like if your favorite cup of coffee and a chocolate cake had a delicious little baby. Plus, the name itself sounds fun enough to impress guests or convince yourself you deserve a little indulgence!
Why you’ll love this recipe?
What I love most about these chocolate stout cupcakes is the perfect balance of flavors and textures—they’re not just another chocolate cupcake. The stout adds this sultry, almost smoky richness that makes the chocolate taste so much deeper and more interesting. On top of that, they’re incredibly easy to whip up. I’m serious: no fancy equipment, no strange ingredients beyond the beer, and you probably already have everything in your pantry. This makes them a lifesaver on those evenings when you want something delicious but don’t want to spend hours baking (or cleaning). Plus, the ingredients are wallet-friendly—flour, cocoa powder, sugar, eggs, and the only “luxury” here is the stout, which I often pick up on sale or use leftover from the weekend.
These cupcakes also shine in their versatility. You can dress them up with a classic cream cheese glaze, a boozy whiskey ganache, or even just a dollop of whipped cream and fresh berries. My kids and I have had these as a quick afternoon snack, a party dessert, and everything in between. I once swapped out the stout for a non-alcoholic malt beverage just to see if anyone would notice—they didn’t. That’s how easy they are to customize. Honestly, if you like recipes that taste like they took hours but actually come together fast, these chocolate stout cupcakes might become your new obsession.
How do I make chocolate stout cupcakes?
Quick Overview
The whole process is surprisingly straightforward—mix your dry ingredients, blend your wet ones (including the star of the show, the stout), then combine and bake. The magic happens when the stout and cocoa marry, infusing the cupcakes with rich depth and tenderness. This method doesn’t require any complicated folding or fancy equipment; just good timing and a gentle hand when mixing to keep the texture light but moist. Trust me, once you get the hang of the basics, you’ll feel like you’re baking a little piece of chocolate heaven in your kitchen.
Ingredients
For the Main Batter:
- 1 cup stout beer (I usually use Guinness, but any stout will do)
- 1 cup unsalted butter (it adds richness and moisture; room temperature is best)
- 3/4 cup unsweetened cocoa powder (go for good quality for a bolder chocolate flavor)
- 2 cups granulated sugar (you can adjust down slightly if you prefer less sweet)
- 2 large eggs (room temperature helps with mixing)
- 1 cup sour cream (this keeps the cupcakes tender and moist)
- 2 1/2 cups all-purpose flour (sifted for a lighter texture)
- 2 1/2 tsp baking soda (reacts with the stout for rise)
- 1/2 tsp salt (balances sweetness)
For the Filling:
- 1/2 cup cream cheese (softened)
- 1/4 cup powdered sugar (adjust for sweetness; I sometimes add a touch of vanilla extract)
- Optional: 2 tbsp cocoa powder (for a mocha twist!)
For the Glaze:
- 1 cup powdered sugar
- 2-3 tbsp stout beer (add slowly for perfect drizzle consistency)
- Optional: 1 tsp vanilla extract or a splash of espresso for extra flavor kick
Step-by-Step Instructions
Step 1: Preheat & Prep Pan
Set your oven to 350°F (175°C). Line your muffin tin with cupcake liners or lightly grease it to prevent sticking. I like to give mine a quick spray because it makes cleanup so much easier. While the oven heats, this is a good time to gather your ingredients so everything’s within reach—baking’s smoother that way.
Step 2: Mix Dry Ingredients
In a large bowl, sift together the flour, cocoa powder, baking soda, and salt. This step helps prevent clumps—trust me, uneven cocoa bits are the saddest find in a cupcake. Stir gently just to combine; don’t overdo it here because we don’t want to toughen the cupcakes.
Step 3: Mix Wet Ingredients
In a separate bowl, melt the butter and mix it with the stout until smooth. Stir in the sugar to slightly dissolve it, then add eggs one at a time, beating well after each addition. Finally, fold in the sour cream. The batter should look glossy and smell like a warm, cozy pub—a little chocolaty, a little malty, all kinds of inviting.
Step 4: Combine
Slowly pour the dry ingredients into the wet, mixing gently with a spatula or wooden spoon until just combined. This part is crucial—overmixing can make the cupcakes dense. The batter will be thick and shiny. If you see streaks of flour, give it one more gentle fold, but stop there.
Step 5: Prepare Filling
While the batter rests, whisk the cream cheese with powdered sugar (and cocoa powder, if using) until smooth and fluffy. Taste a little to see if you want it sweeter. The filling should be silky and scoopable—not runny, not chunky.
Step 6: Layer & Swirl
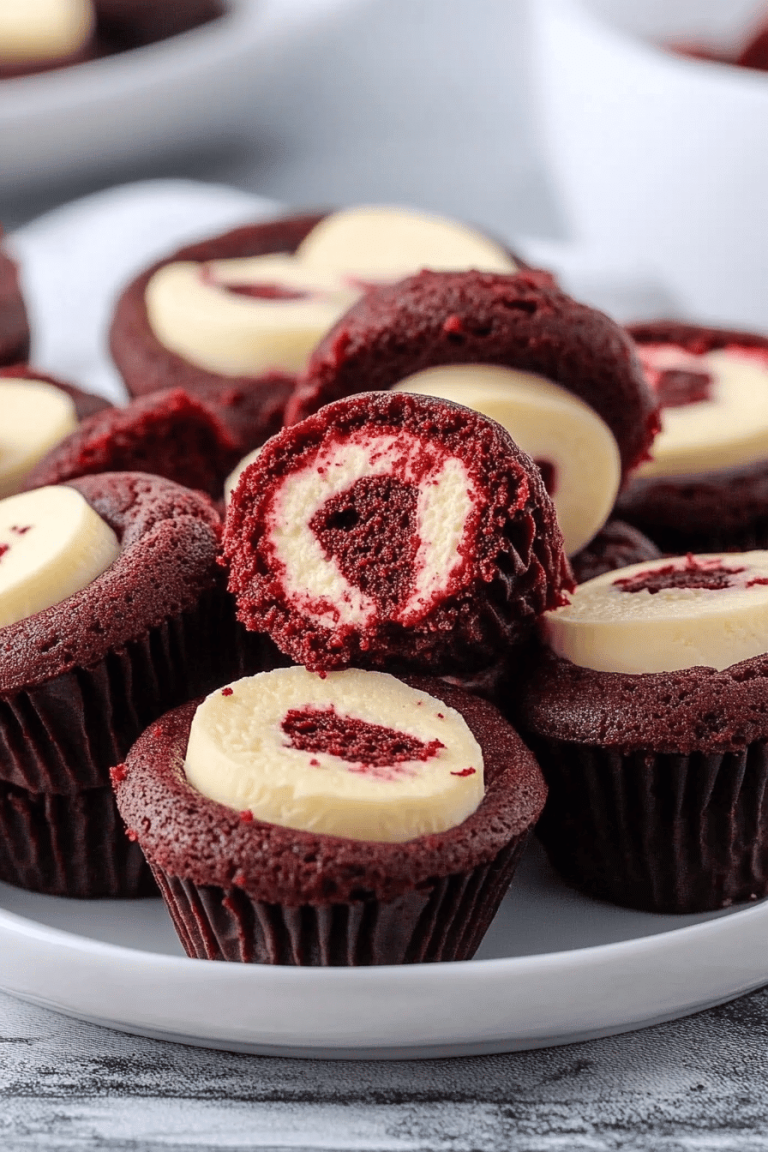
Fill each cupcake liner halfway with the stout chocolate batter, then drop a spoonful of the cream cheese filling in the center. Top with more batter, nearly filling the cups. Using a skewer or knife, swirl the filling gently into the batter to create a beautiful marbled effect. Don’t over-swirl—just enough to see the contrast when baked.
Step 7: Bake
Pop the cupcakes into the preheated oven and bake for 20-25 minutes. Start checking around 18 minutes with a toothpick inserted near the edge (avoid the cream cheese center) to see if it comes out clean. Oven temperatures vary, so keep an eye on them. When done, they’ll be springy and have a lovely dome shape.
Step 8: Cool & Glaze
Let the cupcakes cool in the pan for 10 minutes, then transfer to a wire rack. While still warm, whisk together the glaze ingredients until smooth and glossy. Drizzle over the top of each cupcake or dip the tops for a shinier finish. The stout in the glaze not only adds flavor but gives a subtle shine that makes these cupcakes look extra special.
Step 9: Slice & Serve
These cupcakes are perfect served warm or at room temperature. When you bite into one, you’ll get a luscious chocolate cake with a tangy, creamy center and a sweet, slightly boozy glaze that holds it all together. If you want to get fancy, slice one in half to show off the marbled filling before serving—it’s a crowd-pleaser. Pair with a cold glass of milk or a cup of dark coffee for the full experience.
What to Serve It With
For Breakfast: These cupcakes are surprisingly fantastic with your morning coffee or even a smoky black tea. My husband swears by them as a weekend treat when he’s craving chocolate but wants something a little lighter than a heavy chocolate cake. Try serving with a few fresh raspberries or sliced bananas for a bit of natural sweetness.
For Brunch: Dress them up on your brunch table alongside fresh fruit salad and mimosas. The slightly bitter notes from the stout pair beautifully with the citrus in the orange juice, making these cupcakes feel elegant without any fuss. Plus, they hold up well on a buffet, which I appreciate when hosting family.
As Dessert: Serve these with a small scoop of vanilla ice cream or a drizzle of salted caramel sauce. The contrast between cold and warm, sweet and bitter, makes every bite feel indulgent. I once added a sprinkle of chopped toasted pecans on top for texture that disappeared too fast—it was a hit!
For Cozy Snacks: On a rainy afternoon, these cupcakes with a mug of chai or spiced cider have saved many gloomy days in our house. They’re the kind of snack that somehow feels like a hug wrapped in chocolate—warm, comforting, and exactly what you needed but didn’t realize it.
Top Tips for Perfecting Your Chocolate Stout Cupcakes
Stout Selection: I always use Guinness, but if you want to get creative, try a coffee stout or chocolate stout beer—they amplify the flavors even more. Just avoid anything too fruity or hoppy; it changes the flavor profile significantly.
Mixing Advice: Overmixing is the enemy here. Once you combine wet and dry, fold just until no flour streaks remain. I learned this the hard way—the first batch I made got a little tough because I kept stirring like cake batter was cookie dough.
Swirl Customization: For that signature marbling, drop the cream cheese filling right in the center of each batter scoop, then swirl gently with a toothpick in a figure-eight or circular motion. Too much swirling blends the filling into the batter, losing the visual contrast and texture surprise.
Ingredient Swaps: Tried this with almond milk instead of sour cream, and it was actually creamier! Greek yogurt works well too, just reduce the sugar a little if you go that route. Gluten-free flour blends can work but expect a denser result. Add a touch of xanthan gum for better structure.
Baking Tips: Oven temps can be tricky—if your cupcakes brown too quickly on top but aren’t done inside, tent with foil halfway through baking. Also, placing the pan in the center rack ensures even heat distribution, which is key for moist cupcakes.
Glaze Variations: You can swap the stout in the glaze for coffee, espresso, or even a splash of bourbon to match the grown-up vibe. Adjust powdered sugar quantity to get a glaze that’s thick enough to hold but thin enough to drizzle. I like to start with less liquid and add slowly.
Storing and Reheating Tips
Room Temperature: Store your chocolate stout cupcakes in an airtight container for up to 2 days. Keeping them sealed keeps the moisture locked in, although they are best eaten fresh. Avoid leaving them out longer or they start to dry.
Refrigerator Storage: If you want to keep these longer (up to 5 days), pop them in the fridge in a container with a tight lid. Bring them to room temp before eating, or warm for 10 seconds in the microwave to bring back that soft, gooey center.
Freezer Instructions: These cupcakes freeze beautifully—wrap them individually in plastic wrap and store in a zip-top bag for up to 3 months. Thaw overnight in the fridge or on the counter for a couple of hours. Add glaze after thawing for best texture.
Glaze Timing Advice: If you’re freezing, it’s better to add glaze right before serving. The glaze can get a little sticky or dull looking in the freezer. For room temp or fridge storage, glaze right after cupcakes cool to keep that glossy shine.
Frequently Asked Questions
Final Thoughts
These chocolate stout cupcakes have become one of those recipes I come back to again and again, whether I’m craving something special or just want to surprise the family with a little sweetness wrapped in rich, comforting flavors. The way the stout deepens the chocolate gives each bite a warmth and complexity that’s so satisfying. I love that they’re easy enough to make any night of the week but fancy enough to serve at gatherings—this recipe really bridges the gap between homemade charm and something a little more grown-up. If you give these a try, don’t be surprised if they disappear in minutes—mine always do! Let me know how yours turn out, if you’ve tried any fun twists, or if you have a favorite pairing to share. Happy baking and here’s to many more kitchen memories filled with chocolate and laughter!