There’s something special about walking into the kitchen and being enveloped by the warm, buttery aroma of pecan pie. It’s a smell that instantly transports me back to my childhood, when my grandmother would lovingly prepare this classic dessert for our family gatherings. She’d carefully layer the pecans, syrup, and melted butter in a perfectly flaky crust, and the result was nothing short of magic. To this day, I still get excited whenever I make this pie for my own family and friends. There’s just something about the combination of textures and flavors that never fails to impress.
What is pecan pie?
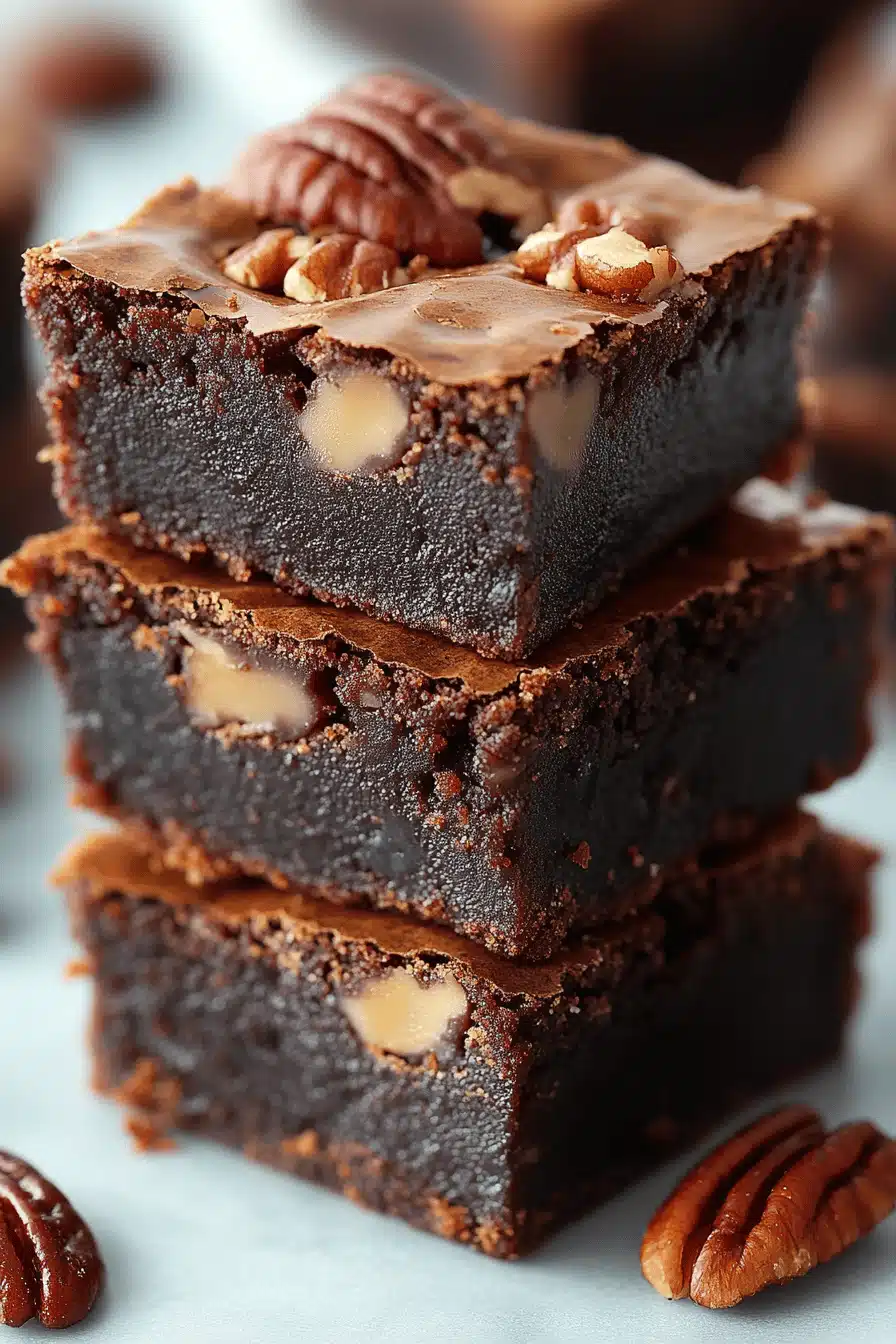
For those who may not be familiar, pecan pie is a traditional American dessert made with pecans, sugar, eggs, and melted butter. It’s essentially a rich and gooey filling nestled in a flaky pastry crust, making it the perfect treat for any occasion. Think of it as a cross between a pie and a tart, with the added bonus of being ridiculously easy to make. It’s a lifesaver on busy nights when you need to whip up something special for your loved ones.
Why you’ll love this recipe?
There are countless reasons why this pecan pie recipe stands out from the rest. First and foremost, it’s incredibly easy to make. With just a few simple ingredients and some basic baking skills, you’ll be rewarded with a pie that’s sure to impress. The flavor profile is also spot on – the perfect balance of sweet and nutty, with just the right amount of gooeyness. Plus, it’s a great way to use up any leftover pecans you might have on hand. What I love most about this recipe is the fact that it’s incredibly versatile. You can serve it as a dessert, a snack, or even as a topping for ice cream or yogurt. The possibilities are endless!
How do I make pecan pie?
Quick Overview
Before we dive into the nitty-gritty of making this pie, let me give you a quick rundown of the process. You’ll start by preheating your oven to 350°F (180°C) and preparing a flaky pastry crust. Next, you’ll mix the filling ingredients together, including the pecans, sugar, eggs, and melted butter. Finally, you’ll assemble the pie and bake it for about 45 minutes, or until the crust is golden brown and the filling is set. That’s it! With a little patience and some basic baking skills, you’ll be enjoying a slice of this heavenly pie in no time.
Ingredients
What are the ingredients for making a pie?
For the Main Batter:
300g all-purpose flour
1 tsp salt
1 cup cold unsalted butter, cut into small pieces
1/4 cup ice water
For the Filling:
1 cup pecan halves
1 cup granulated sugar
3 large eggs
1/2 cup melted unsalted butter
1 tsp vanilla extract
For the Glaze:
1/4 cup light corn syrup
1/4 cup melted unsalted butter
1 tsp vanilla extract
Step-by-Step Instructions
Step 1: Preheat & Prep Pan
Preheat your oven to 350°F (180°C). Meanwhile, roll out the pastry dough to a thickness of about 1/8 inch (3 mm). Transfer the dough to a 9-inch (23 cm) pie dish and trim the edges to fit. Crimp the edges to form a decorative border. This will ensure that your crust stays in place while the pie bakes.
Step 2: Mix Dry Ingredients
In a medium bowl, whisk together the flour, salt, and pecans. Set aside.
Step 3: Mix Wet Ingredients
In a separate bowl, whisk together the sugar, eggs, melted butter, and vanilla extract. This will help to create a smooth and creamy filling.
Step 4: Combine
Add the dry ingredients to the wet ingredients and stir until just combined. Be careful not to overmix – you want to maintain that lovely, chunky texture.
Step 5: Prepare Filling
Pour the filling mixture into the prepared pie crust and smooth the top with a spatula. This will ensure that the filling is evenly distributed and the crust stays in place.
Step 6: Layer & Swirl
Top the filling with a layer of pecans, arranging them in a decorative pattern. You can also add a few extra pecans on top for a decorative touch. This will add texture and visual appeal to your pie.
Step 7: Bake
Bake the pie for about 45 minutes, or until the crust is golden brown and the filling is set. You can check for doneness by inserting a toothpick into the center of the pie – if it comes out clean, it’s ready.
Step 8: Cool & Glaze
Remove the pie from the oven and let it cool on a wire rack for at least 30 minutes. Meanwhile, prepare the glaze by whisking together the corn syrup, melted butter, and vanilla extract. Drizzle the glaze over the top of the pie and smooth with a spatula.
Step 9: Slice & Serve
Slice the pie into wedges and serve warm or at room temperature. You can also refrigerate the pie for up to 2 days before serving.
What to Serve It With
Here are some creative serving suggestions for your pecan pie:
For Breakfast: Serve with a cup of coffee or tea, or as a topping for yogurt or oatmeal. This is the perfect way to start your day!
For Brunch: Serve with a glass of champagne or a refreshing cocktail. This is a great way to celebrate a special occasion!
As Dessert: Serve warm or at room temperature, topped with a scoop of vanilla ice cream or whipped cream. This is the perfect way to end a meal!
For Cozy Snacks: Serve as a snack or appetizer, paired with a cup of coffee or tea. This is a great way to warm up on a chilly day!
Top Tips for Perfecting Your Pecan Pie
Here are some expert tips for perfecting your pecan pie:
Zucchini Prep: Make sure to peel the zucchini before using it in the filling. This will ensure that the filling is smooth and creamy.
Mixing Advice: Be careful not to overmix the filling – this will result in a tough and dense pie. Stop mixing as soon as the ingredients come together in a cohesive mass.
Swirl Customization: Experiment with different swirling patterns to create a visually appealing pie. You can also add a few extra pecans on top for a decorative touch.
Ingredient Swaps: Feel free to substitute other types of nuts or seeds for the pecans, if you prefer. Just be sure to adjust the cooking time accordingly.
Baking Tips: Make sure to bake the pie at the right temperature (350°F or 180°C) and for the right amount of time (45 minutes). This will ensure that the crust is golden brown and the filling is set.
Glaze Variations: Experiment with different glaze flavors and textures to create a unique and delicious pie. You can also add a few extra ingredients, such as cinnamon or nutmeg, for added depth of flavor.
Storing and Reheating Tips
Here are some tips for storing and reheating your pecan pie:
Room Temperature: Store the pie at room temperature for up to 2 days before serving. This will allow the filling to set and the crust to remain crispy.
Refrigerator Storage: Store the pie in the refrigerator for up to 2 days before serving. This will help to keep the filling fresh and the crust crispy.
Freezer Instructions: Store the pie in the freezer for up to 2 months before serving. This will allow you to enjoy your pie at a later date, without sacrificing any of its delicious flavor or texture.
Frequently Asked Questions
Final Thoughts & Conclusion
And there you have it – a delicious and easy-to-make pecan pie recipe that’s sure to impress your friends and family. With its rich and gooey filling, flaky pastry crust, and perfectly balanced flavors, this pie is the perfect treat for any occasion. Whether you’re serving it as a dessert, a snack, or a topping for ice cream or yogurt, this pie is sure to be a hit. So go ahead, give it a try, and let me know how it turns out in the comments below! Happy baking!

Nutella Pop Tarts
Ingredients
Main Ingredients
- 2 count refrigerated pie crusts You can use store-bought or homemade - recipe makes two pie crusts
- 1 cup Nutella
- 1 large egg yolk
- 1 teaspoon water
- 2 tablespoons Turbinado sugar
Instructions
Preparation Steps
- Preheat oven to 350°F.
- Lightly dust a work surface with flour and roll out 1 pie crust to about 1/8-inch thickness. Repeat with the second pie crust.
- Cut out 6 to 8 rectangles approximately 2 inches wide by 3 inches tall from each pie crust. Reroll scraps to make 1 or 2 more tarts.
- Transfer rectangles to a baking sheet lined with parchment paper, leaving 2 inches space between them.
- Spread a heaping tablespoon of Nutella on half of the rectangles.
- Using a fork, lightly prick a couple of holes in the remaining rectangles.
- Place the pricked rectangles on top of the Nutella-spread rectangles.
- Crimp the edges of the tarts with a fork to seal.
- Whisk the egg yolk and water in a small bowl. Brush each pop tart with the egg wash.
- Sprinkle turbinado sugar on top of each tart.
- Bake for 13 to 15 minutes or until golden brown.
- Let cool for a few minutes and serve.
Notes
Nutrition
[wprm-recipe-container]