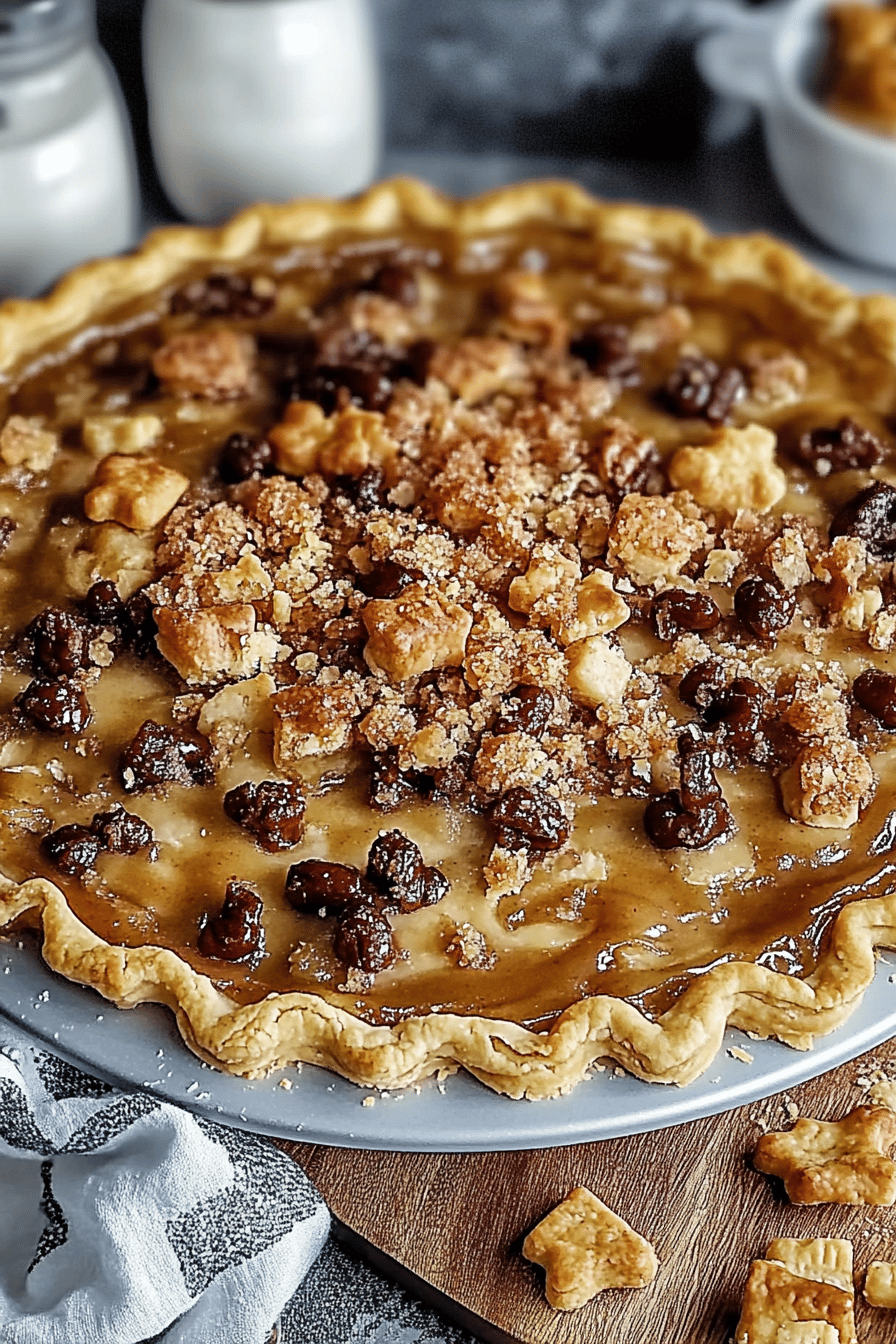
You know, sometimes I get this craving. It’s not for something super fancy, or something that takes hours to assemble. It’s for that deep-down, soul-satisfying, “I-need-a-hug-in-dessert-form” kind of feeling. And that’s exactly when my mind drifts to Texas Trash Pie. Seriously, if you haven’t heard of it, picture this: a wonderfully gooey, slightly salty, perfectly sweet concoction loaded with all sorts of delicious bits, all nestled in a flaky crust. It’s not a pie in the traditional fruit-filled sense, not at all. It’s more like a hug you can eat, with textures and flavors that dance on your tongue. I remember the first time I tried making it, I was a bit skeptical about the name, but oh my goodness, one bite and I was hooked. It’s become my go-to for potlucks, unexpected guests, or just when I need a little pick-me-up. It’s the kind of dessert that makes you close your eyes and just savor the moment.

What is Texas trash pie?
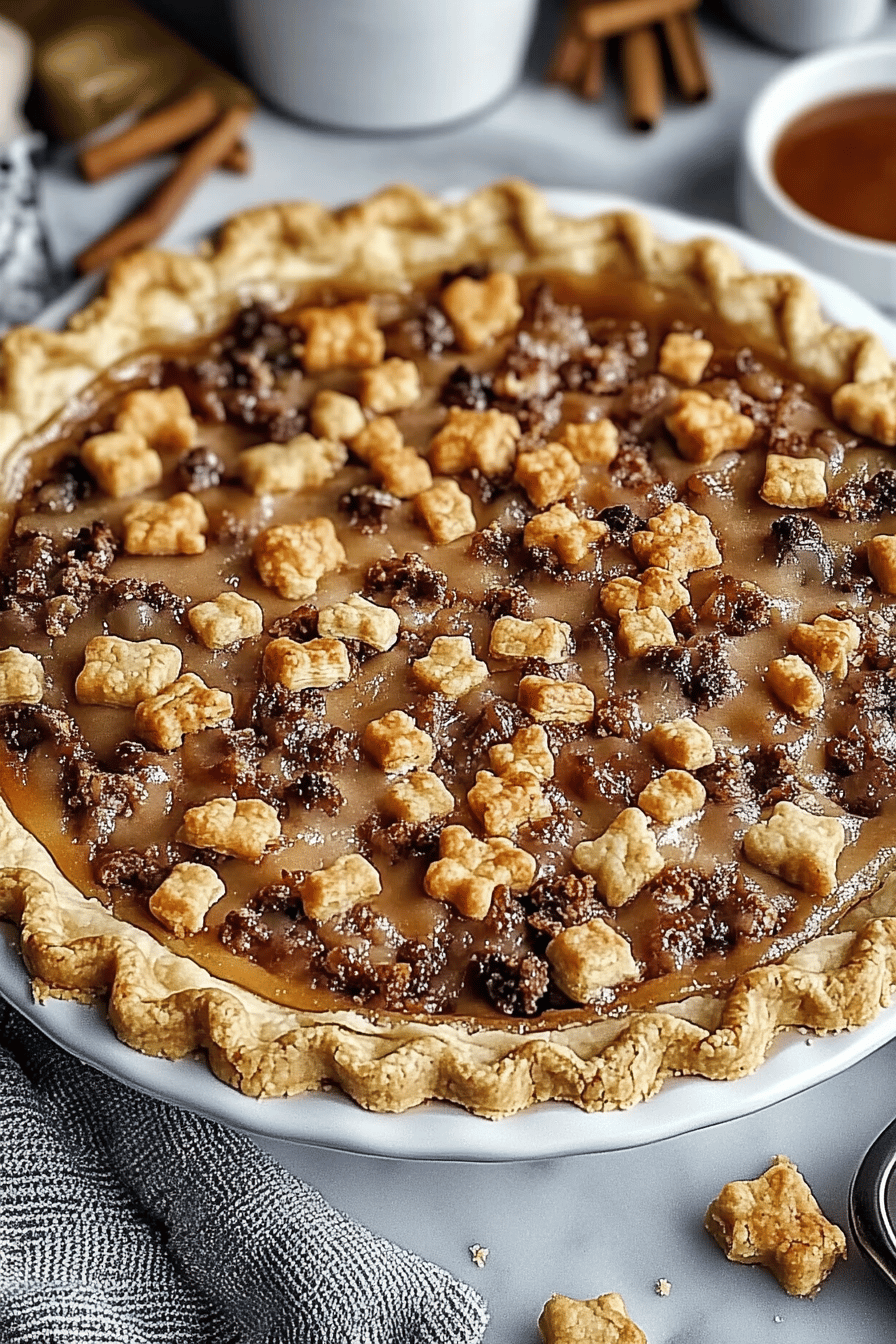
So, what exactly is this wonderfully named Texas Trash Pie? Don’t let the “trash” part fool you, because there’s absolutely nothing messy or unappealing about it. Think of it as a decadent, no-bake pudding or custard pie, but with way more personality! It’s essentially a rich, creamy filling loaded with goodies like chocolate chips, pecans, and sometimes even a touch of coconut, all swirled together in a crisp pie shell. The magic really happens with the balance of sweet and salty, and the delightful textures from all those additions. It’s not overly complicated, which is a huge win in my book. The name, I suspect, comes from the idea that it’s a delicious mix of all sorts of fantastic things thrown together, much like you might find in a trail mix or a loaded nacho platter, but in pie form. It’s the ultimate way to combine a bunch of yummy ingredients into one show-stopping dessert that never fails to impress.
Why you’ll love this recipe?
Honestly, where do I even begin with why this Texas Trash Pie recipe is a total winner? First off, the flavor explosion is just incredible. You get that rich chocolate mingling with the nutty crunch of pecans, all enveloped in a smooth, creamy filling that’s just sweet enough without being cloying. And that subtle hint of salt? It’s the secret weapon that makes everything pop! What I also adore is how surprisingly simple it is. You don’t need to be a master baker to whip this up. Most of the ingredients are pantry staples, and the assembly is straightforward, making it a lifesaver on busy nights when you need a dessert in a hurry. Plus, it’s incredibly cost-effective. You’re using common ingredients, and you get a huge amount of deliciousness for your effort. And versatility? Oh yeah! While it’s fantastic on its own, I’ve found it’s also amazing served with a dollop of whipped cream or even a scoop of vanilla Ice Cream. It’s a crowd-pleaser, perfect for birthdays, holidays, or just a random Tuesday. Compared to some other elaborate desserts, this one truly stands out because it delivers maximum flavor with minimum fuss. It’s the kind of recipe that makes you feel like a baking rockstar without breaking a sweat. What I love most about this pie is its comforting familiarity combined with a delightful surprise in every bite. It’s like a warm hug for your taste buds!
How do you make Texas trash pie?
Quick Overview
Making this Texas Trash Pie is honestly a breeze! You’ll start by prepping your pie crust, then whip up a quick, no-bake filling that’s loaded with delicious mix-ins. The key is gently combining everything to get those lovely swirls. Then, it’s just a matter of chilling it until it’s perfectly set. The entire process from start to finish usually takes less than 30 minutes of active time, leaving you plenty of time to relax while it firms up in the fridge. It’s the perfect example of how simple ingredients can create something truly spectacular with minimal effort.
Ingredients
For the Pie Crust: What is the recipe?
1 unbaked 9-inch pie crust (store-bought or homemade – I often use a pre-made one on busy days, and it works beautifully! Make sure it’s blind-baked according to package directions or your favorite recipe. A good blind bake is crucial for that crisp bottom.)
For the Creamy Filling:
2 cups semi-sweet chocolate chips (or a mix of semi-sweet and milk chocolate for extra richness)
1 cup chopped pecans (toasted lightly for an extra layer of flavor – it makes a huge difference!)
1/2 cup shredded sweetened coconut (optional, but adds a lovely chewiness)
1/4 cup unsalted butter, melted
1/4 cup light corn syrup (this is key for that smooth, fudgy texture)
1 teaspoon vanilla extract
1/4 teaspoon salt (don’t skip this! It balances the sweetness perfectly)
For the Optional Swirl/Glaze:
1/4 cup powdered sugar
1-2 tablespoons milk (just enough to make a drizzleable consistency)
A few extra chocolate chips for garnish (if you’re feeling fancy)
Step-by-Step Instructions
Step 1: Preheat & Prep Pan
First things first, make sure your pie crust is all ready to go. If you’re baking it from scratch, blind-bake it until it’s golden brown and completely cooled. If you’re using a store-bought one, follow the package instructions for blind baking. A well-baked and cooled crust is essential for preventing a soggy bottom, which is the last thing we want with this delicious pie!
Step 2: Mix Dry Ingredients
In a medium-sized mixing bowl, combine your chocolate chips, chopped pecans, and shredded coconut (if you’re using it). Give them a good stir to make sure everything is evenly distributed. This is where all the “trash” magic starts to happen – all those wonderful textures and flavors just waiting to meld together.
Step 3: Mix Wet Ingredients
In a separate, microwave-safe bowl, melt the butter. Once melted, whisk in the light corn syrup, vanilla extract, and salt until everything is smooth and well combined. The corn syrup is really important here for achieving that perfect gooey texture without making it too stiff.
Step 4: Combine
Pour the melted butter and corn syrup mixture over the dry ingredients (chocolate chips, pecans, coconut). Stir everything gently until all the dry bits are coated in the liquid mixture. You don’t want to overmix; just get everything nicely combined. It will look a little clumpy, and that’s perfectly okay!
Step 5: Prepare Filling
This is the fun part! Spoon the chocolate-nut mixture evenly into your pre-baked and cooled pie crust. Gently spread it out with a spatula, making sure to fill any gaps and cover the bottom of the crust completely. You can gently press it down a bit if needed, but don’t pack it too tightly.
Step 6: Layer & Swirl
If you want to add a bit of visual flair, now’s the time. I like to reserve a few extra chocolate chips and sprinkle them over the top. Sometimes, if I’m feeling extra ambitious, I’ll melt a couple of tablespoons of white chocolate and drizzle it over the top in a swirl pattern. But honestly, it’s delicious just as is!
Step 7: Bake
Now, this is a no-bake *filling*, but we still need to briefly bake the assembled pie to set everything properly. Pop it into a preheated oven at 350°F (175°C) for about 20-25 minutes. You’ll know it’s ready when the filling is slightly set around the edges but still has a little bit of a wobble in the very center. Don’t overbake it, or it will become too firm!
Step 8: Cool & Glaze
This is perhaps the most crucial step: patience! Let the pie cool completely on a wire rack for at least 2-3 hours, or until it’s fully chilled and firm. This chilling time is what allows the filling to set up perfectly. While it’s chilling, you can whisk together the powdered sugar and milk in a small bowl to make a simple glaze. Once the pie is completely cooled, drizzle the glaze over the top, if desired. You can also sprinkle a few extra chocolate chips or chopped pecans on top for garnish.
Step 9: Slice & Serve
Once chilled, slice your Texas Trash Pie into wedges. The best way to get clean slices is to use a sharp knife that’s been warmed slightly by running it under hot water and then dried. Serve it chilled, and prepare for the rave reviews! It’s absolutely divine on its own, but a little scoop of vanilla ice cream or some fresh whipped cream never hurts.
What to Serve It With
Texas Trash Pie is so wonderfully versatile, it can honestly fit into almost any meal or occasion! For a cozy breakfast or brunch, I love serving a small slice alongside a steaming mug of strong coffee. The rich, chocolatey goodness is a fantastic contrast to a bitter brew, and it really feels like a special treat to start the day. For a more elegant brunch spread, I’ll often cut it into smaller squares and arrange them on a platter with fresh berries – the tartness of the berries cuts through the richness of the pie beautifully. And as a dessert? Oh, it’s a showstopper! It pairs wonderfully with a glass of milk (for the kids and the kids at heart) or even a dessert wine like a port for a more grown-up indulgence. I’ve also found that a dollop of homemade whipped cream is pure heaven, adding an extra layer of creamy delight. For those times when you just need a comforting snack, a simple slice enjoyed straight from the fridge, maybe while curled up with a good book, is perfection. My family has a tradition of having this after our holiday dinners, and it’s always a welcome, less fussy alternative to a traditional holiday pie. It’s a dessert that invites people to gather around and share a moment of pure deliciousness.
Top Tips for Perfecting Your Texas Trash Pie
Alright, let’s talk about getting this Texas Trash Pie absolutely perfect every single time. I’ve made this so many times, I’ve picked up a few tricks along the way that I think are worth sharing! First off, let’s chat about the nuts. Toasted pecans are a game-changer. It only takes a few extra minutes in a dry skillet over medium heat, stirring constantly, until they’re fragrant. This little step really brings out their flavor and adds a delightful crunch that you just can’t get from raw nuts. Trust me on this one! When you’re mixing the filling ingredients, don’t go overboard. A gentle stir is all you need to coat everything. Overmixing can actually make the chocolate chips break down too much, and we want those lovely little pockets of chocolatey goodness. For the coconut, I find shredded sweetened coconut gives the best texture and flavor, but if you’re not a fan, you can absolutely leave it out. No harm, no foul! If you decide to add the optional glaze, the consistency is key. You want it thin enough to drizzle easily but not so thin that it just runs off the pie. Start with a tablespoon of milk and add more a tiny bit at a time until you reach your desired drizzling consistency. And for baking, watch it closely! The pie is done when the center is still just a *little* bit soft. It will continue to firm up as it cools. If you overbake it, you’ll end up with a pie that’s too firm and less fudgy. When it comes to cooling, patience is your best friend. Letting it chill thoroughly in the refrigerator is what allows the filling to set properly. Rushing this step will result in a pie that falls apart when you try to slice it. I’ve learned this the hard way! If you want to add extra swirls or layers of flavor, consider a drizzle of caramel sauce or even some melted Peanut Butter over the filling before you bake it. It adds another dimension of deliciousness. And finally, don’t be afraid to experiment with the mix-ins! While chocolate chips and pecans are classic, you could try adding some butterscotch chips, white chocolate chunks, or even some dried cranberries for a tart contrast. This recipe is incredibly forgiving and encourages creativity!
Storing and Reheating Tips
One of the best things about Texas Trash Pie is how well it stores, which means you can enjoy it for days (if it lasts that long, which is a big “if” in my house!). For storing at room temperature, I usually only do this if it’s not too warm of a day and if the pie is fully chilled. I’ll cover it loosely with plastic wrap or pop it into an airtight container. It should be good for about 2-3 days, but honestly, its texture is best when chilled. If you’re planning on keeping it for longer than that, or if you live in a warmer climate, the refrigerator is your best bet. Pop it into an airtight container or cover it well with plastic wrap. It will stay delicious and perfectly set in the fridge for up to a week. My kids always seem to find a way to sneak a slice even after a few days! If you’re looking to freeze it, I recommend slicing it first. Wrap each slice individually and tightly in plastic wrap, then place them in a freezer-safe bag or container. This way, you can just grab a single slice whenever the craving strikes. Frozen Texas Trash Pie should last for about 2-3 months. To thaw, simply unwrap the slices and let them come to room temperature for about 30 minutes, or gently warm them in the microwave for about 15-20 seconds. If you’ve already glazed your pie, it stores beautifully. If you plan to freeze it with the glaze on, just make sure it’s well-wrapped to prevent ice crystals. For the best texture and flavor, I always recommend serving it chilled, whether it’s straight from the fridge or after being thawed. The cold really enhances that wonderful fudgy, gooey filling!
Frequently Asked Questions
Final Thoughts
So there you have it – my beloved Texas Trash Pie! I truly hope you give this recipe a try. It’s more than just a dessert; it’s a little piece of joy, a fuss-free way to bring smiles to faces, and a testament to how simple ingredients can create something truly magical. The blend of textures and the delightful sweet-salty flavor profile make it an absolute winner in my book. It’s the kind of recipe that makes you feel like you’ve accomplished something special, even if you spent very little time in the kitchen. If you love this recipe, you might also enjoy my other easy dessert creations like my No-Bake Chocolate Peanut Butter Bars or my incredibly popular Skillet Cookie. They’re all designed to be delicious and manageable, perfect for busy home cooks. I can’t wait to hear what you think of this Texas Trash Pie! If you make it, please leave a comment below and tell me about your experience, or share a photo on social media and tag me – I’d absolutely love to see your creations! Happy baking, and more importantly, happy eating!

Texas Trash Pie
Ingredients
Crust
- 1.5 cup all-purpose flour
- 0.5 teaspoon salt
- 0.75 cup unsalted butter, chilled and cubed
- 4 tablespoon ice water
Filling
- 4 large eggs
- 1 cup granulated sugar
- 0.5 cup light corn syrup
- 0.5 cup chopped pecans
- 0.5 cup chocolate chips semi-sweet
- 0.5 cup shredded coconut
- 0.25 cup butter, melted
Instructions
Preparation Steps
- For the crust: In a large bowl, whisk together flour and salt. Cut in the cold butter with a pastry blender or your fingertips until the mixture resembles coarse crumbs. Gradually add ice water, 1 tablespoon at a time, mixing until the dough just comes together. Form into a disk, wrap in plastic, and chill for at least 30 minutes.
- Preheat oven to 375°F (190°C). On a lightly floured surface, roll out the chilled dough into a 12-inch circle. Carefully transfer the dough to a 9-inch pie plate. Trim and crimp the edges as desired.
- For the filling: In a separate bowl, whisk together eggs and granulated sugar until well combined. Stir in the corn syrup and melted butter.
- Gently fold in the chopped pecans, chocolate chips, and shredded coconut into the egg mixture.
- Pour the filling into the prepared pie crust. Bake for 40-45 minutes, or until the center is set and the crust is golden brown. If the crust starts to brown too quickly, cover the edges with foil.
- Let the pie cool completely on a wire rack before slicing and serving. This pie is delicious served warm or at room temperature.