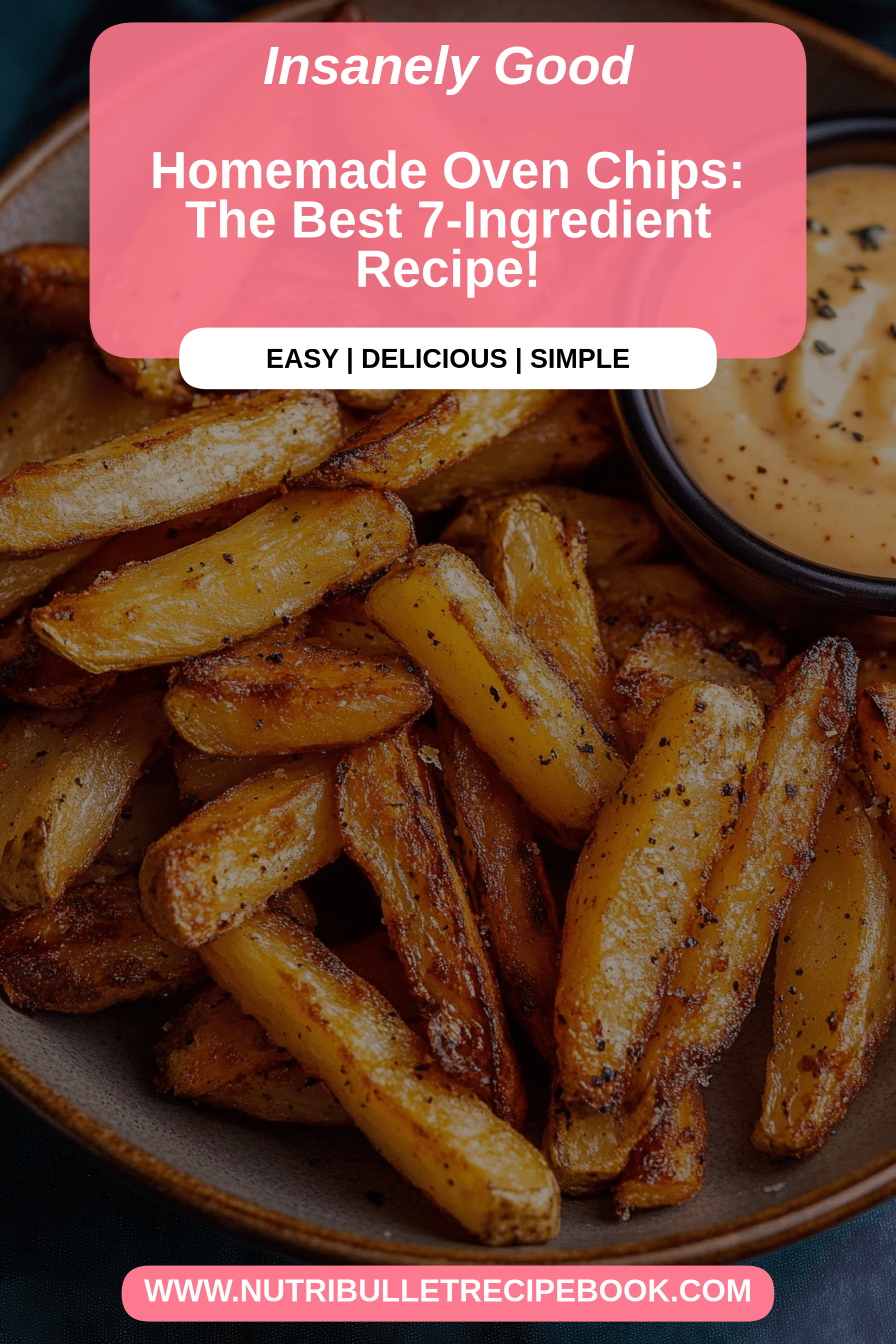
Oh, oven chips. Just saying the words brings me back. I can practically smell them baking, that distinct, comforting aroma that used to fill our kitchen on Friday nights. It’s funny, isn’t it? How a simple dish like fries can hold so many memories. When I was a kid, getting proper “chippy” chips was a treat, a special occasion. But as I got older, and my own kitchen became my happy place, I started to wonder if I could recreate that magic at home, without the deep-fryer grease and the fuss. And let me tell you, after years of tinkering and a few not-so-great attempts (we don’t talk about the soggy ones!), I’ve landed on a method for oven chips that’s just… perfection. They come out gloriously crispy on the outside, fluffy on the inside, and they have this incredible golden hue that just screams delicious. It’s funny, because some people might think of oven chips as a bit of a compromise, a lighter alternative to the real deal. But I promise you, these oven chips stand tall on their own. They’re so good, in fact, that my kids often request them over restaurant fries, and that’s saying something!
What are oven chips?
So, what exactly are these magical oven chips we’re talking about? Think of them as the ultimate golden-brown Potato Wedges, baked to crispy perfection right in your oven. They’re essentially a healthier, more convenient way to enjoy that irresistible fried potato flavor and texture we all crave. Instead of submerging potatoes in hot oil, we’re using a combination of a hot oven and just the right amount of fat (usually oil) to coax out that glorious crispiness. The beauty of oven chips lies in their simplicity and versatility. You can toss them with just salt and pepper, or get fancy with herbs, spices, or even a sprinkle of parmesan. They’re not a complicated dish; they’re honest-to-goodness, comforting food that’s incredibly satisfying. It’s the kind of recipe you can whip up on a busy weeknight when everyone’s starving, or serve as a crowd-pleaser at a BBQ. No fancy equipment needed, just your oven and a bit of potato love!
Why you’ll love this recipe?
What are some of the best oven chips recipes?flavor is just outstanding. We’re talking about potatoes that are crispy, golden, and have that satisfying crunch when you bite into them. The inside stays beautifully fluffy, creating that perfect contrast. It’s like the best of both worlds! Then there’s the sheer simplicity. Honestly, this recipe is a lifesaver on busy nights. Once the potatoes are prepped and in the oven, you can focus on other things. There’s no standing over a hot stove, no oil splattering everywhere. It’s minimal fuss for maximum deliciousness. And let’s talk about Cost-efficiency: What is the best way to measure cost-efficiency?! Potatoes are one of the most budget-friendly ingredients out there, and this recipe uses them so well. You get a huge bang for your buck, making it perfect for feeding a family or a group of friends without breaking the bank. What I truly love most about these oven chips is their incredible versatility. They’re fantastic as a side dish to pretty much anything – burgers, grilled chicken, fish, or even just with a dollop of ketchup for a simple snack. They’re also way healthier than their deep-fried cousins, which is a win-win in my book. If you’ve ever tried my roasted sweet potato fries, you’ll appreciate the similar ease and deliciousness, but these classic potato oven chips have a special place in my heart.
How to Make Oven Chips
Quick Overview
Making these incredible oven chips is surprisingly straightforward! It all starts with selecting the right potatoes, cutting them uniformly, and then giving them a good toss in a flavorful coating. They’re then spread out on a hot baking sheet and baked until they’re golden brown and delightfully crispy. The key is high heat and not overcrowding the pan, which ensures that lovely crunch. It’s a simple, satisfying process that delivers amazing results every single time, making it a go-to for quick and delicious sides.
Ingredients
For the Potatoes:
2 lbs Russet potatoes (about 3-4 medium potatoes). Russets are my absolute favorite for chips because they have a lovely fluffy interior and crisp up beautifully. Look for ones that feel firm and have smooth skin. If you can’t find Russets, Yukon Golds are a decent second choice, though they can be a bit creamier. I usually give them a good scrub under cold water to remove any dirt.
For the Flavor Coating:
3 tablespoons Olive oil. Extra virgin olive oil works wonders here, imparting a lovely subtle flavor. You can also use a neutral oil like canola or vegetable oil if you prefer. I’ve even experimented with avocado oil, and it’s great too! The key is enough oil to coat the potatoes without making them greasy.
1 teaspoon Sea salt. Or to taste. Good quality sea salt really makes a difference, but regular table salt works just fine too.
½ teaspoon Black pepper, freshly ground. Always use freshly ground pepper if you can – it has so much more punch!
Optional additions: A pinch of paprika for a touch of color and smokiness, or some garlic powder for an extra kick. I sometimes add a little sprinkle of dried rosemary when I’m feeling fancy.
Step-by-Step Instructions
Step 1: Preheat & Prep Pan
First things first, preheat your oven to a good, hot 425°F (220°C). This high heat is crucial for getting that crispy exterior we’re aiming for. While the oven is heating up, I like to get my baking sheet ready. I usually line a large baking sheet with parchment paper. This does two things: it makes cleanup a breeze, and it helps prevent the chips from sticking. If you don’t have parchment paper, you can lightly grease the baking sheet with a little extra oil, but parchment is truly my secret weapon for easy cleanup!
Step 2: Prepare the Potatoes
Now for the potatoes! Make sure they’re well-scrubbed. You can peel them if you prefer, but I actually love leaving the skins on for extra texture and nutrients. Plus, it saves a step! Cut each potato in half lengthwise, and then cut each half into wedges. Aim for wedges that are about ½-inch thick. Uniformity is key here; if your wedges are all different sizes, some will cook faster than others, and you won’t get that even crispiness. I usually get about 6-8 wedges from a medium potato. Don’t worry if they’re not perfect; rustic is good!
Step 3: Coat the Potatoes
In a large bowl, combine your potato wedges. Drizzle them with the olive oil. Then, sprinkle over the sea salt, black pepper, and any of your optional seasonings like paprika or garlic powder. Now, here’s where the fun begins: get your hands in there! Toss the potatoes thoroughly with your hands, making sure each wedge is evenly coated with the oil and seasonings. You want to make sure there are no dry spots. This is the step that really infuses them with flavor and helps them get that lovely golden color.
Step 4: Arrange on Baking Sheet
This is probably the most important step for achieving ultimate crispiness. Spread your seasoned potato wedges out onto the prepared baking sheet in a single layer. And I mean a *single layer*. Don’t crowd them! If you pile them on top of each other, they’ll steam instead of crisping up, and nobody wants steamed fries, right? If your baking sheet is too small to fit them all in a single layer, it’s much better to use two baking sheets. Trust me on this one, it makes all the difference.
Step 5: Bake to Golden Perfection
Pop that baking sheet into your preheated oven. Now, bake them for about 20-25 minutes. After about 10-12 minutes, I like to give the pan a good shake, or carefully flip the wedges with a spatula. This helps them cook evenly and get crispy on all sides. Continue baking for another 10-15 minutes, or until they are beautifully golden brown and crispy. The exact time will depend on your oven and how thick you cut your wedges, so keep an eye on them! You’re looking for that gorgeous, deep golden color.
Step 6: Serve Immediately
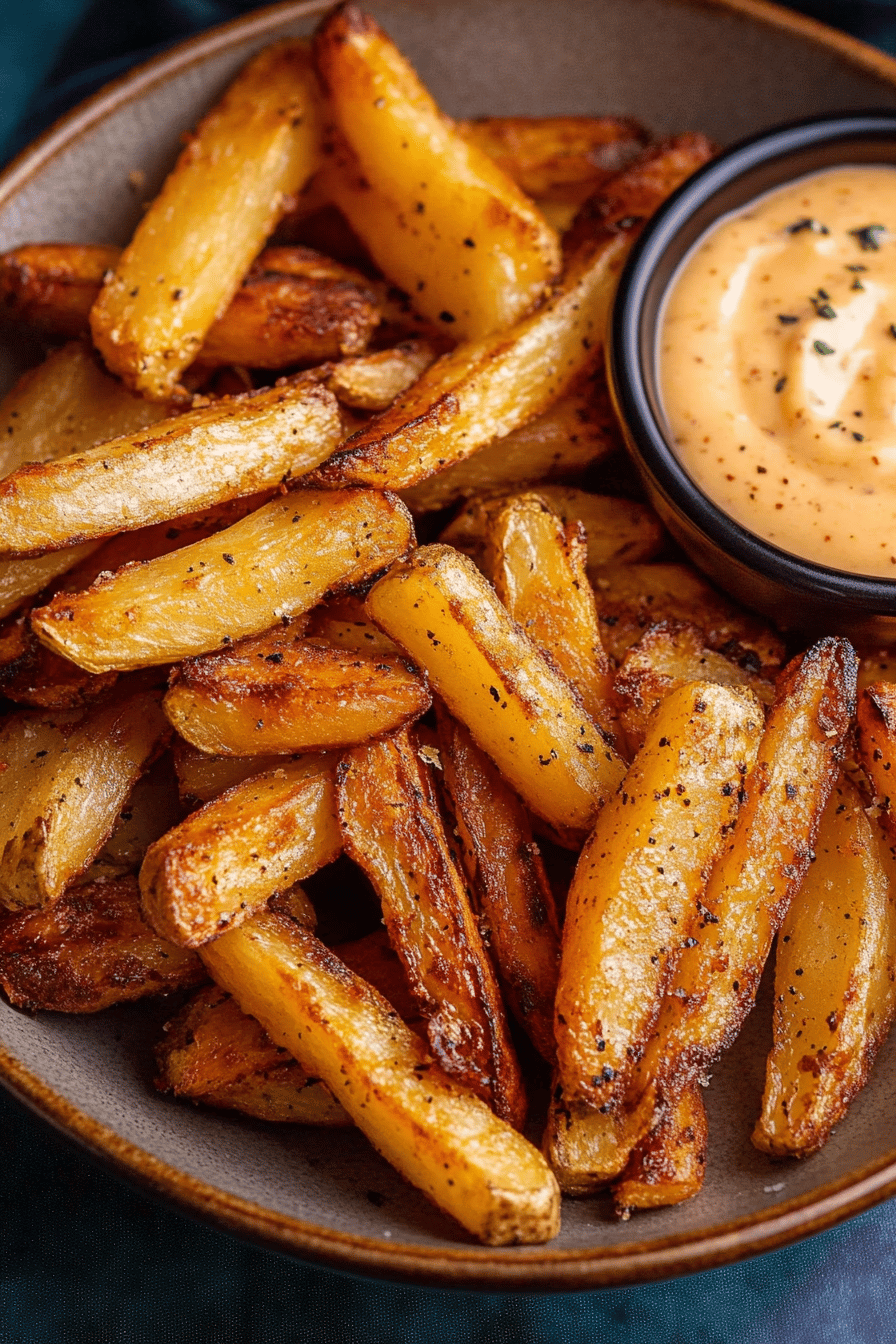
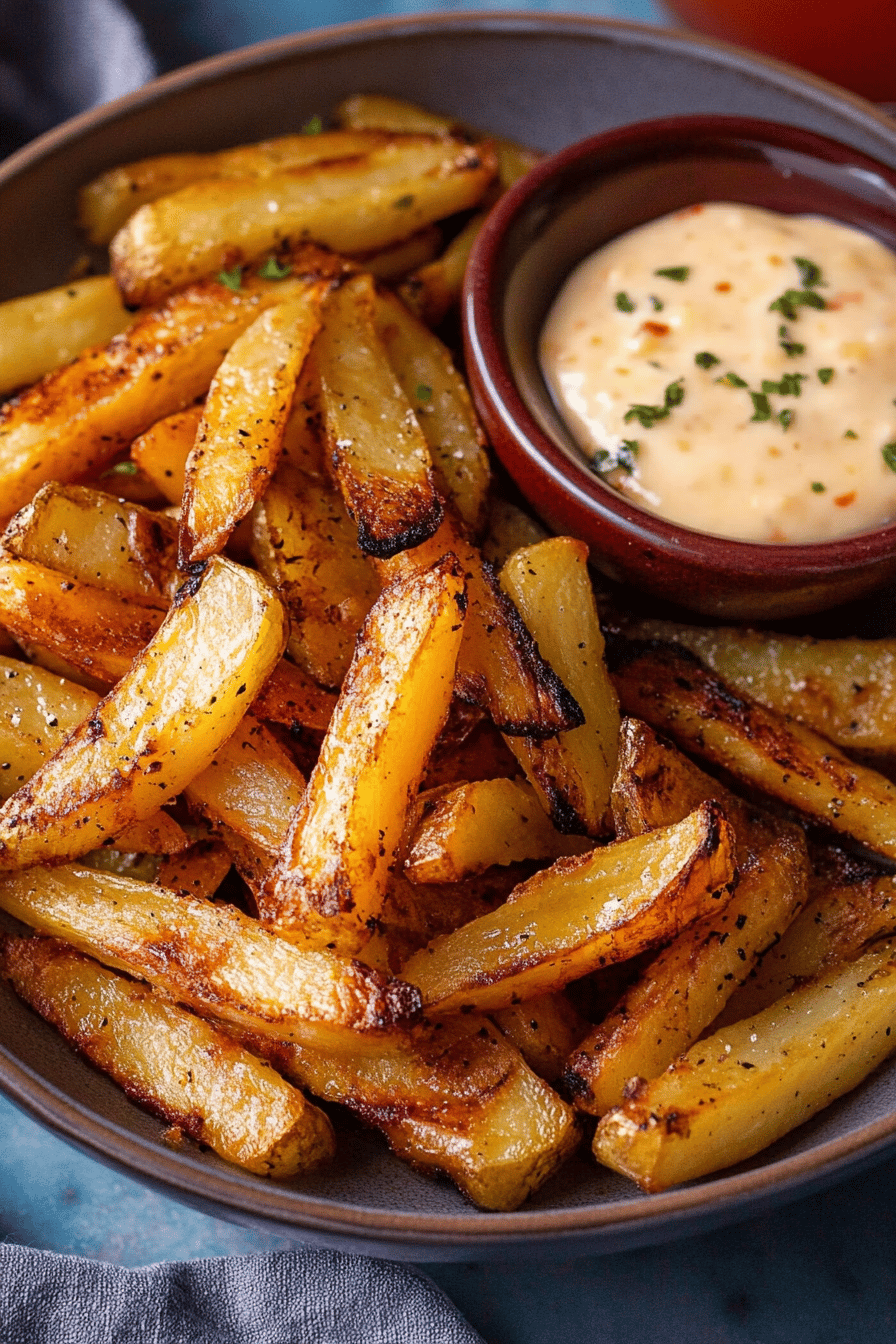
Once they’re done, take them straight out of the oven. These oven chips are truly best served immediately, while they’re piping hot and at their crispiest. Carefully transfer them to a serving bowl or plate. If you made any optional toppings, like fresh parsley or a sprinkle of parmesan, now’s the time to add them! Grab your favorite dipping sauce and enjoy!
What to Serve It With
These oven chips are so versatile, they really do go with almost anything! For a classic Breakfast, I love serving them alongside fluffy scrambled eggs and some crispy bacon. They’re also surprisingly good on their own with a side of hollandaise sauce for a truly indulgent start to the day. For a delightful Brunch spread, imagine a platter of these golden beauties alongside some grilled sausages, a fresh salad, and maybe even a mimosa or a Bloody Mary. They add that perfect comforting element to a more elaborate meal. As a decadent Dessert, okay, hear me out! While not a traditional dessert, a small portion, perhaps dusted with a touch of cinnamon sugar and served with a dollop of whipped cream or a chocolate dipping sauce, can be surprisingly satisfying for a sweet craving. It’s a fun, playful twist! But where they truly shine is as Cozy Snacks. Think movie nights, game days, or just a lazy afternoon. They’re perfect alongside a juicy burger, piled high on a loaded nacho platter, or simply enjoyed with a good dip and good company. My family loves them with our homemade garlic aioli, but classic ketchup or a spicy sriracha mayo are also big hits around here. We’ve even had them as a side to steak, and they held their own beautifully!
Top Tips for Perfecting Your Oven Chips
Over the years, I’ve picked up a few tricks that I swear by for making the absolute best oven chips. Let’s dive into them! For the potato prep, it’s all about the right potato and the right cut. Russets are your best friend here, offering that perfect fluffy interior and crisp exterior. When you cut them, aim for consistent thickness. I usually go for about half an inch. If they’re too thin, they’ll burn, and if they’re too thick, they won’t get crispy all the way through. I’ve learned that scrubbing the potatoes and leaving the skin on really adds to the texture and flavor, so I almost always do that. For mixing, the goal is an even coating of oil and spices. Don’t be shy with the oil, but you also don’t want them swimming in it. Use your hands to really get in there and coat every single wedge. It’s messy, but it’s worth it! I’ve tried using tongs, but they just don’t distribute the oil as well. When it comes to arranging them on the baking sheet, this is where many people go wrong. Overcrowding is the enemy of crispiness! Seriously, give them space. They need to breathe and roast, not steam. If you have to use a second baking sheet, do it. It’s the number one tip for getting them super crispy. Baking them at a high temperature, around 425°F (220°C), is essential. This high heat helps to crisp up the outside quickly. I always give the pan a good shake or flip the chips halfway through baking. This ensures that all sides get beautifully browned and crispy. Keep an eye on them in the last 10 minutes, as ovens can vary. You’re looking for that lovely deep golden color. If you want to experiment with flavor, try adding a little smoked paprika, garlic powder, onion powder, or even a sprinkle of dried herbs like rosemary or thyme with your salt and pepper. For a richer flavor, you can swap some of the olive oil for melted butter, but be aware that butter can burn at high temperatures, so watch them closely. And finally, serve them immediately! Oven chips are at their absolute best straight from the oven. The crispiness fades quickly, so get them to the table while they’re hot and glorious.
Storing and Reheating Tips
Okay, so you’ve made a fantastic batch of oven chips, and maybe, just maybe, there are a few leftovers. It happens! Storing them properly is key to enjoying them later. If you’re planning to eat them within a few hours, you can actually leave them out on the counter, but make sure they’re loosely covered so they don’t dry out completely. For longer storage, the refrigerator is your best bet. Once the chips have cooled down completely (this is important to prevent condensation which makes them soggy), transfer them to an airtight container or a resealable plastic bag. They should stay good in the fridge for about 2-3 days. I’ve found that they tend to lose a bit of their crispiness when refrigerated, but don’t worry, we can fix that! Reheating is where the magic happens. The absolute best way to reheat oven chips is back in a hot oven. Preheat your oven to around 400°F (200°C) and spread the leftover chips in a single layer on a baking sheet. Bake for about 8-10 minutes, or until they’re heated through and have regained some of their crispiness. You can also try air frying them for a super quick crisp-up! If you’re in a real pinch, the microwave can work in a pinch for reheating, but be warned, they will likely be softer and less crispy. I generally avoid microwaving them for this recipe. Freezing oven chips is possible, but I find they lose a lot of their texture. If you do decide to freeze them, cool them completely, spread them in a single layer on a baking sheet and freeze until solid, then transfer to a freezer-safe bag or container. They should last for about 1-2 months. Thaw them in the refrigerator overnight before reheating them in a hot oven or Air Fryer.
Frequently Asked Questions
Final Thoughts
So there you have it – my absolute favorite way to make oven chips that are crispy, golden, and utterly delicious. I really hope you give this recipe a try. It’s one of those dishes that feels like a hug in food form, and it’s so incredibly easy to pull off, even on your busiest nights. The best part, for me, is seeing the smiles when people take their first bite and realize just how amazing homemade oven chips can be. They’re a true testament to simple ingredients done right. If you love this recipe, you might also enjoy my Crispy Roasted Potatoes or my Garlic Herb Roasted Carrots for other fantastic side dish ideas. Don’t forget to come back and tell me how your oven chips turned out in the comments below! I love hearing about your cooking adventures and any fun twists you add. Happy baking (or, well, roasting)!
oven chips
Ingredients
Main Ingredients
- 1 kg potatoes Russet or Maris Piper varieties work best
- 2 tablespoons olive oil
- 1 teaspoon paprika
- 0.5 teaspoon garlic powder
- 0.5 teaspoon salt or to taste
- 0.25 teaspoon black pepper freshly ground
Instructions
Preparation Steps
- Preheat your oven to 220°C (425°F). Line a large baking sheet with parchment paper.
- Wash and scrub the potatoes. You can peel them or leave the skins on for extra texture and nutrients.
- Cut the potatoes into chips of your desired thickness (about 1 cm or 0.5 inch).
- In a large bowl, toss the potato chips with olive oil, paprika, garlic powder, salt, and black pepper until evenly coated.
- Arrange the seasoned chips in a single layer on the prepared baking sheet. Ensure they are not overcrowding the pan, which will steam them instead of crisping them up.
- Bake for 20-25 minutes, then flip the chips and bake for another 10-15 minutes, or until golden brown and crispy.
- Serve hot with your favorite dipping sauce.